If you’re looking for a creative and enjoyable DIY project, you’re in the right place. This tutorial on how to crochet a granny square bag will teach you everything you need to know, even if you’re a beginner. Not only is the process fun and satisfying, but the result is a beautiful, stylish accessory you can proudly carry anywhere. And the best part? You can do it all with this crochet a granny square bag free pattern.
The granny square is a beloved and timeless motif in the world of crochet. It’s simple yet versatile, making it the perfect base for crafting bags of all shapes and sizes. With just a few squares stitched together and some finishing touches, you can create a handmade masterpiece. Whether you’re upcycling leftover yarn or diving into your favorite color palette, this pattern gives you complete creative freedom.
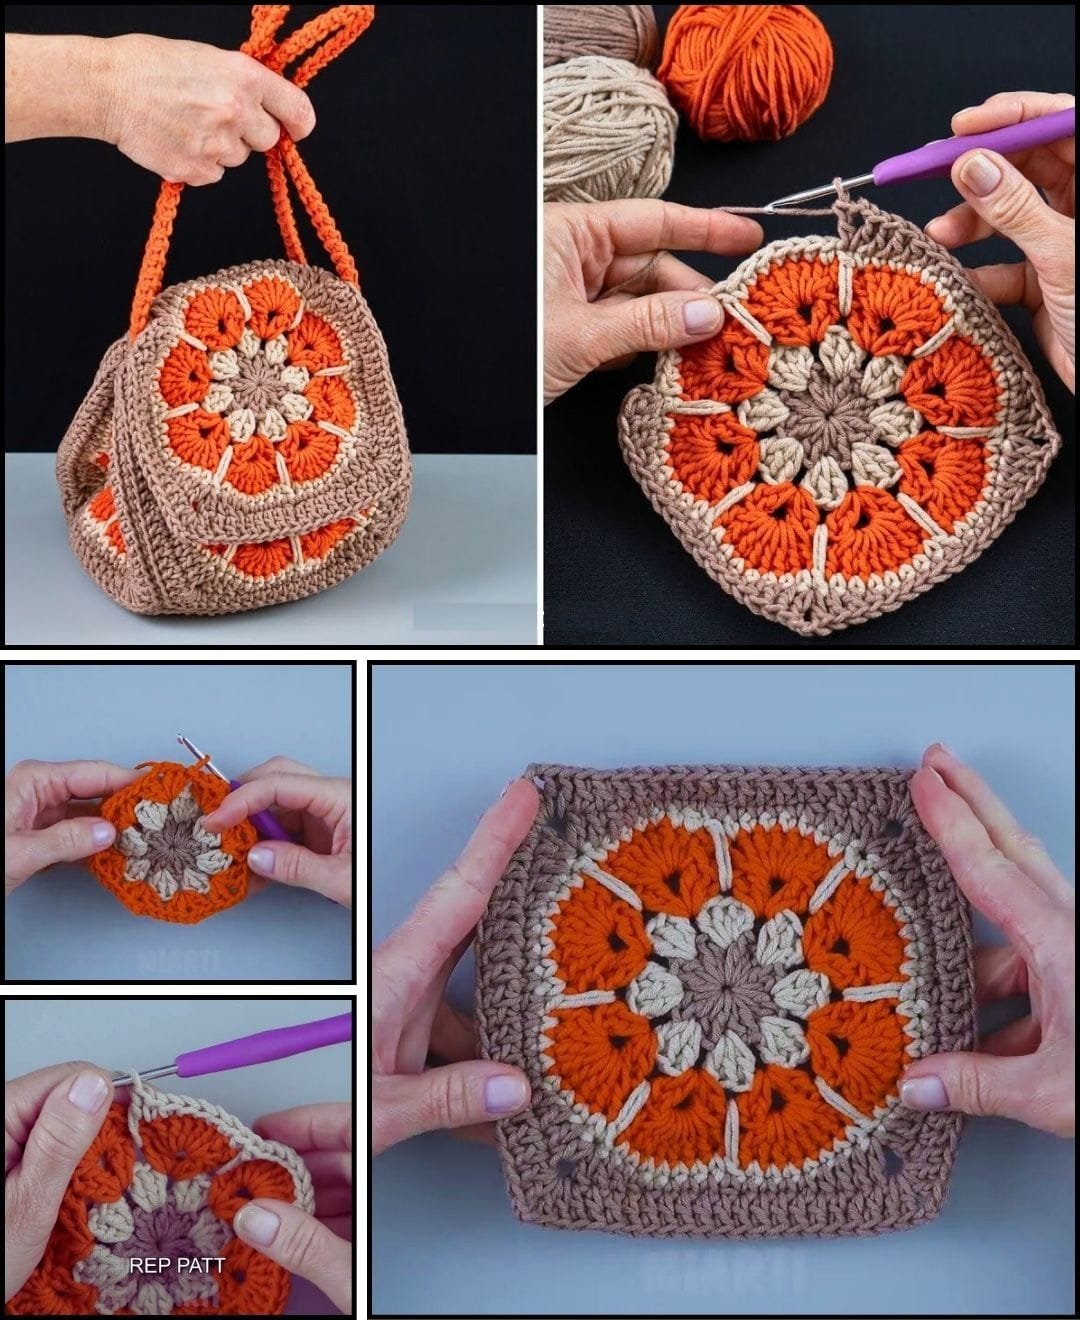
Throughout this guide, we’ll explore the essential steps, from making the squares to assembling your bag. You’ll learn helpful techniques and tips that keep your stitches neat and your design beautiful. If you’ve ever wanted to crochet a granny square bag, now’s the time to grab your hook, gather your yarn, and let’s get started!
Choosing the Right Materials for Your Crochet Granny Square Bag
The first step in any successful crochet project is choosing the right materials. Your crochet a granny square bag will only be as good as the yarn, hook, and tools you use.
For most granny square bags, medium-weight yarn (category 4) works best. It offers the right balance between durability and softness. Cotton yarn is a great option because it holds its shape well and gives your bag a clean, sturdy finish. However, acrylic yarn can be a budget-friendly alternative that still offers plenty of color choices.
When it comes to hooks, a size H/8 (5mm) crochet hook is commonly used for medium-weight yarn. If you crochet tightly, consider going up a size to avoid a stiff square. Always remember to make a swatch before starting to ensure your tension is just right for the project.
Besides yarn and hook, you’ll need a tapestry needle for weaving in ends and scissors for cutting yarn. Optional tools include stitch markers, especially if you tend to lose track of your rounds. For finishing, you may want to line your bag with fabric or add a zipper or button for closure.
Having the right supplies makes a huge difference in the overall look and feel of your finished project. Make sure to gather everything you need ahead of time so you can focus on the joy of crocheting.
Finally, choose your colors wisely! Solid, contrasting, or gradient yarns all work beautifully. Think about how the squares will be arranged when your bag is finished. The color placement will impact the visual flow of your design.
How to Crochet the Granny Squares
The core of the crochet a granny square bag lies in creating the iconic granny square. While there are many variations, we’ll focus on the classic version with a twist for added structure.
Begin by making a magic ring or chain 4 and slip stitch to form a ring. Chain 3 (counts as the first double crochet), then work two more double crochets into the ring. Chain 2, then repeat (3 double crochets, chain 2) three more times to form the four corners. Join with a slip stitch to the top of the starting chain.
Round two begins by slip stitching over to the next corner. Chain 3 again, then make 2 double crochets, chain 2, and 3 more double crochets into the same corner. In the next corner space, do the same. Continue around until each corner has a cluster of 3 dc, ch 2, 3 dc.
In round three, you’ll start working into the spaces between clusters as well as corners. This adds width to your square. Continue increasing each round until your square reaches the desired size.
Once your square is complete, fasten off and weave in the ends with a tapestry needle. Repeat this process until you have enough squares for your bag — typically 13 to 17 squares, depending on your design.
Experiment with color placement to make each square unique. You can create a pattern with alternating colors or keep them uniform for a more classic look.
Stack your squares neatly as you go so you don’t lose track of how many you’ve made. It’s also helpful to block your squares before assembly to ensure they all have the same shape and size.
Assembling and Joining the Granny Squares
Now that your squares are ready, it’s time to join them into a bag shape. This is where the crochet a granny square bag project truly comes to life.
Start by laying out your squares in the desired arrangement. Typically, the layout includes four squares for the front, four for the back, two on each side, and one or two for the base. Arrange them like a cross or T shape before folding them into a cube-like structure.
There are several methods to join granny squares: slip stitch, whip stitch, or join-as-you-go. Each method has its own aesthetic. For a visible seam, use slip stitch on the front loops only. For an invisible seam, use whip stitch on the back.
Work with the wrong sides facing out if you want the seams hidden on the inside. Use a yarn needle and the same color yarn used in your square border for a consistent look.
After joining the squares, fold the shape into a bag and stitch the sides together. Make sure your corners align properly to avoid any awkward bulges or twists in the structure.
Once the body is assembled, consider reinforcing the base of the bag by crocheting a double layer or sewing in a fabric lining. This gives your bag more support and prevents sagging.
Add handles last. You can crochet straps or attach leather or wooden ones depending on your preference. Position them evenly across the top edge of the bag to balance the weight when carrying.
Finishing Touches and Style Tips
Once you’ve assembled your crochet a granny square bag, it’s time to add personality and polish through finishing touches. This is where your creativity can really shine.
Adding a fabric lining to your bag enhances durability and prevents items from poking through the crochet holes. Choose a lightweight cotton fabric that complements your yarn colors. Sew it by hand or machine, and attach it to the inside using a needle and thread.
Closures like buttons, snaps, zippers, or magnetic clasps add both functionality and flair. Be sure to sew these securely, especially if you plan to carry heavier items.
Tassels, pom-poms, and appliqués are excellent for giving your bag a unique vibe. These extras are quick to make and can be color-coordinated to match your bag’s palette.
If you want a boho or festival look, long fringe along the bottom edge is a great addition. For a modern look, keep the design minimal and clean.
Don’t forget to block your bag once it’s assembled. Wet blocking or steam blocking helps shape the bag, smooth the seams, and give it a professional finish.
Style your bag with casual outfits, summer dresses, or even jeans and a t-shirt. It’s the perfect everyday accessory that combines fashion with your handmade skills.
FAQ – Crochet a Granny Square Bag Free Pattern
What size should my granny squares be for a bag?
A good size for granny squares is around 5×5 inches. However, you can adjust this depending on how large or small you want your bag to be.
How many granny squares do I need to make a bag?
Most basic bags use between 13 and 17 squares. The number will depend on your design and desired size. Lay them out before assembling to be sure.
What’s the best yarn for crocheting a granny square bag?
Cotton yarn is best for structure and durability. Acrylic yarn can work too, but it might stretch more over time.
Do I need to line my crochet bag?
Lining is optional but recommended for extra strength and to prevent items from falling through the gaps. It also makes your bag more polished.
Can I add a zipper to my crochet bag?
Yes, you can hand-sew or machine-sew a zipper. Just make sure to attach it securely and consider adding fabric for support if needed.
Is this pattern suitable for beginners?
Absolutely. The crochet a granny square bag free pattern is beginner-friendly, especially since granny squares are one of the first motifs most crocheters learn.
Conclusion
In this guide, we explored every step you need to crochet a granny square bag using a free and accessible pattern. From selecting yarn and crafting perfect squares to assembling your bag and adding creative touches, you now have the complete knowledge to start your own project.
This craft isn’t just about making something beautiful—it’s about enjoying the process and putting your personal style into every stitch. Whether it’s your first crochet project or one of many, making a granny square bag is a joyful and rewarding experience.
We’d love to hear from you! Share your thoughts, feedback, or even your own tips for making granny square bags. Leave a sincere opinion and any suggestions you have for future tutorials or guides!

