If you’ve ever wanted to crochet a flower granny square bag, you’re in the right place. This charming and nostalgic design blends the timeless beauty of floral crochet with the practical appeal of a handmade accessory. Whether you’re an experienced crocheter or a curious beginner, this project is not only enjoyable but also incredibly rewarding.
Crochet a flower granny square bag is more than just a stylish craft—it’s a creative journey that brings out your personality through every stitch. The combination of colorful yarns and floral motifs gives this bag a whimsical, vintage-inspired aesthetic that is perfect for everyday use or gifting. The best part? You can customize the size, colors, and even the type of flower used in the squares.
In this article, we’ll walk you through everything you need to know to crochet a flower granny square bag from start to finish. We’ll cover the essential tools, step-by-step techniques, helpful tips, and customization ideas to make your bag truly unique. Let’s dive into the world of floral crochet magic.
Choosing the Right Materials
When starting your project to crochet a flower granny square bag, your material choices matter a lot. The right yarn and tools will make the crafting process smoother and the final product more durable and beautiful.
First, choose a yarn that holds its shape well. Cotton yarn is often recommended because it’s sturdy and has great stitch definition. Worsted weight or DK yarns are also good choices for granny square bags since they balance thickness and flexibility.
Next, make sure you’re using the correct crochet hook size. Usually, a 4.0mm to 5.0mm hook works well for flower granny squares. Check the label of your yarn to ensure compatibility, and test your tension before starting multiple squares.
Another key tool is a tapestry needle for sewing the squares together. Stitch markers and scissors will also be helpful. You may also need a lining fabric and sewing needle if you want to add interior support to your bag.
Don’t forget to choose your color palette carefully. You can go for pastels, bold contrasts, or a monochrome look—whatever reflects your personal style. This is where your creativity comes into play.
If you’re new to crocheting, it’s okay to start small. Make a few test squares first to get the hang of the stitches. Practice the flower center, the square around it, and see how they join together.
With your materials ready, you’re all set to begin crafting your stunning bag. Preparation is the first exciting step in bringing this project to life.
Making the Flower Granny Squares
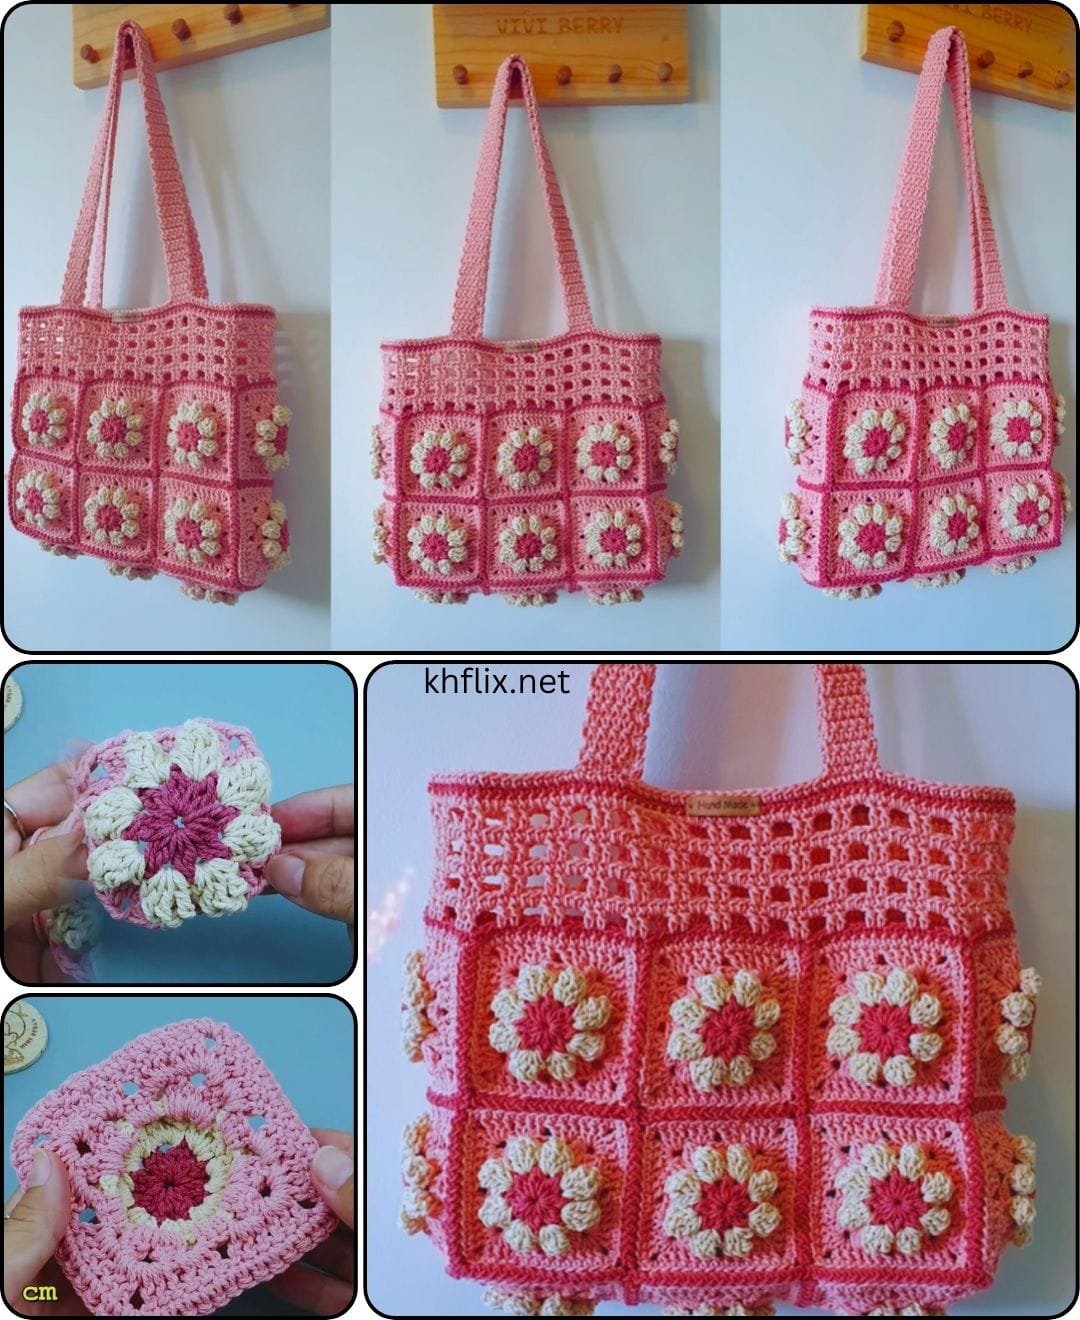
Creating the floral motif is the heart of this project. To crochet a flower granny square bag, you’ll need to make several flower granny squares and join them together. Each square usually begins with a center flower made in the round, followed by the classic granny square border.
Start with a magic ring or chain 4 and join into a circle. Then crochet a small flower using puff, bobble, or cluster stitches. Typically, five or six petals create a visually pleasing result.
Once your flower center is complete, you’ll add the square edges. Switch to a new color to create a clear contrast and highlight the flower. Use traditional granny stitches—groups of 3 double crochets separated by chains—to form the square.
Repeat the square around the flower evenly on all sides. Each round adds size to your square and structure to your bag. Be consistent in your tension to keep all squares uniform.
Make enough squares to match the size of the bag you envision. For a medium handbag, 13–20 squares are usually enough. You can adjust this based on your desired width and height.
After completing your squares, block them if needed. Blocking helps straighten edges and even out stitches, giving your bag a polished, professional finish.
The number of squares, color arrangements, and flower types are all up to you. That’s what makes every crochet flower granny square bag unique.
Assembling the Bag
Once your squares are done, it’s time to put them together and shape your bag. This step brings your vision to life and transforms flat squares into a useful accessory.
Lay out the squares in your desired arrangement. Typically, you’ll need front and back panels, plus side panels and a base. You can use a 3×3 layout for a small square bag or a 4×5 layout for a larger tote.
Use slip stitch or whip stitch to join the squares. Match up corners carefully to maintain alignment. Work on a flat surface and go slowly to avoid gaps or uneven seams.
After joining the panels, begin sewing or crocheting them together to form the bag’s body. Reinforce the base with an extra layer or lining if you want added structure and durability.
For the handle, you can crochet a strap using single crochet rows, chain stitches, or even a braided or twisted rope. Attach the handles securely to the top corners or inside the lining.
Consider adding a fabric lining. It prevents stretching and helps hold the bag’s shape. Cut a rectangle of fabric slightly smaller than the bag, hem the edges, and hand-sew or machine-stitch it inside.
If you’d like, add a button or zipper closure. This can keep items secure and give your bag a finished look. Choose a closure that complements your bag’s colors and style.
Now your crochet flower granny square bag is assembled, you can admire your hard work and prepare it for use or gifting.
Decorating and Customizing Your Bag
Adding personal touches to your bag can make it stand out. Customizing your crochet a flower granny square bag lets you express your creativity and make each project your own.
One idea is to embellish the flowers. Sew small beads, sequins, or pearls in the center of each flower for a sparkling effect. Just be sure they’re securely attached.
You can also play with textures. Try using yarn with glitter, metallic threads, or a slight sheen to give the bag more visual interest. Combine matte and glossy finishes for depth.
Add appliqués or small patches to the bag. Crochet hearts, stars, or leaves and stitch them onto blank areas or corners. This gives the bag a playful, whimsical look.
Consider color-blocking by grouping certain colored squares together. You can create a gradient effect or make the bottom of the bag darker for a stylish contrast.
For added function, sew in a small interior pocket using the same lining fabric. This is perfect for holding keys, lipstick, or coins separately.
Finally, personalize the strap. Instead of a plain handle, add a crocheted flower vine, or interweave two colors to make a striped handle. These customizations will take your bag from beautiful to unforgettable.
FAQ: Crochet a Flower Granny Square Bag
1. How many granny squares do I need to make a bag?
It depends on the size of the bag. A small purse may use 9 squares, while a large tote can require 20 or more. Plan your layout before you begin.
2. What type of yarn is best for this project?
Cotton or acrylic yarns are ideal. They’re durable, easy to work with, and hold the structure of the bag well. Choose a yarn weight like DK or worsted.
3. Can beginners crochet a flower granny square bag?
Yes! It’s a perfect project for beginners who want to learn new stitches and practice assembling parts. Just follow a clear pattern and take your time.
4. Should I line my crochet bag?
It’s optional but highly recommended. A lining prevents the bag from stretching and helps hold smaller items like pens or lip balm.
5. How do I attach the handles securely?
Crochet or sew handles tightly at reinforced areas on the bag. Consider using extra yarn or a backing fabric to add strength at the connection points.
6. Can I wash my crochet bag?
Yes, but wash it gently. Hand-washing in cold water is best. Lay it flat to dry to maintain the shape and prevent damage.
Conclusion
Now that you’ve learned how to crochet a flower granny square bag, you’re ready to turn yarn into a beautiful, functional accessory. We’ve covered material selection, square creation, bag assembly, and decoration tips—all while focusing on SEO-friendly techniques and clear guidance for all skill levels.
Whether you’re crafting for yourself, a friend, or to sell your creations, this pattern opens the door to endless possibilities. Each bag is a work of art, and the process of creating it is just as rewarding as the final product.
If this guide helped you, we’d love to hear your thoughts! Please leave a sincere opinion and share your suggestions so we can keep bringing you helpful and inspiring crochet tutorials. Happy crocheting!

