If you’ve been looking for a fun and creative summer project, crochet a flip-flop keychain free pattern is the perfect place to start! This adorable keychain is quick to make, beginner-friendly, and a wonderful way to add a handmade touch to your bag, keys, or even as a charming gift. Whether you’re a crochet enthusiast or just starting your yarn journey, this tiny flip-flop will leave you smiling with every stitch.
The idea to crochet a flip-flop keychain combines the charm of summer memories with the joy of DIY crafts. The result? A soft, colorful, and lightweight keychain that everyone will love. You can easily customize it with different yarn colors, add beads, or even embroidery to give it your personal flair. And the best part—it’s free to make, as you only need a few materials you likely already have on hand.
In this article, you’ll learn how to crochet a flip-flop keychain from start to finish, with easy-to-follow tips and suggestions to make your project stand out. This guide is beginner-friendly and structured to help both new and experienced crocheters achieve great results. Keep reading to explore how to crochet this fun mini accessory and get inspired to create a whole collection of flip-flop keychains!
Materials Needed to Crochet a Flip-Flop Keychain
Before you begin, it’s essential to gather all the materials required to crochet a flip-flop keychain. This ensures a smooth, uninterrupted crafting experience and helps you stay focused and organized throughout the process.
You’ll need some basic crochet supplies: a small amount of worsted weight or cotton yarn in your favorite colors, a crochet hook (typically 3.5mm or 4mm), a yarn needle for weaving in ends, and scissors. These are all commonly used in small crochet projects, so you may already have them on hand.
Don’t forget the keyring! To transform your mini flip-flop into a keychain, a simple metal keyring or lobster clasp will do the trick. You can usually find these at craft stores or repurpose one from an old keychain.
Polyester stuffing is optional but helpful if you want the sole of the flip-flop to have a bit more structure. However, many prefer to leave it flat for a sleeker look.
For added flair, consider decorative elements like beads, tiny buttons, or even embroidery floss to add initials or little designs. These personal touches can make your crochet flip-flop keychain even more special.
Lastly, it helps to have stitch markers if you’re new to crocheting or working in the round. These can make it easier to keep track of rows and stitches, especially for such a small project.
Step-by-Step Guide to Crocheting the Sole
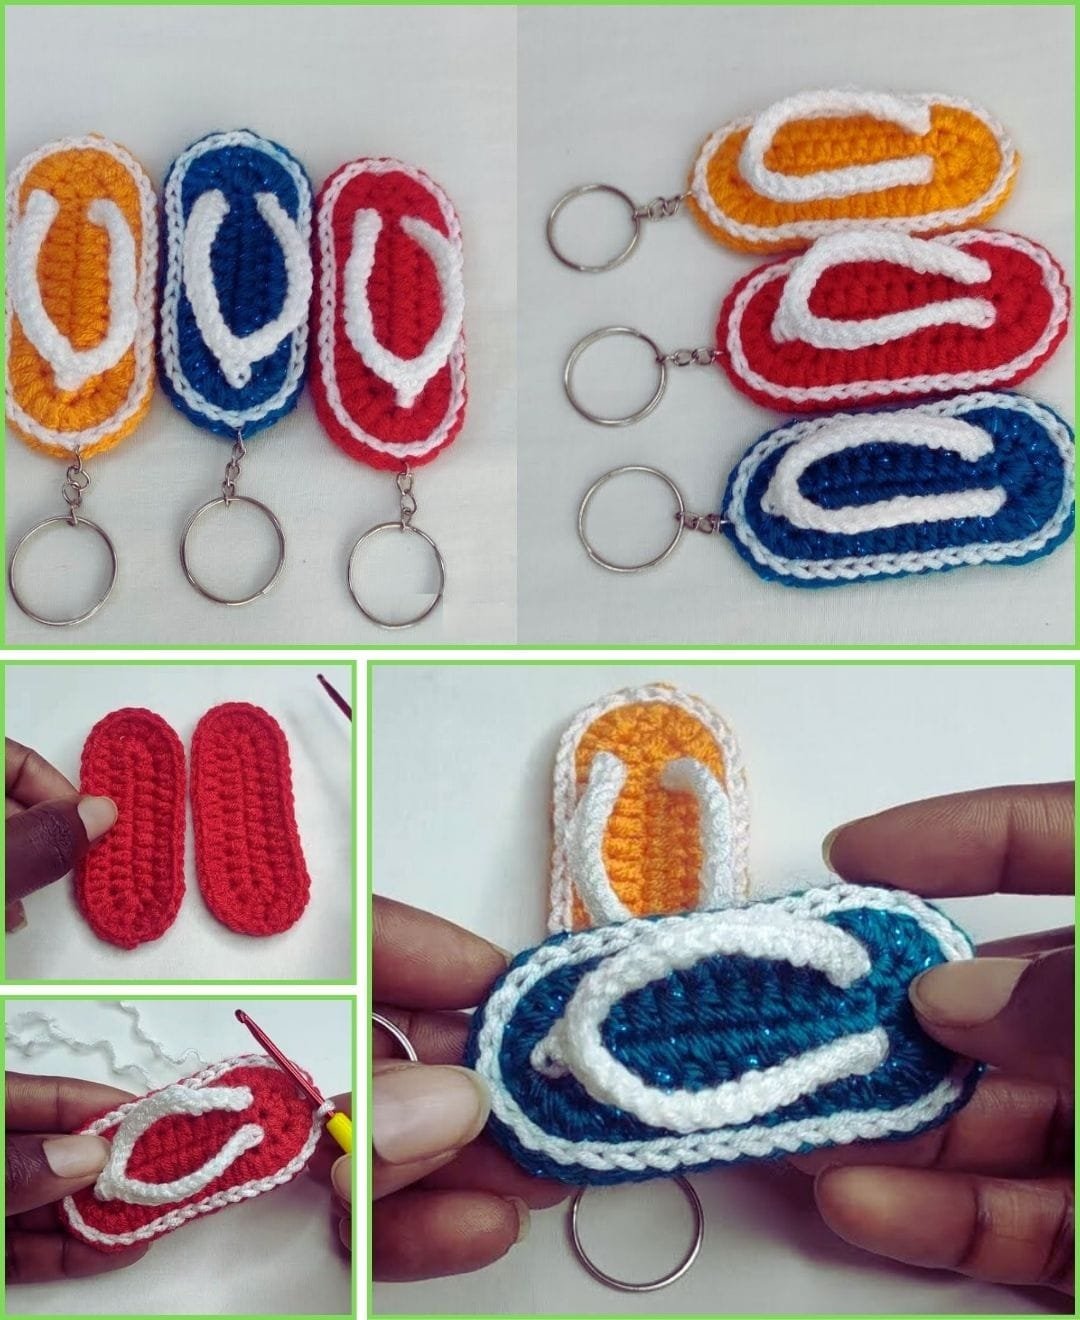
The sole is the foundation of your keychain, and it’s the first part you’ll be working on when you crochet a flip-flop keychain. Think of it as the canvas for your mini summer shoe masterpiece.
Begin by making a magic ring or chain 6 and joining it into a loop, depending on your preference. This will form the starting point for your sole. Use tight, neat stitches to maintain a compact look.
You’ll be crocheting in the round, increasing evenly to shape the oval sole. Single crochets and half double crochets work best here. Keep count of your stitches to ensure symmetry between the top and bottom of the sole.
Work for two to three rounds, gradually increasing at the toe and heel to give it the classic flip-flop shape. Your finished sole should be about 2 to 2.5 inches long.
Fasten off and weave in the ends carefully. For a more realistic effect, you can crochet a second identical sole and stitch them together for extra thickness and durability.
If you’re using stuffing, now is the time to lightly fill the sole before closing it up. Use just a little to maintain the flatness of the flip-flop while giving it form.
Once the sole is complete, admire your work! It’s a satisfying feeling to finish the base, and you’re now ready to move on to the upper parts of your crochet flip-flop keychain.
Creating the Straps and Attaching the Keyring
The next step to crochet a flip-flop keychain is adding the iconic Y-shaped straps. This simple detail gives your mini flip-flop its recognizable look and transforms it into a wearable summer accessory for your keys.
Start by attaching your yarn to the middle top of the sole using a slip stitch. This point will act as the center of the Y strap and is typically positioned about a third of the way down the flip-flop.
Chain a short length (around 8 to 10 chains) to form the first strap. Then, slip stitch it onto one side of the sole where your toes would be. Repeat the process on the other side for the second strap.
Make sure both straps are symmetrical and not too loose. This will ensure your crochet flip-flop keychain maintains its adorable structure over time.
After securing both sides of the strap, use a yarn needle to reinforce the stitches if needed. This is particularly important if the keychain will be handled frequently.
To add the keyring, you can either sew a loop of yarn to the heel of the sole or use a jump ring threaded through one of your stitches. Make sure it’s tightly attached for durability.
At this point, your flip-flop is almost complete! It’s fun to experiment with different colors for the strap and sole to create variety in your crochet flip-flop keychain collection.
Personalizing Your Crochet Flip-Flop Keychain
One of the joys of making your own accessories is the ability to customize every detail. When you crochet a flip-flop keychain, you can make each piece one-of-a-kind by adding small touches that reflect your personality.
Use multicolored yarn or create stripes by changing colors after each row. Ombre yarns or speckled cottons can give your flip-flop a trendy, modern vibe.
Add embellishments like a tiny bow at the base of the straps or a mini flower crocheted separately and sewn on. These additions take just a few minutes and add a lot of charm.
If you’re making these as gifts or favors, personalize them with initials. You can embroider letters on the sole using contrasting yarn or fabric paint for a polished finish.
Some crafters even add small charms or beads to the straps, creating a beachy, boho feel. Make sure any decorations are securely fastened so they don’t come loose with use.
You can also experiment with size. Try making a slightly larger version as a bag charm or a smaller version for earrings or zipper pulls.
With so many options for personalization, crochet a flip-flop keychain becomes not just a craft project but a fun way to express creativity and make functional art.
FAQ – Frequently Asked Questions
Q: Can beginners really crochet a flip-flop keychain?
A: Yes! This project is beginner-friendly. The stitches used are simple and common, like single crochet and slip stitch. As long as you follow the steps carefully, you’ll have no trouble making one.
Q: What kind of yarn works best for this project?
A: Cotton yarn is the best choice because it holds its shape well and is easy to work with for small items. However, acrylic yarn can also be used if it’s what you have available.
Q: How long does it take to crochet a flip-flop keychain?
A: Most people can finish one in under an hour, especially after making the first one. It’s a great quick project to do during a break or while watching a movie.
Q: Is it safe to give these as gifts to children?
A: Yes, but make sure any small parts like beads or buttons are securely attached. Avoid adding choking hazards for very young children.
Q: Can I sell crochet flip-flop keychains that I make from this pattern?
A: Yes, handmade items can be sold, especially if you make them using your own materials and skills. They’re popular at craft fairs, online shops, and as souvenirs.
Q: Can I make other accessories using the same pattern idea?
A: Absolutely! You can adapt this concept into fridge magnets, brooches, earrings, or even garlands. Let your creativity guide you!
Conclusion
Now you’ve learned everything you need to crochet a flip-flop keychain—from materials and construction to customization and presentation. This fun and simple project is not only a delightful way to practice your crochet skills but also a meaningful gift idea or personal accessory.
With just a bit of yarn and imagination, you can bring a touch of summer to your everyday life. Try different colors, experiment with patterns, and make a whole collection to share or sell.
We’d love to hear from you! Leave your honest opinion and share your thoughts or suggestions about this tutorial. Did you enjoy making your flip-flop keychain? What colors did you use? Your feedback helps us bring more joyful projects your way!

