Crochet a Classic Granny Square Free Pattern is one of the most beloved and timeless crochet projects that crafters of all levels enjoy. This traditional design has been passed down through generations, offering endless possibilities for blankets, pillows, bags, and home décor. The beauty of the granny square lies in its simplicity—once you learn the basic stitches and structure, you can easily customize colors, sizes, and styles to suit your taste. Whether you are a beginner picking up a hook for the first time or an experienced crocheter looking for a relaxing project, this pattern is a must-try.
In this guide, we’ll explore the history and charm of the granny square, provide a clear step-by-step process to make your own, and share tips to ensure your work turns out neat and professional. Along the way, you’ll see why the Crochet a Classic Granny Square remains such a popular choice for crafters worldwide. From choosing the right yarn to joining multiple squares into a larger piece, you’ll gain the skills to create something beautiful and lasting.
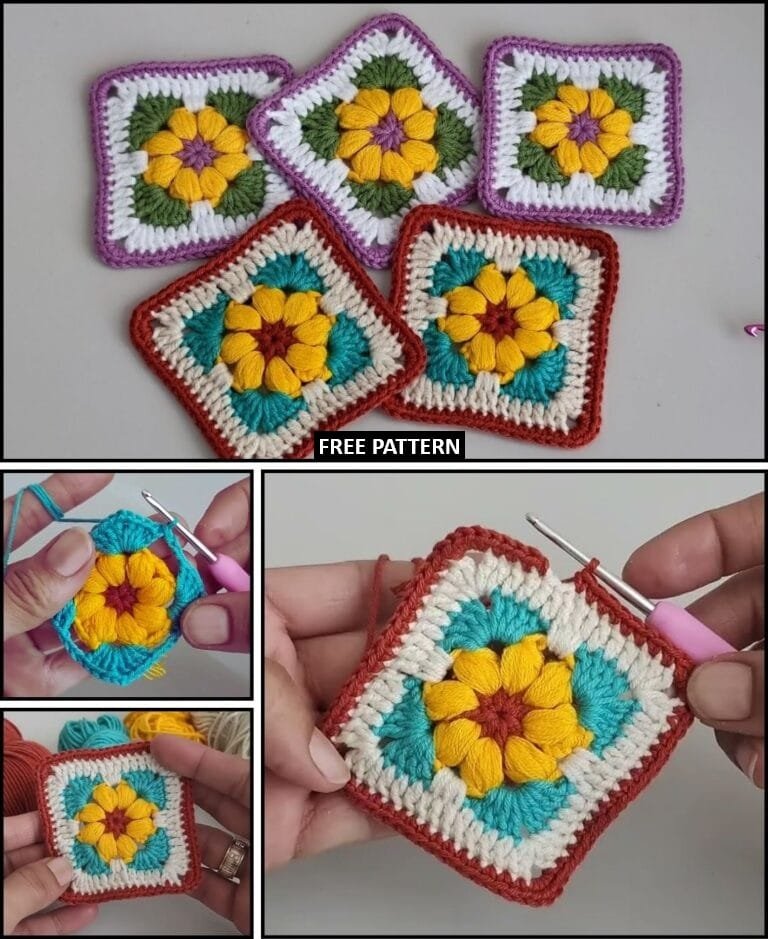
Before diving into the actual stitches, it’s worth noting that granny squares aren’t just practical—they’re also a wonderful creative outlet. You can experiment with vibrant colors, subtle pastels, or even monochrome designs. The repetition of the pattern makes it meditative, while the freedom of color choice allows you to express your personality. By the end of this article, you’ll have both the knowledge and inspiration to start your own Classic Granny Square project.
Understanding the Granny Square Basics
The foundation of Crochet a Classic Granny Square begins with understanding its core structure. At its simplest, the granny square is built from the center outwards, forming a symmetrical square shape. Most patterns start with a small loop in the center and build outward using clusters of stitches separated by chain spaces. These clusters create the iconic “gaps” that make the granny square airy and flexible.
One reason granny squares are so appealing is their adaptability. You can make them as small or as large as you want, and the stitch pattern allows for easy expansion. Whether you use just one color for a clean, minimalist look or multiple shades for a vibrant patchwork effect, the method stays the same.
Another benefit is portability. Since granny squares are typically worked in small pieces, you can crochet them almost anywhere—on a bus, during a lunch break, or while relaxing at home. Then, you can join them together later to create larger projects like throws, shawls, or even garments.
Learning the basic stitches—such as the chain stitch, slip stitch, and double crochet—is essential. If you are new to crochet, practicing these stitches before starting your first square will make the process much smoother. The rhythm of working in the round and repeating clusters becomes second nature with just a bit of practice.
When it comes to yarn selection, medium-weight yarn is a great choice for beginners. It provides enough definition to see your stitches clearly and is comfortable to work with. A size H/8 (5 mm) crochet hook is commonly recommended for this type of yarn, but always check the yarn label for guidance.
The granny square is also a perfect stash-buster project. If you have leftover yarn from other creations, you can mix and match colors in your squares. This eco-friendly approach not only reduces waste but also results in unique, one-of-a-kind pieces.
Step-by-Step Guide to Crochet a Classic Granny Square
To start Crochet a Classic Granny Square Free Pattern, create a slip knot and chain four stitches. Join the ends with a slip stitch to form a ring. This ring will be the center of your square and the anchor for your first round of stitches.
In the first round, chain three (this counts as your first double crochet), then work two more double crochets into the center ring. Chain two to create a corner space. Repeat the process—three double crochets, chain two—three more times. At the end, join with a slip stitch into the top of the starting chain three.
For the second round, slip stitch into the next two stitches and into the corner space. Chain three, then work two double crochets into that space, chain two, and add three more double crochets in the same corner. Chain one to move to the next corner, and repeat the same process around the square.
Continue building each round in this way, always working clusters of three double crochets into corner spaces with chain-two gaps, and adding chain-one spaces between side clusters. The pattern naturally grows as you add more rounds.
A key tip is to maintain consistent tension. Uneven tension can cause your square to pucker or warp. If you notice your square curving, try adjusting your grip on the yarn or using a slightly larger hook.
Blocking your finished granny squares can make a big difference in appearance. Lightly dampen the square, shape it into a perfect square on a flat surface, and pin it in place until dry. This step ensures your squares are uniform and easier to join together.
Joining methods vary, but popular options include slip stitching squares together or using a whipstitch with a yarn needle. Each method gives a slightly different look, so choose the one that best suits your project.
Creative Variations and Color Combinations
One of the joys of Crochet a Classic Granny Square is experimenting with colors. You can opt for a traditional look using a single color per round, or create bold designs with alternating shades. The possibilities are virtually endless.
A popular style is the “scrappy granny square,” where each round uses a different leftover yarn. This creates a charmingly eclectic look and is perfect for reducing yarn waste. For a more coordinated project, choose a color palette of three to five shades that complement each other.
Consider seasonal themes for your squares. Soft pastels work beautifully for springtime throws, while deep jewel tones add warmth in the winter. Bright, bold colors can create a cheerful summer blanket or tote bag.
Texture can also play a role. While the classic granny square uses smooth yarn, you can experiment with textured or variegated yarns to add dimension. The stitch pattern allows the texture to stand out without overwhelming the design.
You can also adapt the classic square into other shapes. By altering stitch counts and arrangements, you can create hexagons, triangles, or rectangles while maintaining the “granny” style. These shapes can be combined into unique and modern crochet projects.
Mixing solid granny squares with open, lacy ones can also create an interesting visual contrast. For example, alternating between a classic airy square and a denser, filled-in square adds depth to blankets or garments.
Tips for Perfecting Your Granny Squares
The key to mastering Crochet a Classic Granny Square Free Pattern lies in attention to detail. Even a simple pattern benefits from careful craftsmanship. Small improvements in your technique can greatly enhance the final product.
Always start with a neat center ring. If you find the traditional chain-four method leaves a hole, try the magic ring technique, which creates a tighter center. This is especially helpful for smaller squares or projects where you want a cleaner look.
Count your stitches regularly. Missing or adding a stitch can cause the square to lose its shape. Taking a moment at the end of each round to verify your stitch count prevents frustration later.
Weave in ends as you go. Since granny squares often involve color changes, you’ll accumulate many yarn tails. Tackling them as you finish each square makes final assembly much easier.
If your square twists or warps, check your tension and make sure you’re turning corners correctly. Loosening up your chain-two spaces in the corners can help prevent pulling.
For large projects, make a sample square and wash it according to the yarn’s care instructions. This allows you to see how the yarn behaves and whether your stitches hold up after washing.
Lastly, enjoy the process. Crocheting granny squares can be meditative and relaxing. Don’t rush through—take the time to appreciate how each round adds beauty and dimension to your work.
FAQ About Crochet a Classic Granny Square
Q: Can beginners make a granny square?
A: Yes! Granny squares are one of the easiest patterns for beginners, requiring only basic stitches like chains, slip stitches, and double crochets.
Q: How long does it take to make one granny square?
A: Depending on your speed and size of the square, it can take anywhere from 15 minutes to an hour.
Q: What is the best yarn for granny squares?
A: Medium-weight acrylic or cotton yarn is ideal for durability and ease of use.
Q: Can I mix different yarn types in one square?
A: It’s best to use yarns of similar weight and fiber content to maintain consistency in tension and appearance.
Q: How do I join granny squares together?
A: Popular methods include slip stitching, whipstitching with a yarn needle, or crocheting them together with a joining stitch.
Q: Can I make clothing from granny squares?
A: Absolutely! Many crochet garments like cardigans, tops, and skirts are made by joining granny squares in creative ways.
Conclusion
In this guide, we explored the timeless beauty of Crochet a Classic Granny Square Free Pattern, covering its basic construction, step-by-step instructions, creative variations, and expert tips for perfection. Whether you’re making a cozy blanket, a stylish bag, or a decorative pillow, granny squares offer endless opportunities for creativity. Now that you have the knowledge and inspiration, grab your hook and yarn, and start your own classic project. I’d love to hear your honest opinion about this tutorial and any suggestions for future topics—share your thoughts and keep the crochet tradition alive.

