If you’re looking for a fun and functional DIY project, then crafting your own crochet card holder is a perfect option. Not only does it give you the chance to practice your crochet skills, but it also results in a stylish, personalized item that’s both practical and unique.
This step-by-step guide will walk you through the entire process, from selecting materials to completing the final product. Whether you’re new to crocheting or an experienced crafter, you’ll find that this project is easy to follow and highly satisfying.
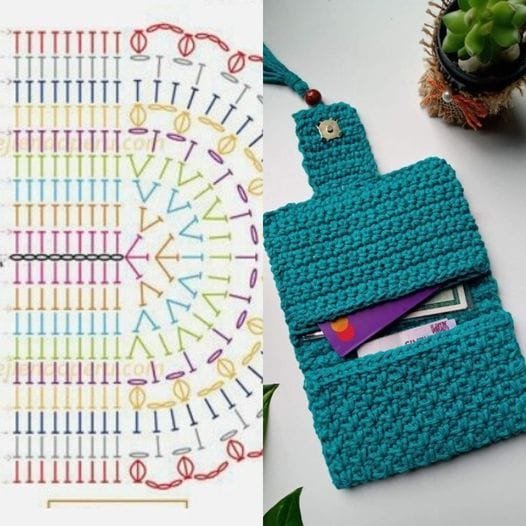
A crochet card holder is the perfect accessory to organize your cards, whether they’re credit cards, business cards, or even loyalty cards. You can create a compact, stylish holder that fits neatly into your wallet or bag.
By customizing your colors and design, you’ll be able to add a personal touch to an everyday item. In this guide, we’ll go over the materials you need, the basic crochet stitches involved, and step-by-step instructions on how to craft your very own crochet card holder.
Crocheting is a craft that offers endless possibilities for creativity, and making a crochet card holder allows you to experiment with different yarns, textures, and colors.
This tutorial is designed to be clear and easy to follow, so you can craft a beautiful card holder in no time. Let’s get started on your new favorite handmade accessory.
1. Materials You Will Need
Before you begin crafting your own crochet card holder, it’s essential to gather all the necessary materials. Having everything ready will ensure that the process goes smoothly, and you can stay focused on crocheting. Here’s what you’ll need:
- Yarn: Choose a yarn that is sturdy enough to hold its shape. Cotton yarn works well for this project because it’s durable and has a natural texture.
- Crochet Hook: Select a hook size that suits your yarn. Generally, a size G (4.0mm) hook works well with medium-weight yarn.
- Scissors: You’ll need a pair of scissors to cut your yarn once you finish your crochet card holder.
- Yarn Needle: A yarn needle is essential for weaving in the ends of your yarn and finishing off your project neatly.
- Measuring Tape: Use this to check the size of your crochet card holder as you go along, ensuring it fits the cards you plan to store.
- Buttons or Closures (Optional): If you’d like to add a closure to your card holder, consider buttons, snaps, or a decorative clasp.
Once you have all your materials in place, you’re ready to begin crafting your crochet card holder. The next step is to familiarize yourself with the basic crochet stitches you’ll be using.
2. Basic Crochet Stitches to Use
If you’re new to crocheting, don’t worry! The crochet card holder uses just a few basic crochet stitches that are easy to learn. Here’s a quick overview of the stitches involved:
- Chain Stitch (ch): This is the most basic stitch and forms the foundation of your project. It’s used to start your crochet row.
- Single Crochet (sc): This is a simple stitch that works up quickly and creates a tight, solid fabric.
- Slip Stitch (sl st): This stitch is used to join rows or to finish off your project neatly.
- Double Crochet (dc): A taller stitch that can add texture and flexibility to your card holder.
These stitches are all relatively simple to master, and once you’re comfortable with them, you’ll be able to craft your own crochet card holder in no time. If you’re unsure how to work these stitches, there are plenty of online tutorials available to help you practice.
3. Step-by-Step Instructions to Crochet Your Card Holder
Now that you’re ready to begin, let’s dive into the step-by-step process of crafting your very own crochet card holder. Follow these easy instructions:
- Start with a Foundation Chain: Begin by making a chain that’s long enough to fit the width of your cards. A good starting point is 12 to 15 stitches, but you can adjust this based on the size of your cards.
- Crochet the First Row: Turn your work and crochet a row of single crochet stitches into each chain stitch. Continue until you reach the end of the row, then turn your work.
- Add More Rows: Continue to crochet single crochet stitches across each row, making sure to turn your work after each row. You’ll need to repeat this process until the length of your crochet piece is long enough to fit your cards comfortably.
- Shape the Card Holder: Once you’ve reached the desired length, you’ll begin to shape the sides of your crochet card holder. This can be done by decreasing stitches or simply folding the sides in.
- Finish the Top Edge: To finish the top edge of your card holder, you can crochet a row of slip stitches or double crochet for a clean, finished look.
- Add a Closure (Optional): If you’d like a closure for your crochet card holder, you can sew on a button or create a small flap to fold over the top. A decorative clasp or snap can also be used to secure the holder.
After finishing the basic shape, trim any excess yarn, and use your yarn needle to weave in any loose ends. Your crochet card holder is now ready to use!
4. Customizing Your Crochet Card Holder
One of the best parts of crafting your own crochet card holder is the ability to customize it to your personal style. Here are some ways to make your card holder even more unique:
- Choose Colorful Yarn: Experiment with different yarn colors to create a card holder that reflects your personality. Consider using a bright color for a fun look or neutral tones for a more sophisticated design.
- Add Texture: Try using textured yarns, like those with a tweed or speckled effect, to give your card holder a unique feel. You can also experiment with different stitch patterns to add dimension to your design.
- Decorative Edging: Add a decorative border to the edges of your card holder for a polished, professional look. A scalloped or picot edge works beautifully for this purpose.
- Personalized Embellishments: Add charms, beads, or even embroidered initials to make your crochet card holder one-of-a-kind. These small details can make your project feel even more special.
- Use a Different Closure: If you prefer a different closure than a button, consider adding a small zipper or a snap fastener. Zippers give the holder a sleek look, while snaps offer ease of use.
- Make it Larger: If you need a larger card holder for more cards, simply adjust the number of foundation chains and the number of rows to increase the size. You can also create a double-sided holder by adding an extra section.
With these customization ideas, your crochet card holder will not only be functional but also a stylish and personalized accessory.
FAQ
Q1: How long does it take to make a crochet card holder?
The time required to make a crochet card holder depends on your crochet skill level, but generally, it takes between 1 to 2 hours for beginners and less time for more experienced crocheters.
Q2: Can I make a crochet card holder without a button?
Yes! You can make your card holder without a button by simply folding the top over or using a different type of closure, such as a snap or a zipper.
Q3: Can I use a different type of yarn?
Yes, you can use any yarn that is suitable for crochet, but make sure it is strong and durable enough to hold your cards. Cotton or acrylic yarns are both great choices for this project.
Q4: What other projects can I make with a crochet card holder design?
The design can be adapted for other small items such as coin purses, wallets, or even mini bags. You can simply adjust the size or add extra sections to create different accessories.
Q5: How do I make sure my crochet card holder is the right size?
Use a measuring tape to check the width and length of your crochet piece as you go along. Make sure it’s slightly larger than the size of your cards to allow for easy storage and removal.
Q6: Can I add a lining to my crochet card holder?
Yes, adding a fabric lining can help make your card holder more durable and give it a polished look. Simply sew the lining inside once you’ve completed the crochet portion.
Join our VIP broadcast list and gain access to exclusive patterns, all for free. As a VIP member, you’ll receive the best patterns daily, delivered directly to your device. ✨📱 It’s a unique opportunity to stay up-to-date with the latest trends and designs, curated just for you. Don’t miss out on enhancing your projects and discovering new inspirations with the best patterns every day! 🎨🔝
Conclusion
In this Craft Your Own Crochet Card Holder: A Step-by-Step Guide, we’ve explored the entire process of creating your very own crochet card holder. From gathering materials to customizing your design, you now have the knowledge to craft a beautiful, functional accessory. Whether you’re looking to keep your cards organized or create a thoughtful gift, this crochet project is a perfect choice.
I’d love to hear your thoughts on this tutorial. Did you enjoy crafting your own crochet card holder? Feel free to share your feedback or suggestions in the comments below. Your insights help improve these guides and inspire other crafters to join in the fun!

