If you’re looking for the perfect crochet project to make for a newborn or a baby, look no further than the Claire Boots for Baby – Crochet Pattern. These adorable, cozy booties are an excellent choice for keeping tiny feet warm and stylish.
Crocheting for babies is always a rewarding experience, and this pattern is both practical and beautiful. Whether you’re making these boots as a gift or for your own little one, the results are bound to impress.
The Claire Boots for Baby – Crochet Pattern is ideal for both beginners and more experienced crocheters. With simple stitches and an easy-to-follow pattern, you can create a pair of baby boots that are not only functional but also fashionable.
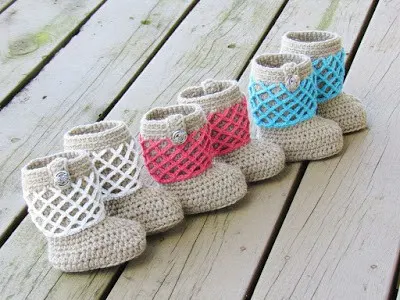
These booties can be customized in various colors to match any baby’s wardrobe or nursery theme, making them a versatile project.
In this blog post, we’ll take you through everything you need to know about the Claire Boots for Baby – Crochet Pattern.
From the materials required to the step-by-step process, this guide will help you crochet these sweet little boots in no time. Additionally, we’ll cover common questions and provide tips to ensure your project turns out perfectly.
1. Materials and Tools for Claire Boots for Baby
Before you start working on the Claire Boots for Baby – Crochet Pattern, it’s essential to gather all the necessary materials and tools. Having the right supplies will make your crochet experience much smoother and more enjoyable.
- Yarn Selection: The best yarn for baby boots is soft and gentle on the skin. Opt for a lightweight, breathable yarn such as cotton or a cotton blend. These types of yarn are perfect for keeping baby’s feet comfortable without causing irritation. Choose colors that suit the baby’s wardrobe, whether you want something neutral or more vibrant.
- Crochet Hook: The crochet hook size is crucial for ensuring the right tension in your stitches. For the Claire Boots for Baby, a 3.5mm crochet hook is typically recommended, but be sure to check your pattern for specific instructions. This hook size helps create tight, even stitches that give the booties their structured look.
- Stitch Markers: Stitch markers are incredibly helpful for keeping track of rounds and sections within your crochet pattern. Especially for beginners, these markers will ensure you don’t lose your place as you work through the Claire Boots for Baby – Crochet Pattern.
- Tapestry Needle: You’ll need a tapestry needle to weave in loose ends after finishing the crochet. The needle will also come in handy when joining parts of the booties, like attaching soles to the upper portion.
- Measuring Tape: To ensure the booties are the correct size, especially if you’re adjusting for a particular baby’s foot, a measuring tape is essential. This helps ensure that the Claire Boots for Baby – Crochet Pattern fits perfectly without being too tight or loose.
- Scissors: A sharp pair of scissors will make trimming excess yarn much easier. Always have these handy as you work through your project.
By preparing all of these materials beforehand, you’ll be ready to dive into crocheting the Claire Boots for Baby with ease.
2. Step-by-Step Guide to Crocheting the Claire Boots for Baby
Once you have all your materials ready, it’s time to start crocheting the Claire Boots for Baby – Crochet Pattern. Follow these steps to create a perfect pair of baby booties.
- Start with the Sole: The sole of the baby boots forms the foundation. Begin by creating a foundation chain, followed by working in rounds to shape the base of the boot. Ensure that the sole is symmetrical and flat, as this will ensure the boots sit correctly on the baby’s feet.
- Crocheting the Sides: After completing the sole, you will start working upward to form the sides of the boots. Use single crochet stitches to create a sturdy, durable structure. Be mindful of your stitch count and ensure the sides of the boot are even and smooth.
- Shaping the Ankle: To ensure the boots stay on the baby’s feet, it’s essential to create a snug fit around the ankle. Decrease stitches in the necessary rounds to shape the ankle portion of the boot. This helps to keep the boot secure without slipping off.
- Creating the Boot Cuff: The boot cuff adds style and warmth to the Claire Boots for Baby. Depending on the pattern variation, you can use ribbed or textured stitches for the cuff. This part is a great opportunity to add a pop of color or a fun design element.
- Adding Decorative Elements: For an extra cute touch, consider adding buttons, bows, or even crochet flowers to the Claire Boots for Baby. These small embellishments can make the boots stand out and add a unique flair to your crochet project.
- Finishing Touches: Once all the sections are complete, it’s time to assemble the boots. Use a tapestry needle to sew any parts together and weave in all the loose ends. Give the boots a gentle stretch to make sure all seams are smooth and that they fit perfectly.
Now that the boots are assembled, you’ve successfully completed the Claire Boots for Baby – Crochet Pattern!
3. Tips for Perfecting Your Claire Boots for Baby
Even if you’re following the pattern closely, there are a few tips and tricks that can help you perfect your Claire Boots for Baby and achieve professional-looking results.
- Tension Control: Maintaining consistent tension throughout your project is key to ensuring that your booties look uniform and polished. Practice on a small swatch before starting the Claire Boots for Baby – Crochet Pattern to get a feel for your tension.
- Adjusting the Size: If you need to adjust the size of the baby boots, it’s easy to make slight modifications to the pattern. Adding or reducing foundation chains can make the booties larger or smaller, depending on the baby’s foot size.
- Stitch Evenly: Pay attention to your stitch placement, especially when working in rounds. Uneven stitches can cause gaps or distortions in the boot’s shape. Use stitch markers if necessary to keep your rounds precise and even.
- Blocking the Boots: After finishing the crochet work, consider blocking the boots to help them retain their shape. Wet-blocking can make a huge difference in how the booties look, giving them a more professional, finished appearance.
- Choosing the Right Yarn: As mentioned earlier, soft yarn is essential. Avoid any yarns that may cause irritation to the baby’s skin. When in doubt, opt for yarns specifically made for baby projects.
- Practice Patience: Crocheting baby booties can be a delicate process, especially when working on smaller details. Take your time, and don’t rush through the pattern. Patience will ensure that your Claire Boots for Baby – Crochet Pattern turns out beautifully.
4. Customizing Your Claire Boots for Baby
One of the best aspects of the Claire Boots for Baby – Crochet Pattern is its versatility. There are endless ways to customize these boots to make them uniquely yours.
- Color Combinations: Feel free to experiment with different color combinations to match the baby’s outfits or nursery theme. Soft pastels are popular choices for baby projects, but don’t be afraid to try bold, vibrant colors as well.
- Adding Patterns: If you’re feeling adventurous, incorporate patterns like stripes, polka dots, or even textured stitches into the Claire Boots for Baby. This can add visual interest and make the booties even more special.
- Personalization: Adding the baby’s initials or name to the boots can make them a memorable keepsake. You can do this by embroidering the letters onto the cuff or sole of the booties.
- Playing with Yarn Types: Experiment with different yarn textures like chenille or velvet for a luxurious feel. Just make sure the yarn remains baby-friendly, meaning soft and non-irritating to sensitive skin.
- Add-ons: From tassels to crochet bows, little add-ons can elevate the design of your baby boots. These decorative elements give the Claire Boots for Baby a personalized touch.
- Seasonal Themes: Customize your Claire Boots for Baby according to the season. For winter, opt for thicker yarn and add faux fur to the cuffs. For spring, choose bright colors and lighter yarn.
The possibilities for customization are endless, and each modification can make the Claire Boots for Baby one-of-a-kind.
FAQ: Claire Boots for Baby – Crochet Pattern
1. What size are the Claire Boots for Baby?
The size of the Claire Boots for Baby – Crochet Pattern can vary depending on how you adjust the pattern. Generally, they fit babies aged 0-6 months, but you can customize the size by adding or removing stitches.
2. What yarn is best for baby booties?
Soft, lightweight yarns such as cotton or baby wool are ideal for baby booties. They’re gentle on the skin and provide breathability, making them perfect for the Claire Boots for Baby.
3. Can I use different colors in this pattern?
Yes! The Claire Boots for Baby – Crochet Pattern is versatile, and you can easily use different colors or combinations to suit your preferences.
4. How long does it take to crochet baby boots?
For an experienced crocheter, it typically takes 2-3 hours to complete a pair of baby boots. Beginners may take a little longer, but the process is still relatively quick.
5. Are the Claire Boots for Baby suitable for beginners?
Yes, the Claire Boots for Baby – Crochet Pattern is beginner-friendly. With basic stitches and clear instructions, even those new to crochet can successfully complete this project.
6. Can I make these boots in larger sizes?
Absolutely! You can adjust the pattern to create larger sizes for older babies or even toddlers by increasing the stitch count and using larger crochet hooks.
Join our VIP broadcast list and gain access to exclusive patterns, all for free. As a VIP member, you’ll receive the best patterns daily, delivered directly to your device. ✨📱 It’s a unique opportunity to stay up-to-date with the latest trends and designs, curated just for you. Don’t miss out on enhancing your projects and discovering new inspirations with the best patterns every day! 🎨🔝
Conclusion
By following this Claire Boots for Baby – Crochet Pattern, you’ve learned how to make adorable, cozy baby boots that are both practical and stylish. From gathering materials to customizing the design, this tutorial has provided you with all the steps needed to complete the project successfully.
We’d love to hear your feedback! Please leave a comment with your thoughts or suggestions, and don’t forget to share photos of your finished boots. Happy crocheting!

