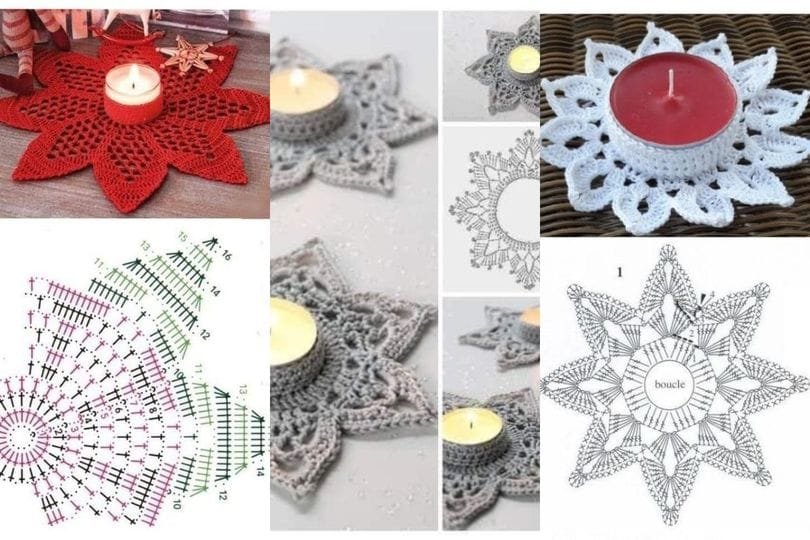
The Christmas Star with Crochet Candle Holder: A Beautiful DIY Holiday Craft is the perfect project to add a touch of handmade charm to your festive décor.
Combining the elegance of a star motif with the practicality of a candle holder, this crochet creation brings warmth and beauty to any holiday celebration.
Whether you’re crafting for your own home or as a thoughtful gift, this project is sure to impress.
Creating a Christmas Star with Crochet Candle Holder is a fun and relaxing activity, suitable for crocheters of all skill levels.
The project allows for endless customization, from the choice of yarn to the style of the star. With this tutorial, you can bring your unique vision to life while spreading the joy of the holiday season.
In this step-by-step guide, we’ll explore how to make your own Christmas Star with Crochet Candle Holder, ensuring it’s both beautiful and functional. By the end of this tutorial, you’ll have a stunning centerpiece or decorative piece to brighten your holiday celebrations.
1. Materials and Tools for Your Christmas Star
Before starting, gather all the materials and tools necessary to create your Christmas Star with Crochet Candle Holder: A Beautiful DIY Holiday Craft. This will help streamline the process and ensure the final result is as stunning as possible.
- Yarn Selection: Opt for metallic or festive-colored yarn, such as gold, silver, red, or green, to enhance the holiday spirit. Cotton yarn works well for sturdiness.
- Crochet Hook: Choose a hook size compatible with your yarn, typically 3.5mm to 4.5mm for a balanced texture.
- Candle Holder: Select a small glass or ceramic candle holder that fits securely within the star’s center.
- Stitch Markers: These will help keep track of your rounds and stitches, ensuring consistency.
- Scissors: A sharp pair of scissors will make cutting yarn easier and more precise.
- Yarn Needle: Use this to weave in ends and sew pieces together if needed.
- Measuring Tape: Accurate measurements ensure the star fits snugly around the candle holder.
With all the materials ready, you can proceed confidently to start crocheting your star-shaped masterpiece.
2. Crafting the Crochet Star
The star is the focal point of the Christmas Star with Crochet Candle Holder, making it essential to craft it with care. Follow these steps to create a perfectly shaped star.
- Start with a Magic Circle: Begin with a magic circle to ensure the center of the star is tight and secure, providing a strong base for the candle holder.
- Create the Base Round: Crochet a round of single crochet (sc) stitches into the magic circle. This forms the base of your star.
- Form the Star Points: To shape the points of the star, alternate between double crochet (dc) and chain stitches (ch). Repeat the pattern five times for a traditional five-pointed star.
- Add Decorative Edging: Enhance the star’s edges with a picot stitch or a simple scallop border for a more festive appearance.
- Reinforce the Structure: Use a slightly tighter tension to ensure the star maintains its shape. You can also starch the star for added stiffness if desired.
- Measure Against the Candle Holder: Place the candle holder at the center of the star to confirm that it fits snugly before finishing.
The crochet star is now ready to serve as the base of your candle holder, bringing elegance and charm to the design.
3. Assembling the Candle Holder
Once the star is complete, it’s time to integrate the candle holder into the design. This step is crucial for ensuring both functionality and aesthetics.
- Positioning the Candle Holder: Place the candle holder at the center of the crochet star, ensuring it’s balanced and stable.
- Securing the Holder: Use small loops of yarn to gently stitch the candle holder to the star’s base. Make sure the stitching is discreet and doesn’t interfere with the candle’s placement.
- Testing for Stability: Check that the candle holder sits securely within the star. Adjust the stitching as needed to improve stability.
- Adding Decorative Features: If desired, embellish the star with beads, sequins, or ribbon to make it more festive.
- Choosing the Right Candle: Opt for a small LED candle for safety, especially if the star is made with flammable materials.
- Final Adjustments: Ensure all stitches are tight, and the candle holder is firmly in place before considering the project complete.
Your Christmas Star with Crochet Candle Holder is now ready to shine as a centerpiece or decorative piece.
4. Styling and Displaying Your Christmas Star
Now that your Christmas Star with Crochet Candle Holder: A Beautiful DIY Holiday Craft is finished, it’s time to find the perfect way to display it during the holiday season.
- As a Centerpiece: Place the candle holder on your dining or coffee table, surrounded by festive decorations like pinecones and ornaments.
- In Window Displays: Position the crochet star on a windowsill to let the light of the candle shine through, creating a cozy atmosphere.
- On the Mantelpiece: Combine the star with garlands, stockings, or other holiday-themed decorations for a stunning mantel display.
- As a Gift: Wrap the crochet star with cellophane and ribbon, gifting it to friends or family as a heartfelt handmade present.
- In Holiday Photo Shoots: Use the star as a prop in holiday-themed photography, adding a unique, handcrafted touch.
- Paired with Other Crafts: Combine the star with other crochet items, such as table runners or tree ornaments, for a cohesive holiday décor theme.
With so many options for styling and displaying your Christmas Star with Crochet Candle Holder, it’s easy to find the perfect spot to showcase your craftsmanship.
FAQ
Q1: Can I use any yarn for this project?
Yes, but it’s best to choose a sturdy, festive yarn like cotton or a metallic blend to enhance the holiday aesthetic and ensure durability.
Q2: Are there safety concerns with using real candles?
If using real candles, ensure the flame is far from the yarn. For maximum safety, opt for LED candles instead.
Q3: Can beginners try this project?
Absolutely! The steps are simple and suitable for all skill levels. Beginners can start with basic stitches and build from there.
Q4: How do I ensure the star maintains its shape?
Use a tighter tension while crocheting and consider starching the star for added stiffness.
Q5: Can I customize the star’s size?
Yes, adjust the number of stitches and rounds to create a larger or smaller star, depending on your preferences.
Q6: How long does this project take?
Depending on your skill level, it can take 2-4 hours to complete the star and assemble the candle holder.
Join our VIP broadcast list and gain access to exclusive patterns, all for free. As a VIP member, you’ll receive the best patterns daily, delivered directly to your device. ✨📱 It’s a unique opportunity to stay up-to-date with the latest trends and designs, curated just for you. Don’t miss out on enhancing your projects and discovering new inspirations with the best patterns every day! 🎨🔝
Conclusion
Creating a Christmas Star with Crochet Candle Holder: A Beautiful DIY Holiday Craft is a delightful way to add a personal touch to your holiday celebrations. This handmade piece combines functionality with festive charm, making it a memorable addition to your home or a thoughtful gift for loved ones.
We hope this tutorial has inspired you to craft your own holiday décor. Let us know in the comments how your project turned out and share your suggestions for future crochet ideas. Happy holidays and happy crafting!

