The holiday season is a time for creativity and joy, and what better way to celebrate than by making your own decorations?
In this Christmas Spiral Star Crochet – Tutorial, you will learn how to create beautiful spiral stars that can add a festive touch to your home or serve as heartfelt gifts for loved ones. This tutorial is designed for crocheters of all skill levels, so whether you’re a beginner or a seasoned pro, you’ll find the instructions easy to follow.
Crocheting your own decorations not only allows you to personalize your holiday decor but also provides a unique opportunity to spend quality time with family and friends.
Imagine the joy of gathering together, sharing laughter, and creating beautiful Christmas Spiral Stars that will brighten up your celebrations. Plus, these stars are perfect for hanging on your tree, adorning your mantle, or even as part of a lovely gift-wrapping embellishment.
Before diving into the steps of this Christmas Spiral Star Crochet – Tutorial, it’s essential to gather your materials and familiarize yourself with the basic crochet stitches that will be used throughout the project.
With the right tools and a bit of patience, you’ll be well on your way to creating stunning spiral stars that will shine bright throughout the holiday season. Let’s get started!
1. Materials You Will Need
Before you can begin your Christmas Spiral Star Crochet, you’ll need to gather a few essential materials. Here’s a comprehensive list:
- Yarn: Choose a worsted weight yarn in festive colors. Traditional red, green, and gold can evoke the Christmas spirit, but feel free to get creative! You can even opt for sparkly or variegated yarns to add a special touch to your stars.
- Crochet Hook: A size H (5.0 mm) crochet hook is typically recommended for worsted weight yarn, but check your yarn label for specific hook size suggestions.
- Scissors: A pair of sharp scissors will help you cut the yarn neatly at the end of your project.
- Tapestry Needle: This is essential for weaving in ends and sewing pieces together if you choose to create multi-layered stars.
- Stitch Markers: While not mandatory, stitch markers can be helpful in keeping track of your rounds and stitches, especially if you’re new to crocheting in the round.
- Pattern Instructions: Keep this tutorial handy as you work through the steps. It can serve as a reference for the various stitches and techniques you will use.
Once you have all your materials gathered, you’re ready to dive into the fun part—crocheting your Christmas Spiral Star!
2. Basic Crochet Stitches Used
Understanding the basic crochet stitches is crucial for successfully completing your Christmas Spiral Star Crochet. Here are the key stitches you will be using:
- Chain Stitch (ch): This is the foundation of most crochet projects. To make a chain stitch, simply yarn over and pull through the loop on your hook.
- Slip Stitch (sl st): Used to join rounds or move to a different stitch without adding height. Yarn over and pull through both loops on your hook.
- Single Crochet (sc): A fundamental stitch that creates a dense fabric. Insert your hook into the stitch, yarn over, pull up a loop, yarn over again, and pull through both loops on the hook.
- Double Crochet (dc): This stitch adds height and creates an open fabric. Yarn over, insert your hook into the stitch, yarn over again, pull up a loop, yarn over, pull through the first two loops, yarn over, and pull through the last two loops.
- Half Double Crochet (hdc): This stitch is a combination of single and double crochet. Yarn over, insert your hook, yarn over again, pull up a loop, yarn over, and pull through all three loops on your hook.
- Magic Ring: This technique allows you to create a tight center for your spiral star. To make a magic ring, wrap the yarn around your fingers to create a loop, insert your hook, yarn over, and pull through to create a starting point.
Familiarizing yourself with these stitches will make your journey through the Christmas Spiral Star Crochet – Tutorial smooth and enjoyable. Don’t worry if you need to look up a stitch; practice makes perfect!
3. Step-by-Step Instructions for Crochet Star
Now that you have your materials and know the basic stitches, it’s time to begin your Christmas Spiral Star Crochet. Follow these steps carefully:
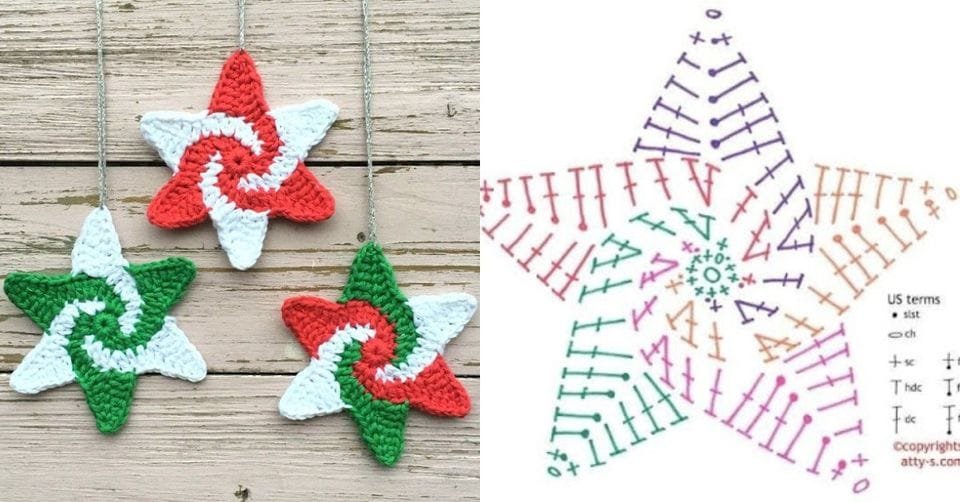
- Create a Magic Ring: Start by making a magic ring. Once you have the ring, secure it with a slip stitch to hold it in place.
- Round 1: Chain 3 (counts as your first double crochet), then work 11 double crochets into the magic ring. Pull the tail of the ring to tighten it, and join with a slip stitch to the top of the first chain 3.
- Round 2: Chain 3 again and work 2 double crochets in the same stitch. Skip the next double crochet and work 3 double crochets in the next stitch. Repeat from * to * around for a total of 6 points. Join with a slip stitch.
- Round 3: Chain 3 and work 2 double crochets in the same stitch, then work 3 double crochets in each of the next 3 stitches, skipping the next stitch. Repeat this pattern around, joining with a slip stitch at the end.
- Round 4: Chain 3 and work 1 double crochet in the same stitch. Then, in each point, work 3 double crochets. You will begin to see the spiral shape emerge.
- Finish Off: Once you have completed your last round, cut the yarn and pull it through the last loop to secure it. Use your tapestry needle to weave in any loose ends.
You’ve now created the basic shape of your Christmas Spiral Star! If you want to create multiple stars, simply repeat these steps for each one.
4. Decorating Your Spiral Star
Now that your Christmas Spiral Star Crochet is complete, it’s time to decorate it to make it even more festive. Here are some fun ideas:
- Add Embellishments: Use beads, sequins, or fabric paint to add sparkle to your star. You can sew or glue these decorations on for extra flair.
- Hang with Ribbon: Cut a piece of ribbon to create a loop for hanging. Attach it to the top of your star for a charming ornament to adorn your tree.
- Layering Stars: Create different sizes of stars and layer them together. You can use a smaller star on top of a larger one for a beautiful dimensional effect.
- Gift Tags: Use your stars as gift tags. Write a message on the back and attach it to gifts for a personal touch.
- Table Decor: Use these stars as part of your table setting. Scatter them around your holiday table or use them as napkin holders.
- Craft Projects: Incorporate your stars into other crafts, such as wreaths or garlands, to spread the festive cheer throughout your home.
Decorating your Christmas Spiral Star allows you to express your creativity and make each piece uniquely yours. Enjoy the process of embellishing and personalizing your stars!
FAQ: Common Questions About Christmas Spiral Star Crochet
- What skill level is required for this crochet tutorial? This Christmas Spiral Star Crochet – Tutorial is suitable for all skill levels. Beginners will find it helpful to follow the step-by-step instructions.
- Can I use different yarn weights? Yes, you can experiment with different yarn weights, but keep in mind that the size of your star may vary. Adjust your hook size accordingly.
- How do I secure my yarn ends? Use a tapestry needle to weave in the loose ends securely. This will prevent unraveling and give your star a polished look.
- Can I wash my crochet star? Yes, you can wash your Christmas Spiral Star, but hand washing is recommended to maintain its shape. Lay it flat to dry.
- What if I can’t master the magic ring? If you have trouble with the magic ring, you can start with a chain of 4 and join it with a slip stitch to form a ring instead.
- Where can I find more crochet patterns? There are many resources available online, including crochet blogs, YouTube channels, and pattern books. Exploring these can provide you with a wealth of new projects!
-
Join our VIP broadcast list and gain access to exclusive patterns, all for free. As a VIP member, you’ll receive the best patterns daily, delivered directly to your device. ✨📱 It’s a unique opportunity to stay up-to-date with the latest trends and designs, curated just for you. Don’t miss out on enhancing your projects and discovering new inspirations with the best patterns every day! 🎨🔝
Conclusion
In this Christmas Spiral Star Crochet – Tutorial, you’ve learned how to create beautiful spiral stars that can enhance your holiday decorations. From gathering materials to mastering basic stitches and adding personal touches, each step has been designed to help you enjoy the crocheting process. These festive stars are not only a fun project but also a wonderful way to share the joy of the season with friends and family.
I hope you enjoyed this tutorial and feel inspired to create your own Christmas Spiral Stars. Please share your thoughts and suggestions in the comments below. Happy crocheting, and may your holidays be filled with warmth and creativity!

