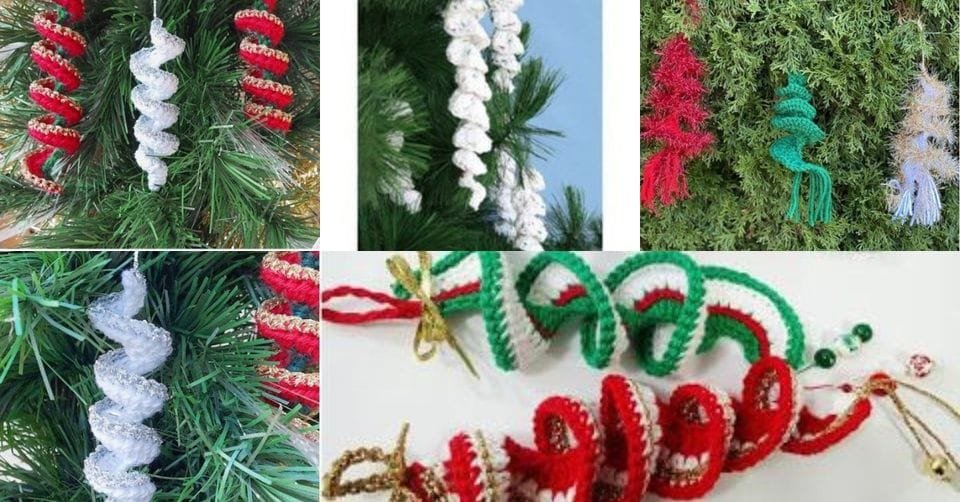
Looking for a fun and festive way to decorate your home this holiday season? Christmas crochet wind spinners are a creative and whimsical way to add a touch of handmade charm to your Christmas decor.
These delightful spinning ornaments can be hung from your tree, in windows, or even outside where they’ll catch the wind and twirl gracefully. Whether you’re an experienced crocheter or just getting started, this pattern will guide you through crafting these beautiful wind spinners.
Using a Christmas crochet wind spinners pattern allows you to make decorations that are not only unique but also highly customizable. You can choose your favorite yarn colors, adjust the size of the spinner, and even add embellishments like beads or ribbons.
Plus, this craft makes for a thoughtful, handmade gift that your friends and family will adore.
In this blog post, we’ll walk you through the steps to create your own Christmas crochet wind spinners. From gathering materials to understanding the pattern, we’ll make sure you have everything you need to create a stunning and festive decoration. So, let’s get started and bring a touch of holiday magic to your home!
1. Materials Needed for Christmas Crochet Wind Spinners
Before you begin your Christmas crochet wind spinners project, it’s important to gather all the materials you’ll need. Here’s a list of items you’ll want to have on hand:
- Yarn: Choose yarn in festive holiday colors like red, green, white, or gold. Acrylic yarn works well for this project as it holds its shape and is available in a wide variety of colors.
- Crochet Hook: Depending on the thickness of your yarn, you’ll need a crochet hook that matches the recommended size on your yarn label. For most wind spinners, a size G (4.0 mm) or H (5.0 mm) hook works best.
- Scissors: A sharp pair of scissors is essential for cutting your yarn cleanly and efficiently. Make sure you have these on hand for trimming the ends of your work.
- Stitch Marker: While not absolutely necessary, a stitch marker can help you keep track of your rounds as you work through the pattern, especially if you’re new to crocheting.
- Beads or Bells (Optional): For added embellishment, you can string beads or attach bells to the bottom of your Christmas crochet wind spinners. This adds a festive jingle and extra sparkle to your decorations.
- Tapestry Needle: A tapestry needle is useful for weaving in the ends of your yarn and attaching any additional embellishments, such as beads or tassels.
With your materials ready, you’re prepared to begin creating your Christmas crochet wind spinners. Ensuring you have everything you need from the start will make the process smooth and enjoyable.
2. Understanding the Christmas Crochet Wind Spinners Pattern
Now that you have your materials, let’s dive into understanding the Christmas crochet wind spinners pattern. The key to creating these beautiful decorations is following the pattern carefully and paying attention to each step.
- Starting with a Magic Ring: Many crochet wind spinner patterns begin with a magic ring. This technique allows you to create a tight, secure center for your wind spinner, preventing any gaps in the middle. If you’re unfamiliar with the magic ring, it’s a method where you crochet directly into a loop that can be pulled tight.
- Crocheting in Rounds: The pattern typically involves working in rounds, which gives the wind spinner its spiral shape. You’ll crochet a series of stitches into each round, gradually increasing the number of stitches as you go.
- Creating the Spiral Effect: To achieve the twisting, spinning effect, you’ll alternate between different stitch heights, such as single crochets, half-double crochets, and double crochets. This variation in stitch height causes the spinner to twist naturally.
- Adjusting the Size: You can easily adjust the size of your Christmas crochet wind spinners by adding or subtracting rounds from the pattern. The more rounds you add, the longer and more dramatic the wind spinner will be.
- Adding Embellishments: Once your crochet wind spinner is complete, you can personalize it by adding embellishments like beads, bells, or even small pom-poms. These additional touches make your spinner extra special and festive.
- Finishing Off: When you’re done crocheting, make sure to finish off your work by weaving in any loose ends with a tapestry needle. This will give your wind spinner a clean, professional look.
Following the Christmas crochet wind spinners pattern step-by-step will ensure that your project turns out beautifully. Take your time, and don’t be afraid to experiment with colors and embellishments to make it your own!
3. Customizing Your Christmas Crochet Wind Spinners
One of the best parts of making Christmas crochet wind spinners is the ability to customize them to your liking. Here are some ideas for making your wind spinners stand out and reflect your personal style:
- Choosing Different Colors: While traditional Christmas colors like red, green, and white are popular, you can choose any color combination that matches your decor. Try using metallic yarns for a shimmering effect or pastel shades for a softer, wintery look.
- Incorporating Glitter Yarn: For extra sparkle, consider using glitter or metallic yarn. This type of yarn adds a festive shimmer to your wind spinners, making them shine when the light hits them.
- Adding Tassels or Fringe: Attach tassels or fringe to the bottom of your wind spinner for added movement and texture. This is a great way to personalize your project and make it more dynamic.
- Using Different Hook Sizes: If you want to change the size of your wind spinners, try using a larger or smaller crochet hook. A larger hook will create a looser, more open design, while a smaller hook will result in a tighter, more compact wind spinner.
- Creating Multiple Layers: For a more intricate look, you can crochet multiple wind spinners of different sizes and attach them together. This will create a cascading effect that’s sure to impress.
- Hanging with Ribbon: Instead of simply using yarn to hang your wind spinners, consider using decorative ribbon or twine. This adds a touch of elegance and makes the decoration even more festive.
By experimenting with different colors, yarns, and embellishments, you can create Christmas crochet wind spinners that are truly one-of-a-kind.
4. Displaying and Caring for Your Crochet Wind Spinners
Once you’ve completed your Christmas crochet wind spinners, it’s time to display them proudly! Here are some tips on how to show off your handiwork and care for your spinners to keep them looking great for years to come:
- Hanging Indoors: Your crochet wind spinners can be hung from the ceiling, in front of windows, or even on your Christmas tree. The spinning motion will catch the light, creating a magical effect.
- Outdoor Display: If you choose to hang your wind spinners outside, make sure they are protected from harsh weather conditions. While acrylic yarn is durable, exposure to rain or snow may cause it to fade or become damaged over time.
- Storing for Next Season: At the end of the holiday season, be sure to store your wind spinners carefully. Place them in a cool, dry location and avoid crushing them to maintain their shape.
- Cleaning Your Wind Spinners: If your Christmas crochet wind spinners become dusty or dirty, gently hand wash them with mild detergent and air dry. Avoid using hot water or a washing machine, as this can cause the yarn to shrink.
- Displaying in Groups: For a dramatic effect, consider displaying multiple wind spinners together in different sizes and colors. This will create a stunning visual display, perfect for holiday gatherings.
- Gift Ideas: Crochet wind spinners make wonderful handmade gifts. Package them in a festive box with a personalized note to add a special touch.
By following these display and care tips, your Christmas crochet wind spinners will remain a beautiful and cherished part of your holiday decorations.
FAQ: Frequently Asked Questions About Christmas Crochet Wind Spinners
- What type of yarn is best for crochet wind spinners?
Acrylic yarn is an excellent choice for wind spinners because it holds its shape well and is available in a wide variety of colors. You can also use cotton yarn for a softer look. - How long does it take to crochet a wind spinner?
The time it takes depends on your skill level and the size of the wind spinner. Most wind spinners can be completed in a couple of hours, making this a quick and fun project. - Can I make crochet wind spinners in different sizes?
Yes! You can adjust the size of your wind spinner by adding or subtracting rounds from the pattern or by using a larger or smaller crochet hook. - How do I make the wind spinner twist?
The twisting effect is achieved by alternating stitch heights, such as single crochets, half-double crochets, and double crochets. This causes the wind spinner to naturally twist when hung. - Can I add embellishments to my wind spinner?
Absolutely! Adding beads, bells, or tassels can enhance the design and make your wind spinner even more festive and fun. - Can I use crochet wind spinners as outdoor decorations?
Yes, but be mindful of weather conditions. If hung outside, the wind spinner may fade or become damaged in heavy rain or snow. It’s best to display them in a covered area. -
Join our VIP broadcast list and gain access to exclusive patterns, all for free. As a VIP member, you’ll receive the best patterns daily, delivered directly to your device. ✨📱 It’s a unique opportunity to stay up-to-date with the latest trends and designs, curated just for you. Don’t miss out on enhancing your projects and discovering new inspirations with the best patterns every day! 🎨🔝
Conclusion
In this article, we’ve covered how to create your own Christmas crochet wind spinners using a simple yet festive pattern. With just a few materials and a bit of time, you can craft a unique holiday decoration that will add charm to any space. Whether you hang them indoors or out, your wind spinners are sure to bring a touch of holiday magic to your home.
We hope this tutorial has inspired you to get creative with your holiday decor. Please feel free to share your thoughts, suggestions, or questions in the comments section below. We’d love to hear about your own experiences and any customizations you made to the pattern!

