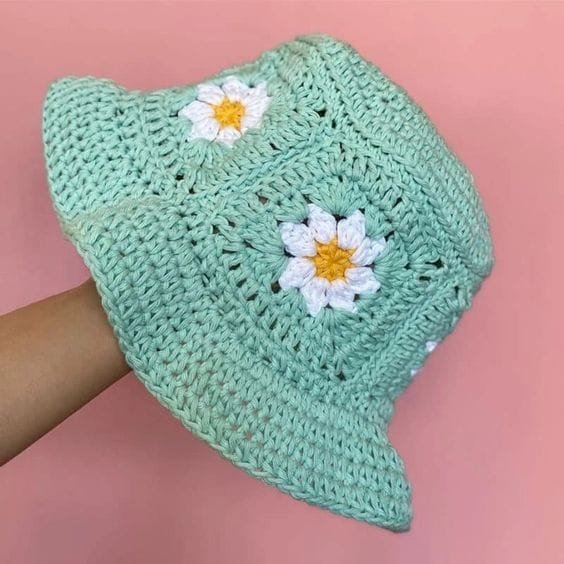
The Charming Daisy Flower Hat Crochet – Free Pattern is a delightful crochet project perfect for adding a touch of floral beauty to your wardrobe. Whether you’re an experienced crocheter or just starting out, this project offers a fun and accessible way to create a stylish accessory.
The delicate daisy flower motif, combined with a soft hat design, makes it an ideal addition for any season, bringing a cheerful vibe to your outfits.
Crocheting a hat with a flower accent is an ideal way to showcase your creativity and skill. The Charming Daisy Flower Hat Crochet features a simple yet elegant design that allows you to experiment with colors and styles.
The versatility of this pattern means it can be worn by anyone, from children to adults, and can be adapted for various occasions. In this article, we’ll walk you through the steps of creating this beautiful crochet hat, from selecting materials to finishing touches.
Whether you’re looking for a cozy, stylish hat for cooler weather or a fun accessory for sunny days, the Charming Daisy Flower Hat Crochet – Free Pattern is a fantastic project to try. It’s easy to follow, quick to make, and the finished product will surely add a touch of charm to any outfit.
1. Materials Needed for the Charming Daisy Flower Hat
To get started on the Charming Daisy Flower Hat Crochet – Free Pattern, you’ll need a few essential materials. The quality of your yarn and crochet tools will play a significant role in the final result, so let’s break down what you’ll need:
Yarn: The most important material for this project is the yarn. Choose a soft, medium-weight yarn (like worsted weight) to give the hat structure and comfort. A cotton or acrylic blend yarn works well for this type of crochet project, but feel free to experiment with different textures. You’ll need one main color for the hat itself and smaller amounts of a contrasting color for the daisy flower accents.
Crochet Hook: For the Charming Daisy Flower Hat Crochet, use a crochet hook appropriate for your yarn. Typically, a size H (5mm) hook is recommended for worsted weight yarn, but you can adjust depending on your yarn choice and tension.
Yarn Needle: A yarn needle is essential for weaving in loose ends after completing your crochet project. It also helps in attaching the daisy flowers to the hat once they’re finished.
Scissors: A sharp pair of scissors is needed to cut your yarn at the end of each round or project section.
Stitch Markers: These are helpful for marking the beginning of your rounds, ensuring that you maintain proper stitch counts and round structure.
Button or Embellishments: While optional, adding a button to the center of your daisy flower can give it an extra pop of charm. Alternatively, you can choose to embellish the hat with other decorative elements like beads or sequins.
Having all of these materials on hand before you begin will help ensure a smooth crocheting experience as you work through the Charming Daisy Flower Hat Crochet – Free Pattern.
2. How to Crochet the Hat Base
Now that you’ve gathered your materials, it’s time to start crocheting the base of the hat. The foundation of the Charming Daisy Flower Hat Crochet is simple to follow, but it’s important to make sure your stitches are tight and even to create a snug fit.
Begin by creating a magic ring to start crocheting the crown of the hat. This technique allows you to work in the round without leaving a gap in the center. Start with six single crochet stitches (sc) into the magic ring and pull the ring tight. This will form the first round of your hat.
For the next round, increase each stitch to create a larger diameter. Simply work two single crochet stitches (sc) into each stitch around, which will double your stitch count. Continue increasing in each round as needed to reach the desired size for the top of the hat.
Once you’ve reached the desired size for the crown of the hat, you’ll start working in continuous rounds without increasing. This is the part where the hat starts to take shape, so be sure to check the size against your head to ensure a proper fit. You can use a stitch marker to keep track of where your rounds begin and end.
As you continue working down, alternate between single crochet stitches (sc) and half double crochet (hdc) for a smooth, flexible fabric that’s both sturdy and comfortable. The choice of stitch will determine the texture and stretchiness of the hat, so feel free to adjust based on your personal preference.
If you’d like a thicker or warmer hat, you can use a thicker yarn or add more rounds until it reaches your desired length. Make sure to check the hat frequently to ensure it fits snugly but comfortably around your head.
3. Crocheting the Daisy Flower
The Charming Daisy Flower Hat Crochet – Free Pattern is incomplete without the adorable daisy flowers that adorn the hat. Crocheting these flowers is simple and adds a lovely, playful touch to the finished hat.
Start with a small chain of four stitches and join them with a slip stitch to form a loop. This loop will serve as the foundation of the daisy’s petals.
To crochet the petals, work into the loop by creating five double crochet (dc) stitches. After completing each petal, chain one stitch before beginning the next one. This will create evenly spaced petals around the center of the flower.
Once you’ve created all five petals, finish the flower by joining the last petal to the first with a slip stitch. You can use a different color of yarn for the center of the flower by working single crochet (sc) stitches into the center of the flower. This adds depth and a beautiful contrast to the petals.
Repeat the process to create multiple daisy flowers, depending on how many you want to attach to the hat. Keep in mind that you can experiment with different color combinations for the flowers to match your hat or add a unique flair to each one.
Once your flowers are completed, you’ll use a yarn needle to attach them to the hat. Position the flowers around the brim or crown of the hat and sew them in place using a strong thread. You can also add a decorative button in the center of each flower for extra detail.
4. Assembling the Hat and Adding Finishing Touches
Now that you’ve crocheted both the base of the hat and the daisy flowers, it’s time to assemble your project and add the final touches. This part is essential for making your Charming Daisy Flower Hat Crochet look polished and complete.
First, position the daisy flowers on the hat. You can place them in a scattered pattern or arrange them symmetrically, depending on your aesthetic preference. Make sure the flowers are evenly spaced before attaching them to the hat with a yarn needle.
Once all the flowers are securely attached, take a moment to check the fit of your hat. If needed, you can add extra rounds to the brim to adjust the size. Be sure to weave in any loose ends left from attaching the flowers or working the yarn.
For an extra touch of charm, consider adding a decorative element such as a bow, ribbon, or charm to the hat. This can personalize your creation and give it a unique flair. Additionally, you can block the hat by dampening it lightly and shaping it over a bowl or head form to help it maintain its structure.
Finally, give your hat a gentle wash and let it air dry to ensure that all the stitches settle into place and any stray fibers are smoothed out. Once dry, your Charming Daisy Flower Hat Crochet is ready to wear and show off!
FAQ
Q1: How long does it take to crochet the Charming Daisy Flower Hat?
A1: The time required to complete the hat depends on your crochet experience and speed. On average, it can take between 3 to 6 hours to finish the hat, including the time to crochet the flowers and assemble everything.
Q2: Can I adjust the size of the hat?
A2: Yes, you can adjust the size by adding more rounds to the base of the hat or adjusting the number of stitches in each round to make the hat larger or smaller. The pattern is flexible for customization.
Q3: What yarn should I use for the Charming Daisy Flower Hat?
A3: A medium-weight yarn (such as worsted weight) is ideal for this project. You can choose cotton, acrylic, or a blend depending on your preference for softness, durability, and feel.
Q4: Can I use a different flower design for the hat?
A4: Absolutely! While the daisy flower is featured in this pattern, you can experiment with other flower designs to add your own unique touch to the hat.
Q5: Is this pattern beginner-friendly?
A5: Yes, the Charming Daisy Flower Hat Crochet – Free Pattern is beginner-friendly. It uses basic crochet stitches such as single crochet, double crochet, and slip stitch, making it suitable for those who are new to crocheting.
Q6: Can I make the daisy flowers in different colors?
A6: Yes, you can make the daisy flowers in any colors you like. Experiment with different color combinations to create a fun, colorful hat that suits your personal style.
Join our VIP broadcast list and gain access to exclusive patterns, all for free. As a VIP member, you’ll receive the best patterns daily, delivered directly to your device. ✨📱 It’s a unique opportunity to stay up-to-date with the latest trends and designs, curated just for you. Don’t miss out on enhancing your projects and discovering new inspirations with the best patterns every day! 🎨🔝
Conclusion
The Charming Daisy Flower Hat Crochet – Free Pattern is a delightful project that combines creativity and practicality. Whether you’re making it for yourself, as a gift, or for a special occasion, this hat will add a whimsical touch to any outfit. By following the steps outlined in this guide, you can create a beautiful, personalized hat that features charming daisy flowers.
We’d love to hear your thoughts on this pattern! Please share your feedback and suggestions in the comments below. Happy crocheting!

