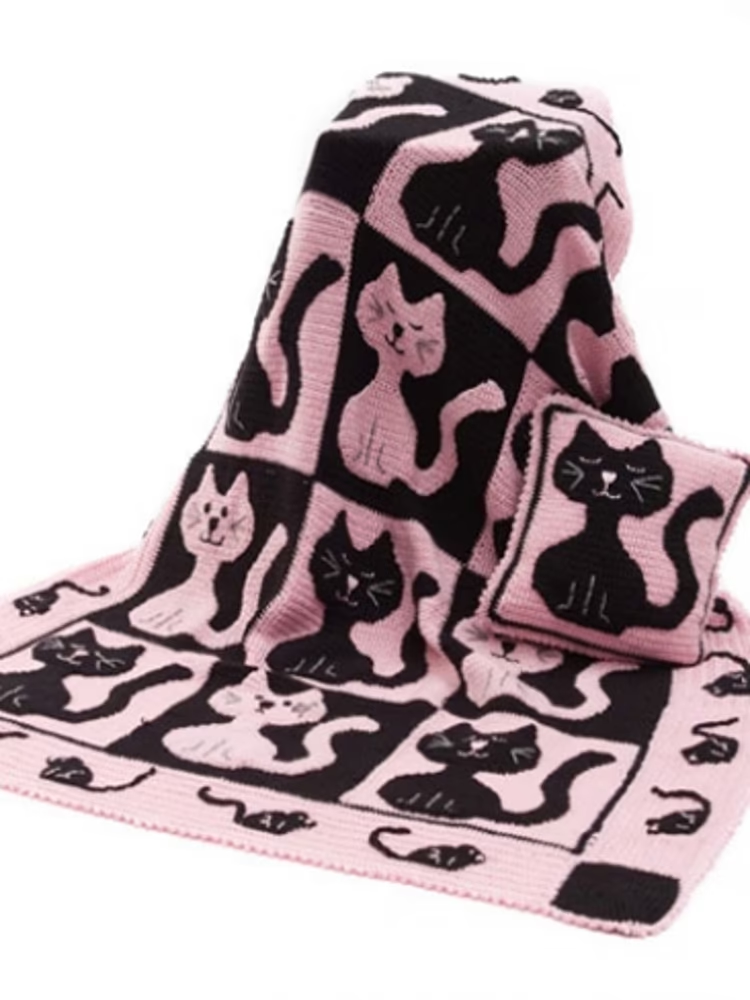
Creating a Cat & Mouse Throw & Pillow in Caron Simply Soft – Tutorial is a delightful way to add charm and whimsy to your home decor.
This project not only showcases your crochet skills but also provides a cozy addition to any living space. With the playful design of cats and mice, this throw and pillow set is perfect for cat lovers and adds a unique touch to your home.
Caron Simply Soft yarn is a fantastic choice for this project. Known for its incredible softness and sheen, it feels luxurious against the skin and drapes beautifully, making it ideal for throws and pillows.
Whether you are snuggling under the throw while watching a movie or using the pillow for added comfort, this combination will surely become a favorite in your home.
In this comprehensive tutorial, we will guide you through the entire process of creating your Cat & Mouse Throw & Pillow.
From selecting the right materials to completing the final touches, we will ensure you have everything you need to create a stunning and functional piece. Let’s dive in and explore the joy of crafting with yarn!
1. Materials You Will Need
To start your Cat & Mouse Throw & Pillow in Caron Simply Soft – Tutorial, gathering the right materials is crucial. Having everything on hand will streamline the process and enhance your crafting experience. Here’s a comprehensive list of what you will need:
First and foremost, you will need Caron Simply Soft yarn. This yarn is available in a variety of colors, allowing you to choose shades that complement your home decor. For the throw and pillow set, consider selecting a main color, such as soft gray for the cats and white or beige for the mice. Don’t forget to pick up some contrasting colors for additional details, like whiskers or eyes, to bring your creations to life.
Next, you will need the appropriate crochet hooks. For Caron Simply Soft, a 5.0 mm (H-8) hook is typically recommended, but check the yarn label for guidance. Using the right hook size ensures that your stitches are even and your project comes out as expected.
Additionally, gather some essential tools like a pair of scissors for cutting your yarn and a yarn needle for weaving in loose ends. A yarn needle with a large eye is especially useful for working with thicker yarns, allowing for easy threading and finishing.
It may also be beneficial to have stitch markers on hand. These can help you keep track of your rounds and ensure that your work remains organized as you progress. A tape measure will be handy for checking the dimensions of your pieces, ensuring they match the intended sizes for both the throw and pillow.
Finally, prepare a comfortable workspace where you can crochet without distractions. A well-lit area with minimal interruptions will make your crafting experience more enjoyable and productive.
2. Crocheting the Cat & Mouse Throw
Now that you have gathered all your materials, it’s time to begin crocheting the Cat & Mouse Throw. This section will guide you through the steps needed to create the throw, ensuring you understand the pattern and techniques involved.
Start by creating a foundation chain that matches the desired width of your throw. Depending on your preference, you can make it as wide or narrow as you like, but a common width is around 50 to 60 inches. Once you have your foundation chain, begin working in rows using your chosen stitch pattern. A simple double crochet stitch is an excellent choice for a warm and cozy texture.
As you crochet, consider incorporating the cat and mouse motifs. You can create separate squares or panels featuring the designs, or you can alternate the patterns throughout the throw. If you are using a graph or pattern, be sure to follow it closely to achieve the correct placement of each motif.
When adding the cat and mouse details, use contrasting colors to make the designs stand out. For example, if your main throw color is gray, you might use black or dark brown for the cats and a lighter shade for the mice. This contrast will enhance the visual appeal and add interest to your work.
Pay attention to your tension while crocheting, as maintaining an even tension is key to achieving a professional-looking finish. If you notice any inconsistencies, adjust your grip or hook size as necessary. Remember, practice makes perfect, so don’t hesitate to unravel and redo sections if needed.
Once you’ve completed the desired length of your throw, it’s time to add a finishing touch with a border. A simple single crochet border around the entire throw can help give it a polished look. This step is essential as it helps prevent the edges from curling and adds durability to your work.
3. Crafting the Cat & Mouse Pillow
With your throw complete, it’s time to move on to creating the Cat & Mouse Pillow. This charming pillow will complement your throw perfectly, providing comfort and a cohesive look to your decor. Let’s explore how to craft this delightful accessory.
Start by crocheting two identical pillow covers, ensuring they are the same size for a perfect fit. A standard pillow cover size is around 18 x 18 inches, but you can adjust this based on your preference or the size of your pillow insert. Use the same stitch pattern you employed for the throw, maintaining consistency across your project.
As with the throw, incorporate the cat and mouse designs into your pillow covers. You can choose to position them in the corners, in the center, or even scattered across the cover. Whichever design you choose, be sure to use the same contrasting colors for continuity and style.
Once you have crocheted both pillow covers, it’s time to join them together. Place the two covers back to back, with the right sides facing each other. Use a slip stitch or whip stitch to sew the edges, leaving an opening on one side for inserting the pillow form.
Before inserting the pillow, it’s a good idea to weave in any loose ends with a yarn needle. This will ensure a neat appearance and prevent any unraveling of stitches. Once the ends are secure, carefully insert the pillow form through the opening. Adjust the pillow until it fills the cover evenly, and then sew the opening closed.
To enhance your pillow’s look, consider adding embellishments such as buttons or bows. These little details can bring personality to your creation and make it even more special. If you’re feeling creative, you could even add additional features like embroidered eyes or stitched patterns to further personalize your design.
Finally, give your finished pillow a gentle wash and block it to shape. This step will help to even out any stitches and enhance the overall finish of your pillow.
4. Caring for Your Cat & Mouse Throw & Pillow
After completing your Cat & Mouse Throw & Pillow in Caron Simply Soft – Tutorial, it’s important to know how to care for your creations to ensure they last. Proper maintenance will help keep your throw and pillow looking fresh and vibrant over time.
Begin by checking the care label on your Caron Simply Soft yarn. Most acrylic yarns can be machine washed on a gentle cycle, but it’s always best to verify specific care instructions to prevent damage. If your throw or pillow features embellishments, it’s recommended to wash them by hand to avoid any potential issues.
When washing your throw and pillow, use a mild detergent that is suitable for delicate fabrics. Avoid using bleach or harsh chemicals, as these can damage the fibers and colors of your work. It’s best to wash your throw and pillow separately from other items to prevent color bleeding.
After washing, gently press out excess water without wringing or twisting your creations. If you choose to use a dryer, select a low heat setting to avoid shrinkage or distortion. Alternatively, you can lay your items flat to dry, reshaping them as needed.
For quick clean-ups, spot cleaning is a practical solution. If you notice any stains, treat them promptly with a fabric-safe stain remover. This will help to maintain the overall appearance of your throw and pillow.
When storing your throw and pillow, keep them in a cool, dry place away from direct sunlight to prevent fading. If you need to fold your items, ensure they are not creased for extended periods, as this will help retain their shape.
If your throw or pillow becomes damaged, don’t worry! Minor repairs can often be fixed with a yarn needle or a crochet hook. Taking the time to mend any issues will help your pieces remain cherished items in your home.
FAQ
1. How long does it take to complete the throw and pillow?
The time it takes to complete your throw and pillow will vary depending on your crochet experience and the amount of time you dedicate to the project. Generally, you can expect to spend several days to a couple of weeks on the entire set.
2. Is this tutorial suitable for beginners?
Yes, this tutorial is suitable for beginners. Basic knowledge of crochet stitches is helpful, but the instructions are designed to guide you through each step clearly.
3. Can I use other yarn types for this project?
While Caron Simply Soft is recommended for its softness and drape, you can experiment with other yarn types. Just ensure that the yarn is of similar weight and has comparable care instructions.
4. What colors work best for the cat and mouse designs?
You can choose any colors that suit your taste. Traditional colors like gray for cats and white or cream for mice are popular, but feel free to get creative with your palette.
5. How do I block my finished throw and pillow?
To block your finished items, lay them flat on a clean surface, shape them to the desired dimensions, and pin them in place. Lightly mist with water and allow them to dry completely.
6. Can I add additional designs or embellishments to my throw and pillow?
Absolutely! Feel free to personalize your throw and pillow with additional designs, embellishments, or embroidered details to make them uniquely yours.
Join our VIP broadcast list and gain access to exclusive patterns, all for free. As a VIP member, you’ll receive the best patterns daily, delivered directly to your device. ✨📱 It’s a unique opportunity to stay up-to-date with the latest trends and designs, curated just for you. Don’t miss out on enhancing your projects and discovering new inspirations with the best patterns every day! 🎨🔝
Conclusion
In this Cat & Mouse Throw & Pillow in Caron Simply Soft – Tutorial, we have explored the entire process of creating a whimsical and cozy addition to your home decor. From gathering materials to crocheting the throw and pillow, we’ve provided detailed instructions to ensure your success. With proper care and maintenance, your beautiful creations will last for years to come.
We hope you enjoyed this tutorial and are inspired to create your own version of this charming project. We encourage you to share your thoughts and suggestions in the comments below. Your feedback is valuable, and we look forward to seeing your creations! Happy crocheting!

