If you’re looking for a unique crochet pattern that adds depth and texture to your projects, the Braided/Woven Crochet Block – Tutorial is just what you need. This design features an eye-catching woven or braided look that instantly elevates any crochet piece.
Whether you’re planning to make a blanket, a scarf, or even a decorative cushion, this block can add that extra element of interest to your crochet creations.
The Braided/Woven Crochet Block might look complicated at first glance, but with the right instructions, it’s actually quite straightforward.
This tutorial will walk you through the steps of creating this beautiful block, starting with simple stitches and guiding you through the weaving technique. You’ll not only learn how to crochet the block but also how to incorporate it into larger projects for an even more intricate appearance.
In this Braided/Woven Crochet Block – Tutorial, we’ll explore different techniques and tips that will make your crochet block sturdy and beautiful. From yarn selection to how to connect your blocks into larger projects, this tutorial will have you creating stunning woven patterns in no time. Let’s dive into the details and get you started on your braided crochet adventure.
1. Getting Started: Materials and Yarn Selection
To create the Braided/Woven Crochet Block, you’ll need the right materials to ensure your project turns out beautifully. Selecting the appropriate yarn and hook size is critical to achieving the texture and structure of the braided design.
First, choose a yarn that has a good level of elasticity and stitch definition. A medium-weight yarn (also known as worsted weight) works perfectly for this block because it provides enough thickness to showcase the woven design without being too bulky. For a softer look, you can opt for cotton or acrylic yarn, both of which are readily available and easy to work with. A solid color or subtle gradient is ideal to let the braided pattern stand out.
The hook size you use will depend on your yarn, but typically, a 5mm or 6mm hook works best for a medium-weight yarn. If your yarn label recommends a specific hook size, you can follow that suggestion, but feel free to adjust based on your tension and desired block size.
Before you start crocheting, gather a few other essential tools such as scissors, a tapestry needle for weaving in ends, and stitch markers. These tools will help you maintain consistency in your block’s size and structure, especially if you’re making multiple blocks for a larger project.
Now that you have your materials ready, it’s time to start crocheting your Braided/Woven Crochet Block. The next section will walk you through the basic stitches and initial rows of the block.
2. Basic Stitches for the Braided/Woven Crochet Block
The Braided/Woven Crochet Block – Tutorial begins with basic crochet stitches that most crafters are already familiar with. If you’re a beginner, don’t worry—these stitches are easy to master with a little practice.
Start by making a foundation chain. For the braided or woven look to appear properly, your foundation chain should be a multiple of a certain number (such as 24 or 32 chains), depending on the size you want your final block to be. This multiple ensures that the weaving effect will work out evenly as you progress.
Once you’ve created your foundation chain, work the first row using single crochet (sc) stitches. This row creates the base for the rest of the block and sets the stage for the braided texture. Single crochet stitches are perfect for this block because they provide a dense, sturdy fabric that will hold up well once the woven effect is added.
After the initial row, alternate between rows of single crochet and double crochet (dc) stitches. The double crochet stitches create small gaps that will later be used for weaving the strips of crochet, which form the braided effect. Continue alternating these two stitch types until you’ve completed around 8-10 rows, depending on the desired size of your block.
As you work these rows, pay close attention to your tension. Consistent tension is crucial for making sure the weaving will look even and professional. Once the main body of the block is complete, you’re ready to move on to the weaving section, which is where the magic happens.
3. Creating the Braided/Woven Effect
The defining feature of the Braided/Woven Crochet Block is the braided or woven look created by carefully weaving strips of crochet fabric through the base block. This technique adds an extra layer of texture and visual interest to your work, making it stand out from traditional crochet blocks.
To create the woven effect, you’ll first need to crochet additional strips using the same yarn and hook size. These strips are usually created using simple chain stitches or slip stitches, depending on how thick or tight you want the braid to appear. Each strip should be long enough to weave through the entire width of your crochet block.
Once you have a few strips ready, you’ll begin weaving them through the double crochet gaps that you left in the block. Start by threading the strips through the spaces, going over and under each row, just like traditional weaving. Depending on how you alternate the strips, you can create different looks, from tight braids to looser, more relaxed weaves.
It’s important to keep the tension even as you weave, so the strips lie flat and don’t pull or bunch up the base block. Once all the strips are woven in, use a tapestry needle to secure the ends by weaving them into the edges of the block, making sure they’re tight enough to hold the shape.
After you’ve completed the woven effect, step back and admire the unique texture and intricate design you’ve just created. Your Braided/Woven Crochet Block is now ready to be used in larger projects, whether it’s a blanket, pillow cover, or even a wall hanging.
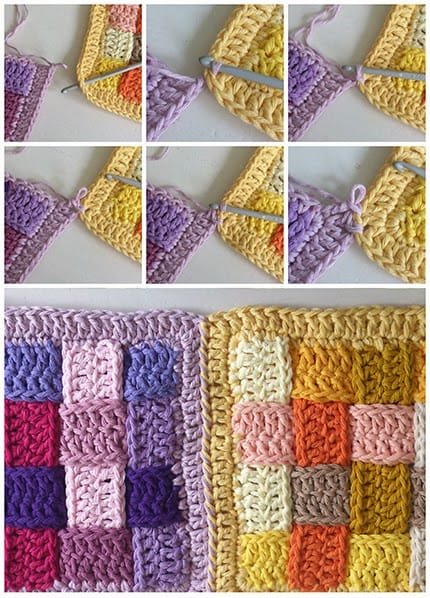
4. Joining Multiple Braided/Woven Blocks
One of the great features of the Braided/Woven Crochet Block is that it can be used in combination with other blocks to create larger projects. Whether you’re making a blanket or a decorative piece, joining multiple blocks together is the key to achieving a cohesive design.
To join your blocks, you can use several methods, depending on the final look you want to achieve. One of the easiest ways is to use a slip stitch join. Place two blocks side by side, with the right sides facing up, and slip stitch through the edges of both blocks to attach them securely. This method creates a clean and nearly invisible seam.
Alternatively, you can use the whip stitch to join your blocks. This method involves using a tapestry needle to sew the edges together, working through both loops of the crochet stitches on each block. The whip stitch is a bit more noticeable but adds a handmade feel to the project, which many crafters appreciate.
Another option is to crochet an additional row around each block before joining them. This adds a small border around each block, making the braided design stand out even more. You can use single crochet or even a decorative stitch like the crab stitch for this border.
Once your blocks are joined, the Braided/Woven Crochet Block can be turned into a variety of items, from throws to cushion covers. The versatility of this block makes it a popular choice among crochet enthusiasts.
FAQ about Braided/Woven Crochet Block – Tutorial
Q1: What is a braided or woven crochet block?
A braided or woven crochet block is a textured crochet design where strips of crochet fabric are woven through a base block to create a braided or interlocking pattern. This gives the block a unique, three-dimensional appearance.
Q2: Is the Braided/Woven Crochet Block difficult to make?
While the Braided/Woven Crochet Block might look intricate, it’s actually quite easy to make. The pattern relies on basic stitches such as single crochet and double crochet, with the woven effect added afterward. As long as you follow the tutorial, it’s suitable for beginners and advanced crocheters alike.
Q3: What type of yarn works best for a braided or woven crochet block?
A medium-weight yarn, such as worsted weight, works best for this project. It provides enough thickness to showcase the woven design without being too bulky. Cotton or acrylic yarns are great options because they offer good stitch definition.
Q4: How do I maintain even tension while weaving the strips?
To maintain even tension, weave the strips slowly and make sure to pull each one through gently, without stretching or distorting the base block. Adjust the strips as needed to ensure they lie flat and evenly across the block.
Q5: Can I use different colors for the woven strips?
Absolutely! Using different colors for the woven strips can add a beautiful contrast and make the braided pattern stand out even more. You can experiment with various color combinations to achieve the desired look.
Q6: How can I use the braided/woven crochet block in larger projects?
The braided/woven crochet block is perfect for larger projects such as blankets, scarves, or cushion covers. Simply create multiple blocks and join them using methods like slip stitching or sewing. You can also add borders for extra flair.
Join our VIP broadcast list and gain access to exclusive patterns, all for free. As a VIP member, you’ll receive the best patterns daily, delivered directly to your device. ✨📱 It’s a unique opportunity to stay up-to-date with the latest trends and designs, curated just for you. Don’t miss out on enhancing your projects and discovering new inspirations with the best patterns every day! 🎨🔝
Conclusion
In this Braided/Woven Crochet Block – Tutorial, we’ve covered all the steps to create a stunning crochet block with a unique braided texture. From selecting the right yarn to weaving the strips for a flawless braided effect, this pattern is both fun and rewarding.
Whether you’re new to crochet or looking to add a new technique to your skillset, this tutorial offers a perfect way to create eye-catching crochet blocks.
We hope you enjoyed learning how to make the Braided/Woven Crochet Block. Please share your feedback and suggestions in the comments below. We’d love to hear your thoughts and see what creative projects you come up with! Happy crocheting!

