The Beautiful Crochet Owl Keychain – Free Pattern is a fun and charming project for crocheters of all skill levels.
Whether you’re a seasoned crocheter or just beginning your crafting journey, this cute little owl keychain is perfect for sprucing up your keys or bags.
With its adorable features and simple design, it’s a great way to practice basic crochet skills while creating a delightful accessory that also makes an excellent gift.
In this guide, we will walk you through each step to create your own Beautiful Crochet Owl Keychain – Free Pattern.
We’ll cover the materials you’ll need, the stitches used, and give you some creative tips on how to personalize your owl keychain. B
y the end of this tutorial, you’ll have a beautiful little owl that can be attached to your keyring, bag, or even used as a fun decorative piece.
This project is great for using up scrap yarn you have lying around, and it’s small enough to complete in just a few hours.
The Beautiful Crochet Owl Keychain – Free Pattern is the perfect beginner-friendly project with enough room for creativity and customization. Let’s dive into the details and start crocheting this adorable owl keychain!
1. Materials You Need for the Beautiful Crochet Owl Keychain
Before starting your Beautiful Crochet Owl Keychain – Free Pattern, it’s important to gather all the materials you’ll need for this project. With the right supplies, you can create a polished and cute owl keychain that will make an impact.
1.1. Yarn
For this keychain, you’ll need a small amount of yarn in a few different colors. A medium-weight yarn (like worsted weight) is perfect for this project. You can use any colors you like for the owl’s body, wings, and facial features. A main color for the owl’s body, a contrasting color for the wings, and a couple of accent colors for the eyes and beak will make your owl stand out beautifully.
1.2. Crochet Hook
A 4mm (G-6) crochet hook is typically used for medium-weight yarn, but the size of the hook can vary depending on the yarn you choose. If you use a thinner yarn, a smaller hook will give you a tighter, more defined stitch. Make sure to adjust your hook size accordingly to avoid too loose or too tight stitches.
1.3. Keychain Ring
To turn your crochet owl into a keychain, you’ll need a small keychain ring or clasp. This ring will allow you to attach the owl to your keys, bags, or any other accessory you wish. These keychain rings are available in many craft stores and online shops.
1.4. Stitch Marker
A stitch marker will be helpful for keeping track of your rounds while crocheting the owl. It will ensure that your stitches stay even and that you don’t lose your place in the pattern.
1.5. Scissors
You’ll need a pair of scissors to cut your yarn after finishing each piece of the owl. Scissors are also handy for trimming any excess yarn or weaving in the loose ends.
1.6. Yarn Needle
A yarn needle is necessary for weaving in any loose ends when you finish your crochet owl keychain. This will ensure that your keychain looks neat and tidy and that no stray yarn is visible.
2. Basic Stitches for the Beautiful Crochet Owl Keychain
Now that you’ve gathered all your materials, it’s important to familiarize yourself with the basic stitches used in the Beautiful Crochet Owl Keychain – Free Pattern. These stitches are simple, but mastering them will give your keychain a polished, professional look.
2.1. Magic Ring
The magic ring (or adjustable ring) is a technique used to start crochet projects in the round. It allows you to crochet tightly at the center of your project. To make a magic ring, wrap the yarn around your fingers, then pull the yarn through the ring to form the first stitch. This technique is essential for creating a smooth, tight start to your crochet owl.
2.2. Single Crochet (sc)
The single crochet stitch is the most basic and fundamental stitch used in crochet. It creates a firm, tight fabric. To single crochet, insert your hook into the stitch, yarn over, and pull through. Then yarn over again and pull through both loops on the hook. Single crochet will be used extensively in the body and wings of the owl keychain.
2.3. Increase (inc)
To increase a stitch, you work two single crochet stitches into the same stitch. This is used to make the shape of the owl grow evenly. It’s important to follow the pattern’s increases to ensure the owl’s body is well-formed.
2.4. Decrease (dec)
Decreasing stitches is used to shape the owl’s head and body by making the stitches tighter together. This is typically done by crocheting two stitches together. It’s important to decrease at the right intervals to shape the owl’s body.
2.5. Slip Stitch (sl st)
The slip stitch is used to join pieces or finish off your work. It’s a simple stitch where you insert your hook into the stitch, yarn over, and pull through both the stitch and the loop on your hook. This stitch will be used to close off your owl’s body and secure any finishing touches.
2.6. Chain Stitch (ch)
The chain stitch is often used to create the foundation of a project or to add height to a stitch. It’s an essential technique for starting your work and adding texture to your crochet owl’s feathers.
3. Step-by-Step Instructions for the Beautiful Crochet Owl Keychain
Now that you’re familiar with the materials and basic stitches, let’s get started with the step-by-step instructions for the Beautiful Crochet Owl Keychain – Free Pattern. Follow these steps carefully, and you’ll have your very own crochet owl keychain in no time!
3.1. Create the Owl’s Body
Start by making a magic ring and crocheting 6 single crochet stitches into the ring. Pull the ring tight to close the hole. Continue to work in rounds, increasing the stitches until you reach the desired size for the owl’s body. You will want to make sure the body is round and even, using the increase stitches to shape the owl.
3.2. Shape the Head and Body
Once you have the body of the owl, work in rounds, gradually decreasing the stitches to shape the owl’s head. As you decrease, remember to keep your stitches tight to prevent any gaps. When the body is the right size, finish off with a slip stitch and leave a long tail to sew the owl’s eyes and beak.
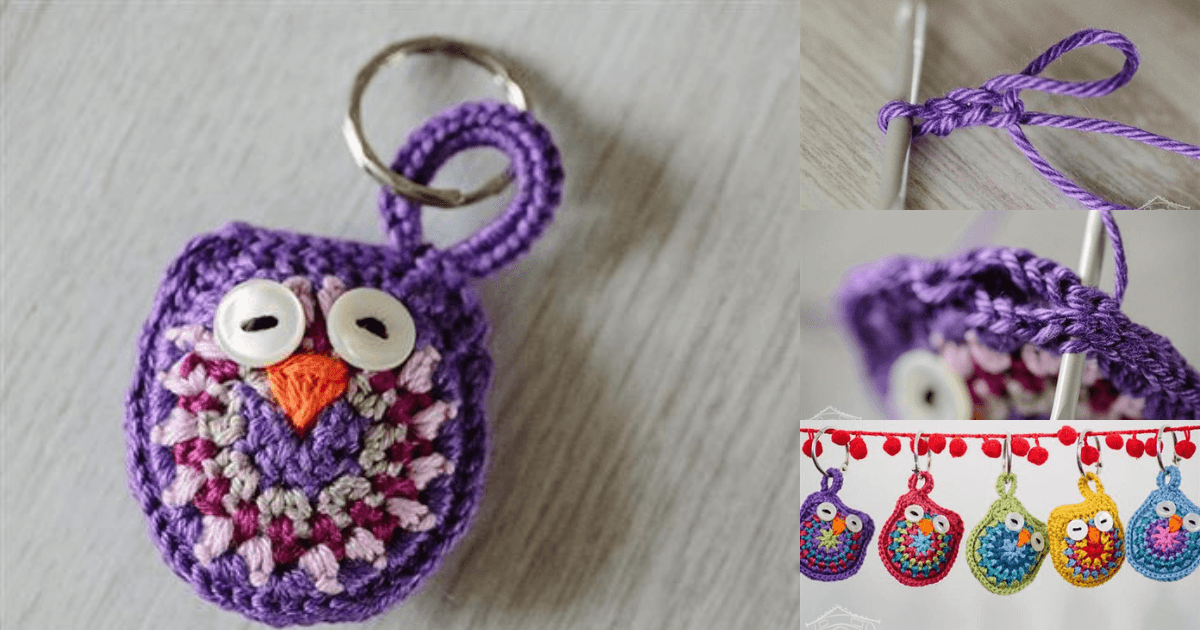
3.3. Add the Eyes
To create the owl’s eyes, crochet two small circles using a contrasting color yarn. These should be placed on the front of the owl, slightly above the center of the body. Sew them securely to the body using a yarn needle. You can choose to add a small black bead or button for the pupils to make the eyes more expressive.
3.4. Make the Beak
Crochet a small triangle for the owl’s beak using orange or yellow yarn. Attach it in the middle of the eyes, just below them, to create a cute little beak. Secure it tightly and trim any excess yarn.
3.5. Attach the Wings
Next, crochet two small wings using the same yarn as the body or a contrasting color. These should be small ovals that will be sewn on either side of the owl’s body. Attach them with a yarn needle, ensuring they are positioned symmetrically.
3.6. Add the Keychain Ring
Finally, to turn your crochet owl into a keychain, sew the keychain ring to the top of the owl’s head. Make sure it is securely attached so that the owl can be easily hung on a keyring or bag.
4. Personalizing Your Beautiful Crochet Owl Keychain
One of the best things about the Beautiful Crochet Owl Keychain – Free Pattern is how customizable it is. There are plenty of ways to add your own unique touch to the design. Here are a few ideas to get you started.
4.1. Use Different Yarn Textures
Experiment with different yarn textures to create a more dimensional look for your owl. Consider using fluffy, textured yarn for the wings or body to add a fun, tactile element to the keychain.
4.2. Add Accessories
You can add a small pom-pom to the top of your owl’s head, or even crochet a tiny scarf or sweater for your owl to wear. These small details can give your keychain a personalized flair.
4.3. Experiment with Colors
While the traditional owl colors like brown, white, and yellow work beautifully, don’t be afraid to try out bold colors. A pink owl with teal wings or a blue owl with purple eyes will give your keychain a modern, stylish twist.
4.4. Add Beads or Embellishments
For added texture and sparkle, consider sewing on small beads or sequins to the owl’s wings or body. This can give your keychain a bit of bling, making it even more eye-catching.
4.5. Create a Family of Owls
Why settle for one when you can make a whole group? Create different variations of your owl keychain using different colors, sizes, and accessories. You can make a family of owls for a fun, whimsical collection.
4.6. Experiment with Different Eye Designs
Instead of the traditional round eyes, try using different shaped buttons or crochet techniques to create unique, expressive eyes. A heart-shaped button or a large round bead can give your owl an adorable personality.
FAQ
1. What is the best yarn for a crochet owl keychain?
The best yarn for a crochet owl keychain is a medium-weight yarn like worsted weight. It’s easy to work with and creates a sturdy, durable keychain. You can also use cotton or acrylic yarn for a smooth finish.
2. How long does it take to make a crochet owl keychain?
Typically, it takes a few hours to complete a crochet owl keychain, depending on your skill level and how much detail you add. If you’re a beginner, you might take a little longer.
3. Can I make a crochet owl keychain without using a keychain ring?
Yes, if you don’t want to use a keychain ring, you can simply crochet a loop and hang the owl as a decoration or attach it to a bag as a charm.
4. Can I make a crochet owl keychain with other crochet techniques?
Absolutely! While the free pattern in this article uses basic stitches like single crochet, you can experiment with other techniques like the puff stitch or bobble stitch to add texture and dimension to your owl.
5. How do I make my crochet owl keychain stand out?
To make your crochet owl keychain unique, use fun colors, add accessories like scarves or hats, and try adding beads, sequins, or small embellishments to make your owl truly one of a kind.
6. Can I sell the crochet owl keychains I make?
Yes, you can sell the crochet owl keychains you make, as long as you follow any relevant laws regarding handcrafted goods in your area. Just make sure you’re not directly copying someone else’s pattern.
Join our VIP broadcast list and gain access to exclusive patterns, all for free. As a VIP member, you’ll receive the best patterns daily, delivered directly to your device. ✨📱 It’s a unique opportunity to stay up-to-date with the latest trends and designs, curated just for you. Don’t miss out on enhancing your projects and discovering new inspirations with the best patterns every day! 🎨🔝
Conclusion
In this tutorial, we covered the steps to create your own Beautiful Crochet Owl Keychain – Free Pattern.
From gathering materials to adding personal touches, this project is a fun and creative way to add a bit of whimsy to your day.
We hope you enjoyed learning how to make this adorable crochet keychain and that you’ll try out different variations to make it your own.
We’d love to hear your thoughts and suggestions! Please leave a comment below with your feedback, and feel free to share any ideas you have for future crochet projects.

