If you’re looking for a fun and creative project, these Baby Turtle Instructions – Free Tutorial are the perfect way to get started! Whether you’re a seasoned crafter or just beginning, this adorable baby turtle pattern is easy to follow and will leave you with a cute, handmade turtle.
You can use it as a toy, decoration, or even a thoughtful gift for a loved one. The instructions are simple, and the materials are easy to find, making this project accessible for all skill levels.
The baby turtle pattern is ideal for those who enjoy crochet or knitting. Its small size means you can complete it in a relatively short time, and the result is a charming little turtle that looks professionally crafted.
By following these step-by-step Baby Turtle Instructions, you’ll be able to create your own baby turtle in no time. With a few basic stitches and some patience, you’ll be able to bring your turtle to life!
In this tutorial, we’ll guide you through the entire process of creating the baby turtle. From gathering your materials to finishing touches, every step is covered to ensure that you achieve the best results.
So, let’s dive in and learn how to make a baby turtle with this free tutorial that’s perfect for crafters of all levels.
1. Materials Needed for the Baby Turtle Project
To get started with this Baby Turtle Instructions – Free Tutorial, you’ll first need to gather all the necessary materials. Luckily, the list is short and simple, so you should have everything you need in no time.
First, you will need yarn. Choose soft yarn in two different colors: one for the turtle’s shell and another for the body. Acrylic or cotton yarn works best, and you can go for any thickness, but a medium weight is commonly used.
You will also need a crochet hook. The size of the hook will depend on the yarn you choose. Typically, a 3.5mm to 4.5mm crochet hook is recommended for projects like this. Make sure to choose a size that works well with your yarn and gives you the desired stitch tightness.
Don’t forget stuffing for the turtle! Polyester fiberfill is commonly used to stuff amigurumi projects like this one. It will give your turtle a soft and squeezable feel.
A pair of safety eyes will bring your baby turtle to life! These small plastic eyes are safe for children’s toys and can be easily inserted into the head. You can also embroider the eyes using black yarn or thread if you prefer.
Tapestry needles are essential for sewing the turtle parts together and weaving in the ends of the yarn. These large, blunt needles are designed for yarn work and will make the final assembly of your turtle a breeze.
Lastly, you’ll need scissors to trim the yarn and make sure everything looks neat and polished. Once you have all these materials, you’re ready to start crafting your baby turtle!
2. Creating the Body and Shell of the Baby Turtle
The first step in making your baby turtle is to crochet the body. This is a straightforward process that involves basic crochet stitches, making it an excellent project for beginners. Follow these Baby Turtle Instructions – Free Tutorial carefully, and you’ll have your turtle body ready in no time.
Start by making a magic ring, which is the foundation of many amigurumi projects. This technique allows you to create a tight center for the turtle’s body without any gaps. Once your magic ring is secure, crochet six single crochets into the ring, then pull it tight to close.
Next, you will begin increasing the number of stitches in each round. This will create the round, plump shape of the turtle’s body. Continue to crochet in rounds, adding stitches evenly to expand the circle. Keep going until you reach the desired size for your turtle’s body.
Once the body is complete, it’s time to make the turtle’s shell. The shell will be a separate piece that you will attach to the body later. Start the shell the same way as the body, using a magic ring and working in rounds. However, this time you’ll use your second color of yarn to give the shell a contrasting look.
To add texture to the shell, you can experiment with different crochet stitches, such as half-double crochet or double crochet. This will create a more interesting and visually appealing shell for your turtle.
Once the shell is the right size, set it aside. You’ll attach it to the body after completing the next steps, which include creating the legs, tail, and head.
3. Assembling the Legs, Tail, and Head
Now that the body and shell of your baby turtle are complete, it’s time to focus on the smaller parts: the legs, tail, and head. These parts may seem tricky, but with these Baby Turtle Instructions – Free Tutorial, you’ll be able to create them easily.
To make the legs, start by crocheting a small oval shape. You’ll need to make four legs in total, so repeat the same steps for each leg. Keep the stitches tight and even to create sturdy legs that will help the turtle stand.
For the tail, you will crochet a small triangle. Start with a magic ring, then crochet in rounds, decreasing stitches as you go. This will create a pointed tail that you can easily attach to the back of the body.
The head is the final piece, and it’s similar to the body in terms of construction. Start with a magic ring, then increase stitches in each round to create a round head. Once the head reaches the desired size, stuff it with fiberfill and sew it onto the body.
Once all the parts are complete, it’s time to assemble the turtle. Use a tapestry needle to sew the legs, tail, and head onto the body. Make sure everything is securely attached before moving on to the next step.
After the body parts are attached, place the shell on top of the body. Sew the shell to the body using the same yarn you used for the shell, making sure it is centered and secure.
4. Finishing Touches and Personalization
Now that your turtle is assembled, you can add some finishing touches to bring it to life! The Baby Turtle Instructions – Free Tutorial wouldn’t be complete without a few personal touches.
First, attach the safety eyes to the head. Position them evenly on either side of the head and insert them securely. If you’re using embroidered eyes instead of safety eyes, use a small amount of black yarn and carefully sew the eyes in place.
Next, you can use embroidery floss or yarn to add extra details, such as a smile or nostrils on the turtle’s face. These little details will give your turtle more personality and charm.
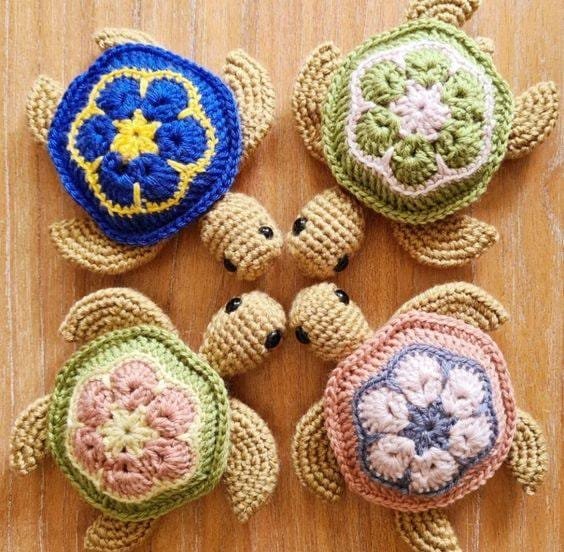
If you want to get creative, consider adding patterns or designs to the turtle’s shell. You can use different colors of yarn to create stripes, spots, or other designs on the shell. This will make your turtle truly unique!
Once all the details are added, give your turtle a final check. Make sure all parts are securely attached, and trim any loose yarn ends. If you used fiberfill, make sure the turtle is stuffed evenly so that it maintains its shape.
Your baby turtle is now complete! Take a moment to admire your work before gifting it to someone special or displaying it proudly in your home.
FAQ
What is the Baby Turtle project?
The Baby Turtle project is a crochet pattern that guides you through creating a small, handmade turtle using yarn, crochet hooks, and basic stitches. This free tutorial is ideal for beginners and experienced crafters alike.
What materials do I need for the Baby Turtle project?
You will need yarn, a crochet hook, safety eyes (or black yarn for embroidery), fiberfill for stuffing, a tapestry needle, and scissors. These simple supplies are all you need to complete the turtle.
How long does it take to make a baby turtle?
The time it takes to make a baby turtle depends on your skill level and how much time you can dedicate to the project. On average, it can take anywhere from 2 to 4 hours to complete.
Can I personalize the baby turtle?
Yes! You can personalize the baby turtle by using different colors of yarn, adding embroidery details, or creating patterns on the turtle’s shell. This allows you to make each turtle unique.
Is this project suitable for beginners?
Yes, the Baby Turtle Instructions – Free Tutorial is perfect for beginners. The pattern uses basic crochet stitches and is easy to follow. With patience and practice, anyone can create a baby turtle.
Can I use different types of yarn for this project?
Absolutely! You can use any type of yarn you like, as long as it’s compatible with your crochet hook. Just keep in mind that different yarn weights will affect the size of your finished turtle.
Join our VIP broadcast list and gain access to exclusive patterns, all for free. As a VIP member, you’ll receive the best patterns daily, delivered directly to your device. ✨📱 It’s a unique opportunity to stay up-to-date with the latest trends and designs, curated just for you. Don’t miss out on enhancing your projects and discovering new inspirations with the best patterns every day! 🎨🔝
Conclusion
In this Baby Turtle Instructions – Free Tutorial, we’ve covered all the steps needed to create an adorable baby turtle using simple materials and easy crochet techniques. From gathering your supplies to assembling the legs, tail, and head, this guide is designed to help you craft a charming turtle that can be cherished for years.
Whether you’re making the turtle as a gift or for yourself, the possibilities for customization are endless. We hope this tutorial inspires you to pick up your crochet hook and start creating! We would love to hear your feedback on this project, so please leave a comment below with your thoughts and any suggestions for future tutorials. Happy crafting!

