Angelic Crochet: Crafting Ethereal Angel Wings is a beautiful, intricate, and enchanting craft that blends the timeless art of crochet with the imagery of celestial beings.
Whether you’re an experienced crocheter or a beginner looking for a new challenge, creating angel wings through crochet can be a fulfilling and spiritually uplifting project.
These ethereal creations serve as not only a representation of delicate, heavenly beauty but also a perfect addition to your home decor, wearable items, or special occasions like weddings or Christmas.
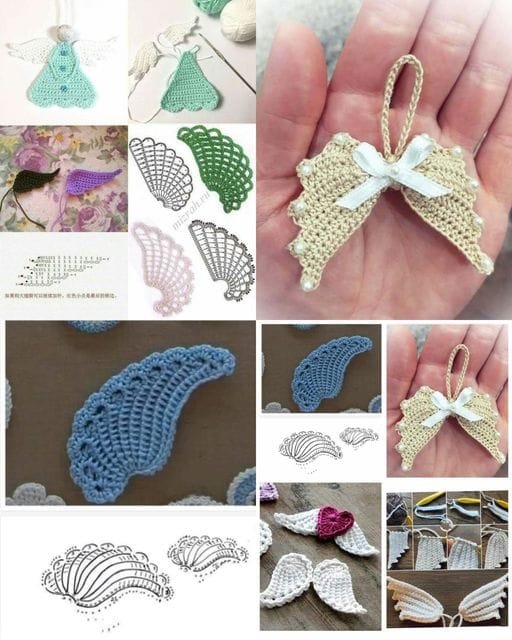
Crocheting angel wings offers a unique opportunity to work with different yarns, textures, and patterns, resulting in a customizable and personal accessory or decoration. The process involves combining basic crochet techniques with some more advanced patterns, but it is an accessible craft for people of all skill levels.
As you stitch together these beautiful wings, you will experience the satisfaction of transforming simple yarn into something that represents grace, serenity, and lightness.
In this article, we’ll guide you through the crafting process of angelic crochet wings, offer helpful tips on choosing the best materials, and provide insight into making your wings look as ethereal as possible.
We’ll also cover common mistakes to avoid, as well as variations you can use to make your crochet wings truly unique. Let’s embark on this celestial journey and learn how to make angelic crochet wings step by step!
1. Materials You’ll Need for Angelic Crochet Wings
Before you begin creating your angelic crochet wings, it’s essential to gather the right materials. The type of yarn, crochet hook, and additional accessories you use can significantly affect the outcome of your project.
Choosing the Right Yarn
For angelic crochet wings, lightweight, soft yarn is key to achieving the delicate and airy appearance. Opt for cotton, acrylic, or silk yarn, as these materials are lightweight and flexible, perfect for a soft, ethereal effect. You may also want to experiment with sparkly or metallic yarn for a magical glow, especially if you’re creating angel wings for a festive or special occasion like Christmas. White and ivory are traditional choices, but pastel colors or even silver and gold can add a unique twist to your wings.
Selecting a Crochet Hook
The right crochet hook is essential to achieving the perfect stitch and tension. For most lightweight yarns used in angelic crochet, a hook size between 2.5mm to 3.5mm works best. The exact size depends on the yarn thickness and your desired texture. Remember, a smaller hook creates a tighter stitch, which is often necessary to maintain the fine detail of the wings.
Optional Accessories and Embellishments
To add a personal touch, consider embellishing your angelic wings with beads, ribbons, or feathers. These additional elements can enhance the ethereal feel of your wings, giving them an extra dimension of beauty. If you wish to give your wings a 3D effect, stiffening agents like fabric stiffener or starch can help hold the shape and structure.
Gathering all the materials ahead of time will make the process smoother and more enjoyable. Having a clear vision of the look and feel you want for your angelic crochet wings will help guide your material choices.
2. Basic Crochet Techniques for Angelic Wings
Creating angelic crochet wings involves several basic crochet techniques that come together to form intricate and stunning designs. If you’re already familiar with these techniques, you’ll find it easier to navigate the project, but don’t worry if you’re a beginner! We’ll break down each step to help you understand how to craft each stitch.
The Foundation Chain
Start by creating a foundation chain for the wings. This chain sets the foundation for the body of the wings. For most patterns, you’ll begin by chaining between 20-40 stitches, depending on the desired size of your wings. You can adjust the chain length to create wings of different proportions. The foundation chain must be loose enough to provide flexibility but tight enough to hold the structure of the wings.
Single Crochet and Double Crochet Stitches
The basic stitches that form the angelic crochet wings include single crochet (sc) and double crochet (dc). These stitches help shape the wings and give them the volume they need to look ethereal. The single crochet stitch creates a tight fabric, which is ideal for the detailed parts of the wings, such as the central spine. The double crochet stitch, on the other hand, creates a looser, more airy fabric, which is perfect for the outer parts of the wings where you want a light and flowing texture.
Increasing and Decreasing Stitches
To shape the wings, you’ll need to use increasing and decreasing stitches. These techniques allow you to create the curved, pointed, or feather-like shapes that are characteristic of angel wings. When you increase, you add more stitches to widen the wings, and when you decrease, you reduce stitches to create tapered points. These techniques give your wings a more organic and natural look, mimicking the graceful flow of actual angel wings.
Working in the Round
If you’re making a 3D set of angelic wings, working in the round will help you create a structured shape that stands out from a flat design. This technique involves crocheting in continuous rounds, allowing you to build the wings’ shape with a defined curvature. It’s often used when creating wings that have depth or a more realistic form.
With these fundamental crochet techniques, you will start to form the basic shape of your angelic crochet wings, gradually building up texture and volume.
3. Shaping the Wings for Ethereal Beauty
Shaping is where the magic happens when crafting angelic crochet wings. The ability to shape the wings to look soft, light, and ethereal requires careful attention to detail. Below are the steps for achieving that perfect angelic silhouette.
Adding the Wing Tip and Feathers
To create the feathery look typical of angel wings, you can use feather stitches at the outer edge. This stitch involves creating a series of double crochets, followed by a chain, and then pulling the yarn tight. The result is a textured, feather-like edge that adds depth and movement to the wings. Adding feathers along the top and bottom can create the perfect finishing touch for your wings.
Layering for Depth
For more complex and dynamic wings, consider layering multiple rows or sections. Crochet a smaller version of the wings first, and then gradually add larger rows around it, creating the effect of layered feathers. This technique enhances the visual interest and gives the illusion of depth, making your angelic crochet wings appear more voluminous and light.
Using Stiffening Techniques
While yarn is naturally flexible, some designs require a more rigid structure, especially when creating large or dramatic angel wings. To maintain the shape of your wings, you can apply fabric stiffener or starch to hold the fabric in place. This step is especially important if you plan to hang the wings as a decoration or use them for a costume. Simply spray the wings with the stiffener, and allow them to dry in the desired shape.
Adding Embellishments
Embellishments can further elevate the ethereal quality of your wings. Consider adding beads along the tips or across the central spine for a shimmering effect. Ribbons can be used to tie the wings to a costume or other accessory. You can even crochet a halo to go along with your angel wings for an extra touch of divinity.
Shaping your wings to perfection can take time, but with patience and attention to detail, you’ll create stunning, celestial wings that feel as if they’re ready to take flight.
4. Variations on Angelic Crochet Wings
Once you’ve mastered the basic technique for creating angelic crochet wings, you can begin to explore different variations to suit your style or project. Here are a few ideas to get you started:
Small and Delicate Wings
For a daintier and more subtle look, consider creating smaller wings. These can be used for keychains, pendants, or even as small decor items. Smaller wings are perfect for those who want a soft touch of angelic crochet without going overboard.
Large, Dramatic Wings
If you’re looking to make a bold statement, large, dramatic wings can be created by using thicker yarn and more intricate patterns. These wings can be worn as part of a costume or displayed as showpieces at weddings or other events. Experiment with feather stitches and beads for added texture.
Winged Accessories
Beyond standalone angel wings, you can incorporate the wing design into other accessories. Try adding wings to a crocheted bag, shawl, or headpiece. This way, you can bring a little bit of the ethereal, celestial world into your everyday life.
Mixed Media Wings
For a truly unique creation, consider mixing crochet with other materials, like fabric, feathers, or even wire. This can give your wings more texture and create a fascinating contrast between the softness of crochet and the strength of other materials.
Exploring different variations allows you to create angelic crochet wings that perfectly match your vision, whether you’re making a small, intricate accessory or a large, dramatic centerpiece.
FAQ
Q1: What is the best yarn for angelic crochet wings?
A1: Lightweight, soft yarns like cotton, acrylic, or silk are ideal for creating angelic crochet wings. These yarns offer the necessary flexibility and lightness to achieve an ethereal look.
Q2: How can I make my crochet wings stiffer?
A2: To stiffen your wings, you can use fabric stiffener or starch. Simply spray or brush it onto your wings and allow them to dry in the desired shape to maintain structure.
Q3: How long does it take to make angelic crochet wings?
A3: The time it takes to make your wings depends on the size and complexity of the design. A small pair of wings may take a few hours, while larger, more detailed wings could take several days.
Q4: Can I use these wings for a costume?
A4: Yes, angelic crochet wings are perfect for costumes! Whether for Halloween, Christmas, or a special event, they can be a beautiful addition to your outfit.
Q5: What if I’m a beginner at crochet?
A5: Don’t worry! With a little practice and patience, beginners can successfully create angelic crochet wings. Start with simple patterns and gradually progress to more intricate designs as you gain confidence.
Join our VIP broadcast list and gain access to exclusive patterns, all for free. As a VIP member, you’ll receive the best patterns daily, delivered directly to your device. ✨📱 It’s a unique opportunity to stay up-to-date with the latest trends and designs, curated just for you. Don’t miss out on enhancing your projects and discovering new inspirations with the best patterns every day! 🎨🔝
Conclusion
Creating angelic crochet wings is an incredibly rewarding craft that combines creativity, skill, and a touch of celestial beauty. Whether you’re making wings for a special event, adding a unique accessory to your wardrobe, or simply exploring a new crochet technique, this craft offers endless possibilities. By following the steps outlined in this article, you’ll be able to create stunning, ethereal wings that are sure to capture attention.
We hope this guide has inspired you to try your hand at crafting angelic crochet wings. Please share your thoughts, experiences, and suggestions in the comments below – we would love to hear from you!

