The Adorable Chick Crochet Pattern is the perfect project for anyone who loves creating cute, handmade animals that melt hearts instantly.
Starting an Adorable Chick Crochet Pattern is also a great way to explore amigurumi techniques while crafting something small and manageable.
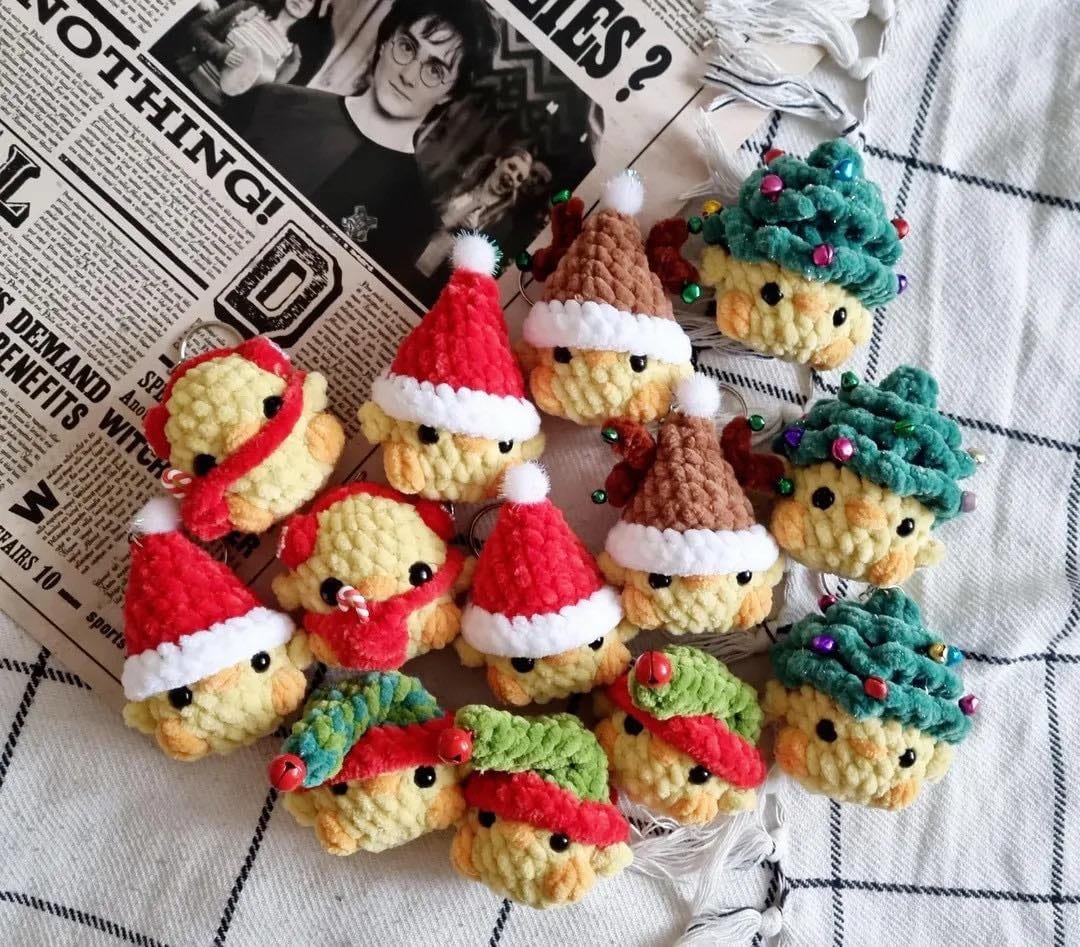
Handmade with love, these crochet chicks make wonderful gifts for baby showers, birthdays, or Easter baskets. They are reusable, durable, and filled with character.
Materials and Tools for the Adorable Chick Crochet Pattern
To make your Adorable Chick Crochet Pattern, you’ll need a few basic materials. Start with soft acrylic or cotton yarn in shades of yellow for the body, orange for the beak and feet, and a bit of white or black for the eyes if you plan to crochet them. For a smooth and neat finish, choose a yarn with a medium thickness, such as DK or worsted weight.
A crochet hook size between 2.5 mm and 3.5 mm usually works best, depending on your yarn choice. Using a smaller hook will keep your stitches tight so that the stuffing doesn’t show through the gaps. You’ll also need fiberfill stuffing, a yarn needle for sewing pieces together, scissors, and stitch markers to help you keep track of your rounds.
Safety eyes are a great option if you prefer a more lifelike look, but you can also embroider the eyes using black yarn for a soft, baby-safe finish. This makes your Adorable Chick Crochet Pattern perfect for infants or small children.
If you want to add a bit of flair, consider using pastel or speckled yarns. They create unique textures and color variations that make every chick slightly different and even more adorable. Glitter or fuzzy yarns can also make your chick stand out for seasonal decorations.
Finally, prepare a comfortable, well-lit workspace. Crocheting small amigurumi projects requires focus, and having a tidy area helps you keep track of all those little pieces. Once your tools are ready, you’re set to begin your Adorable Chick Crochet Pattern adventure.
How to Crochet the Adorable Chick Step by Step
To start your Adorable Chick Crochet Pattern, begin with a magic ring — this creates a neat, closed center. Work six single crochets (sc) into the ring and tighten it to form the base. Continue crocheting in continuous rounds, increasing the stitch count evenly to shape a round body. Usually, by round six or seven, you’ll have a smooth sphere forming the chick’s main body.
Once the body reaches your desired size, stop increasing and continue crocheting around evenly to maintain the shape. This step gives your chick a balanced, plump appearance. Before closing the bottom, lightly stuff it with fiberfill — not too tight, just enough to give it structure while keeping it squeezable.
Next, crochet the small wings. These are often made separately using a few rows of single or double crochet stitches to form a slightly oval shape. Make two identical wings and sew them symmetrically onto the sides of the body. These wings are what give your Adorable Chick Crochet Pattern its signature cute and rounded look.
For the beak, use orange yarn and crochet a tiny triangle or diamond shape. Fold it slightly and attach it to the center front of the chick’s face. The beak should be small enough to look delicate yet visible enough to bring expression to your chick’s features.
To make the feet, crochet two small ovals or use a combination of chain and slip stitches to form flat claws. Attach them securely to the bottom. If your chick will stand as a decoration, make sure the feet are evenly placed so it stays balanced.
Finally, attach the eyes — either safety eyes or embroidered ones. Position them evenly above the beak. This step brings your Adorable Chick Crochet Pattern to life, giving it that innocent, cheerful expression everyone loves.
Decorating and Personalizing Your Adorable Chick
One of the best parts of working with the Adorable Chick Crochet Pattern is how easily you can customize it. You can make each chick unique by adding accessories, adjusting the size, or experimenting with different colors. For example, try creating pastel chicks in pink, mint, or blue for Easter. They look charming displayed in a basket or along a window sill.
Add a small ribbon or bowtie around the chick’s neck for extra cuteness. You can crochet a tiny flower or hat and attach it to give your chick even more personality. These small details turn a simple project into something that feels handcrafted and full of character.
If you’re crocheting for kids, consider making a few different expressions by slightly adjusting the eyes and beak positions. A tilted eye or an off-center smile can make your Adorable Chick Crochet Pattern look shy, sleepy, or mischievous — perfect for storytelling or pretend play.
For Easter decorations, place several crochet chicks in colorful plastic eggs or small baskets. They make perfect table centerpieces or seasonal gifts. Add some artificial grass or fabric flowers for a complete springtime display.
If you’re creating the chick as part of an amigurumi set, you can design matching characters like a bunny, lamb, or duckling. Together they form an adorable farm or Easter collection that appeals to both children and adults.
Lastly, don’t forget to take photos of your finished Adorable Chick Crochet Pattern. Sharing your handmade work on social media or craft communities can inspire others and give you the satisfaction of showing your creativity to the world.
Tips and Tricks for a Perfect Adorable Chick Crochet Pattern
To make your Adorable Chick Crochet Pattern look flawless, keep a few important tips in mind. First, maintain consistent tension throughout your work. Uneven stitches can distort the shape of your chick and make it look lopsided. If your stitches are too loose, the stuffing may show; if too tight, your hands might get tired quickly.
Use stitch markers at the start of each round so you don’t lose your place. Amigurumi patterns usually work in continuous rounds, so marking the first stitch helps prevent mistakes. This small habit makes the process smoother and more enjoyable.
Stuff your chick gradually. Adding too much fiberfill at once can stretch the stitches and make the shape uneven. Instead, fill small amounts at a time, pressing gently until you achieve a soft but firm feel.
If you want your chick to stand upright, place a small round weight — like a pebble or a beanbag pellet — inside the bottom before closing it. This keeps your Adorable Chick Crochet Pattern balanced and display-ready.
To avoid visible seams, sew the parts together using a yarn needle and the same yarn color. Take your time with this step; neat finishing makes your chick look professional. For an extra polished appearance, you can lightly brush the finished piece with a soft toothbrush to fluff the yarn surface.
Finally, always enjoy the process. Crochet is about relaxation and creativity as much as the finished result. Each time you make a chick, it becomes easier and more enjoyable — and before long, you’ll have a whole flock of adorable handmade companions.
FAQ About the Adorable Chick Crochet Pattern
1. Is the Adorable Chick Crochet Pattern beginner-friendly?
Yes! It’s perfect for beginners. The pattern uses basic stitches such as single crochet and simple increases and decreases, making it easy to follow.
2. How long does it take to make one chick?
Typically, a small chick takes about two to three hours, depending on your speed and experience level.
3. What kind of yarn should I use for the best result?
Soft acrylic or cotton yarn in light yellow is ideal. Both types hold shape well and give a smooth, fluffy look.
4. Can I use different colors?
Absolutely! Try pastel pink, mint, white, or even multicolored yarns for a fun twist. Bright variations make each Adorable Chick Crochet Pattern unique.
5. How do I keep the chick’s shape firm?
Use tight stitches and stuff evenly. For display pieces, you can insert a small cardboard disc at the base to keep it flat.
6. Are safety eyes safe for children?
Safety eyes are fine for older kids, but for infants, it’s best to embroider the eyes using yarn to avoid choking hazards.
7. Can I wash my crochet chick?
Yes, hand wash gently in cool water, reshape, and air dry. Avoid hot water to keep the yarn from stretching or fading.
8. How can I make the chick stand up properly?
Use a heavier stuffing at the bottom or add a small weight like dried beans or pebbles sealed in fabric to help balance it.
Conclusion
The Adorable Chick Crochet Pattern is more than just a cute craft — it’s a joyful creative experience that combines simplicity, artistry, and charm.
With just a bit of yarn, time, and patience, you can bring to life a delightful handmade chick that adds warmth to any space. From Easter decorations to thoughtful gifts, these little crochet creations spread happiness wherever they go.
Now it’s your turn to grab your yarn and hook, and start crafting your own Adorable Chick Crochet Pattern today! I’d love to hear your honest opinions, experiences, and ideas — share your thoughts and suggestions so we can keep making the crochet world even more adorable together.

