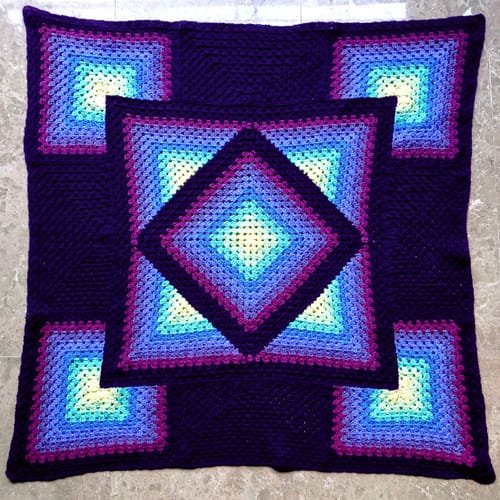
If you’re looking for a crochet project that combines elegance, charm, and a touch of tradition, the Squared Diamond Granny Throw Crochet – Tutorial is just what you need. This stunning crochet throw features a beautiful squared diamond design, perfect for anyone wanting to add a touch of sophistication to their home décor.
Whether you’re an experienced crocheter or new to the craft, this tutorial will guide you step-by-step through the process of creating your own Squared Diamond Granny Throw.
Crochet enthusiasts love granny squares because they are versatile and easy to adapt to any project. The Squared Diamond Granny Throw takes the classic granny square and adds a modern twist by creating a diamond shape within the squares. The result is a unique and eye-catching pattern that’s perfect for a throw, blanket, or even a decorative piece for your home.
This tutorial will cover everything you need to know, from choosing your yarn and crochet hook to finishing touches like edging. You’ll learn how to create the squared diamond pattern, join the squares together, and finish the throw beautifully.
Let’s dive into this exciting Squared Diamond Granny Throw Crochet – Tutorial and create a masterpiece!
1. Choosing Yarn and Hook for the Squared Diamond Granny Throw
Before starting your Squared Diamond Granny Throw, it’s important to choose the right yarn and crochet hook. The materials you select will have a big impact on the look, feel, and durability of your throw.
When it comes to yarn, the Squared Diamond Granny Throw looks stunning in both solid and variegated colors. If you prefer a classic, elegant look, choose a soft, neutral yarn such as cream, gray, or pastel shades. For a more vibrant and fun throw, consider using bold, bright colors or a variegated yarn that adds natural color changes throughout your work. Wool or wool blends work well for this project as they provide warmth, while acrylic yarns are durable and easy to care for.
As for the crochet hook, you’ll need to select a size that complements your yarn. Most yarn labels recommend a specific hook size, but for the Squared Diamond Granny Throw, you’ll likely be using a 5mm to 6mm hook. If you want a tighter, more structured throw, go with a smaller hook. If you prefer a looser, drapier throw, opt for a larger hook.
Once you’ve chosen your yarn and hook, you’re ready to begin the exciting process of creating your Squared Diamond Granny Throw. In the next section, we’ll dive into how to crochet the squared diamond pattern.
2. Crocheting the Squared Diamond Pattern
The hallmark of the Squared Diamond Granny Throw is its unique squared diamond design. This pattern builds upon the classic granny square, but with an added twist that creates the striking diamond shape within each square.
To start, you’ll need to know how to crochet a basic granny square. If you’re already familiar with this technique, the Squared Diamond Granny Throw Crochet pattern will be easy to pick up. The first step is creating the center of the square. Begin with a magic ring, chain three stitches, and then work double crochet stitches into the ring. You’ll create a square by working into the corners, increasing at each corner to keep the square shape.
The diamond pattern comes in as you continue to build the granny square. To create the diamond effect, you’ll change yarn colors or stitch techniques at certain intervals. By alternating between regular granny square stitches and the special diamond stitches, you’ll form a diamond in the center of each square. This is what gives the Squared Diamond Granny Throw its unique and beautiful design.
As you work through each square, be sure to keep your stitches consistent and even. The diamond pattern will stand out more if your tension is regular throughout. Once you’ve finished crocheting your squares, it’s time to move on to joining them together.
3. Joining the Granny Squares
Now that you’ve crocheted several squares, it’s time to join them to form the Squared Diamond Granny Throw. This step is crucial for ensuring that your throw looks cohesive and polished.
There are several methods for joining granny squares, but for the Squared Diamond Granny Throw, a seamless join is often preferred. One of the most popular methods is the slip stitch join, which creates a nearly invisible seam. To do this, simply place two squares together, right sides facing each other, and slip stitch through the back loops of both squares. This method ensures that your throw lies flat and that the squared diamond pattern flows smoothly from one square to the next.
Another option is the whipstitch method. With this method, you sew the squares together using a yarn needle. This is a faster way to join your squares, but the seam will be more noticeable. However, some crocheters prefer this look, as it adds a bit of texture and visual interest to the throw.
No matter which joining method you choose, take your time to ensure the squares are aligned correctly. This will help maintain the symmetry of the Squared Diamond Granny Throw and ensure that the diamond patterns match up perfectly.
4. Adding the Finishing Touches
Once your Squared Diamond Granny Throw is fully assembled, it’s time to add the finishing touches. These final steps will give your throw a professional look and ensure it lasts for years to come.
The first step is to block your throw. Blocking involves wetting or steaming your throw and then pinning it into shape to ensure that it dries evenly. This step is especially important for the Squared Diamond Granny Throw, as it helps to define the diamond patterns and straighten the edges of your squares. Use blocking mats and rust-proof pins to gently stretch your throw to the desired dimensions, and leave it to dry completely.
Next, consider adding a border to your throw. A border not only helps to frame the design but also adds extra durability to the edges of your throw. For the Squared Diamond Granny Throw, a simple single crochet or double crochet border works beautifully. If you want to add more texture, you can experiment with a shell or picot edge.
Finally, weave in all your loose ends using a yarn needle. This step is often tedious but essential for ensuring your throw looks neat and tidy. With all the loose ends woven in, your Squared Diamond Granny Throw is ready to be enjoyed!
FAQ About Squared Diamond Granny Throw Crochet
Q1: What is the best yarn for the Squared Diamond Granny Throw?
The best yarn for the Squared Diamond Granny Throw depends on your preferences. Wool or wool blends add warmth, while acrylic yarn is more affordable and easy to care for. Variegated yarn can add a dynamic color change to the diamond pattern.
Q2: Can I adjust the size of the Squared Diamond Granny Throw?
Yes, you can adjust the size by adding or reducing the number of granny squares. Simply crochet more or fewer squares based on the size you desire, whether it’s a smaller throw or a larger blanket.
Q3: How do I keep my tension consistent throughout the project?
Keeping your tension consistent is important for the diamond pattern to stand out. Practice holding your yarn and hook the same way throughout your work and take breaks if needed to avoid hand fatigue, which can affect tension.
Q4: Is blocking necessary for the Squared Diamond Granny Throw?
Yes, blocking is recommended for the Squared Diamond Granny Throw as it helps to define the diamond patterns and straighten the edges. This step ensures your throw has a polished, professional finish.
Q5: What size crochet hook should I use for this project?
A 5mm to 6mm crochet hook is typically used for this pattern, but you should adjust the hook size based on your yarn and tension. A smaller hook will create a tighter throw, while a larger hook will give a looser drape.
Q6: Can I use this pattern for other projects besides a throw?
Absolutely! The Squared Diamond Granny Throw pattern can be adapted for pillows, blankets, or even scarves. Just adjust the number of squares based on the project you want to create.
Join our VIP broadcast list and gain access to exclusive patterns, all for free. As a VIP member, you’ll receive the best patterns daily, delivered directly to your device. ✨📱 It’s a unique opportunity to stay up-to-date with the latest trends and designs, curated just for you. Don’t miss out on enhancing your projects and discovering new inspirations with the best patterns every day! 🎨🔝
Conclusion
The Squared Diamond Granny Throw Crochet – Tutorial is a fun and rewarding project that combines traditional granny squares with a modern diamond design. Whether you’re making this throw for yourself or as a gift, the results are sure to impress. Throughout this tutorial, we’ve covered everything from choosing the right yarn and hook to crocheting the squared diamond pattern and finishing the throw with blocking and edging.
We hope you’ve enjoyed this tutorial and feel inspired to create your own Squared Diamond Granny Throw. If you have any questions or suggestions, please feel free to leave a comment below. We’d love to hear your thoughts and see your finished projects! Happy crocheting!

