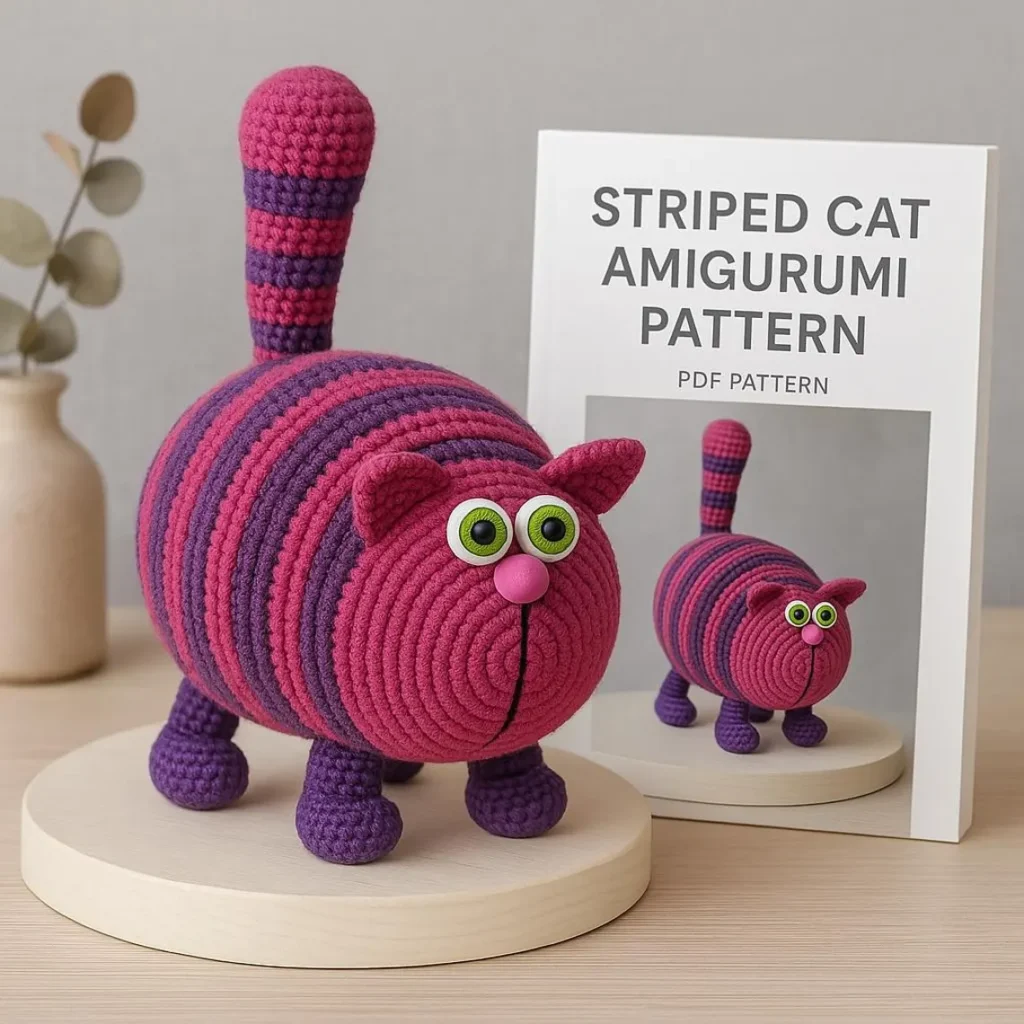
Striped Cat Amigurumi Pattern has become a favorite among crochet enthusiasts and toy makers worldwide. This adorable craft allows creators to design cute, striped cat figures that are both collectible and fun to make. Whether you are a beginner or an experienced crocheter, this Striped Cat Amigurumi Pattern provides a charming project that enhances your skills.
Creating a Striped Cat Amigurumi Pattern is not just about crafting a toy; it is about expressing creativity. The patterns guide you through every step, from selecting the right yarn colors to stitching the smallest details that bring your cat to life. Many crafters find joy in customizing their cats with different stripes, expressions, and sizes, making each piece unique.
This Striped Cat Amigurumi Pattern is perfect for gifts, home décor, or personal collections. With a few tools and a bit of patience, you can create an endearing plush cat that captures the imagination. The simplicity of amigurumi techniques combined with the charm of stripes makes this pattern accessible to many.
Choosing the Right Materials for Your Striped Cat Amigurumi Pattern
Selecting high-quality materials is crucial for the success of your Striped Cat Amigurumi Pattern. Using soft cotton or acrylic yarn ensures that the toy is cuddly and durable. Consider choosing contrasting colors for the stripes to make your cat visually striking.
A suitable crochet hook is essential. The recommended size depends on the yarn thickness, but generally, a 2.5mm to 4mm hook works well for amigurumi. Ensuring the stitches are tight will help your striped cat maintain its shape over time.
Safety eyes or embroidered eyes enhance the cat’s personality. If the toy is intended for children, opt for securely attached eyes to prevent any hazards. Choosing an eye size that complements the overall size of your cat is important.
Stuffing is another key factor. Polyester fiberfill is widely used for its softness and ability to hold shape. Distribute the stuffing evenly, especially in the head and body areas, to achieve a balanced look.
You may also need a yarn needle for sewing pieces together and weaving in ends. A stitch marker helps keep track of rounds, which is crucial for maintaining consistent stripe patterns.
Finally, scissors and a measuring tape ensure your pieces are precise. Correct measurements contribute to a polished finish, making your Striped Cat Amigurumi Pattern truly professional-looking.
Step-by-Step Guide to Crocheting Your Striped Cat
Start by creating the head. Form a magic ring and crochet in rounds, gradually increasing until you reach the desired size. Alternate yarn colors according to the stripe sequence you want for your Striped Cat Amigurumi Pattern.
The body follows a similar process but usually involves fewer increases to maintain a cylindrical shape. Pay attention to stitch count to ensure the body proportions match the head.
Limbs and tail are crafted separately. Crocheting them with consistent tension is key for symmetry. Once finished, attach them carefully to the body using a yarn needle.
Ears are often small triangles. Crocheting them in one color or adding a stripe enhances the cat’s charm. Placement is important; symmetrical ears create a balanced appearance.
Stripes are achieved by changing yarn colors at the end of each round or row. Planning the stripe sequence in advance ensures a cohesive design throughout the Striped Cat Amigurumi Pattern.
Finally, assemble all parts and secure loose ends. Add any finishing touches, like embroidered whiskers or a tiny nose, to complete your charming striped cat.
Customizing Your Striped Cat Amigurumi Pattern
Customization is where your Striped Cat Amigurumi Pattern truly shines. Experiment with different color palettes to create unique cats. Bold stripes give a playful look, while subtle shades create a more realistic appearance.
Eye shapes and sizes can drastically change the personality of your cat. Large, round eyes convey innocence, while narrower eyes give a mischievous look.
Accessories such as tiny scarves, bows, or collars add character. They are optional but can enhance the toy’s appeal, especially if you plan to gift it.
Adjusting the size of the cat is easy by using different yarn weights or crochet hook sizes. Larger cats are great for cuddling, while smaller versions make charming collectibles.
Pattern variations allow you to explore textures. Consider using different yarn types, such as fluffy or variegated yarn, to add depth and interest.
Even facial expressions can be customized. Simple embroidery stitches can create smiles, frowns, or quirky looks, making your Striped Cat Amigurumi Pattern uniquely yours.
Common Mistakes and How to Avoid Them
One common mistake in creating a Striped Cat Amigurumi Pattern is uneven tension. Uneven stitches can distort the cat’s shape, making it lopsided or floppy. Maintaining consistent tension ensures a neat finish.
Another mistake is skipping stitch markers. Without markers, it’s easy to lose track of rounds, causing inconsistencies in stripe placement. Always mark your rounds.
Overstuffing or understuffing can ruin the final look. Too much stuffing stretches the stitches, while too little makes the cat floppy. Find a balance to keep the shape firm yet soft.
Incorrect yarn color changes can disrupt the stripe pattern. Plan your color changes carefully and weave in ends neatly to maintain a professional appearance.
Misplacing limbs or ears can affect proportions. Lay out all pieces before sewing to ensure correct positioning. Accuracy in assembly is critical for symmetry.
Finally, neglecting finishing touches like embroidered features can make the toy look incomplete. Spend a few extra minutes adding details, as they bring the Striped Cat Amigurumi Pattern to life.
FAQ About Striped Cat Amigurumi Pattern
Q: Can beginners follow the Striped Cat Amigurumi Pattern?
A: Yes, this pattern is suitable for beginners with basic crochet knowledge. Clear instructions and simple stitches make it accessible.
Q: What yarn is best for making a striped cat?
A: Soft cotton or acrylic yarn is ideal. Choose contrasting colors to highlight the stripes effectively.
Q: How do I make my cat safe for children?
A: Use embroidered eyes instead of plastic ones and securely attach all parts to avoid choking hazards.
Q: Can I adjust the size of the striped cat?
A: Absolutely. Use different yarn thickness or crochet hook sizes to make larger or smaller cats.
Q: How do I keep the stripes even?
A: Plan your color changes ahead and use stitch markers to track rounds. This ensures uniform stripes.
Q: Can I sell the cats I make?
A: Yes, handmade amigurumi can be sold, but check local regulations and consider crediting the original pattern creator if necessary.
Q: How do I clean my striped cat amigurumi?
A: Hand wash gently in cold water and air dry. Avoid machine washing to maintain the shape and color integrity.
Conclusion
Creating a Striped Cat Amigurumi Pattern is a rewarding experience that blends creativity with craftsmanship. By carefully choosing materials, following the step-by-step guide, and customizing details, you can create adorable striped cats that charm everyone. Avoid common mistakes to ensure a polished, professional-looking toy.
Now that you have learned the techniques for making your striped cat, try experimenting with colors, sizes, and accessories to make each one unique. Don’t forget to share your creations and leave your honest opinions and suggestions. Your feedback helps improve patterns and inspires new ideas in the amigurumi community.