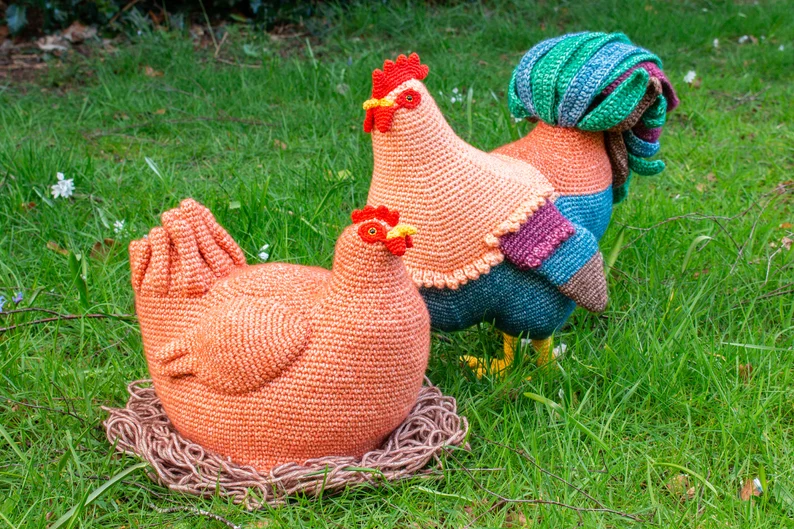
Creating a Rooster Crochet Pattern – Full Size Rooster Amigurumi Pattern is an exciting and rewarding crochet project that allows you to craft a vibrant, lifelike rooster.
Whether you’re a seasoned crocheter or just starting out, this pattern offers a fun and creative way to showcase your skills. Amigurumi patterns like this one are known for their intricate details, and crafting a full-size rooster will truly make your work stand out.
This Rooster Crochet Pattern is perfect for home décor, gifts, or even as a unique addition to your crochet collection.
Using this Rooster Crochet Pattern – Full Size Rooster Amigurumi Pattern, you’ll get to experiment with colors, textures, and techniques to bring your rooster to life. The step-by-step guide will walk you through the entire process, ensuring you create a stunning piece that captures the essence of this charming animal.
Crocheting amigurumi can sometimes feel daunting, but with patience and the right pattern, you can easily craft this rooster with amazing results.
In this article, we will dive into how to crochet your very own rooster, including the materials you’ll need and the steps to complete each section of the rooster.
Get ready to bring this project to life with a detailed Rooster Crochet Pattern – Full Size Rooster Amigurumi Pattern that will have you feeling proud of your crochet skills in no time!
1. Gathering Materials for Your Rooster Crochet Pattern
Before you begin crocheting your Rooster Crochet Pattern – Full Size Rooster Amigurumi Pattern, it’s essential to gather all the necessary materials. Having the right tools and supplies will make the process smoother and more enjoyable.
First, choose a high-quality yarn for your rooster. For a realistic look, consider using cotton or acrylic yarn in shades of red, white, yellow, and black. These colors will mimic the natural appearance of a rooster and give your project a lifelike finish.
Next, you’ll need a crochet hook that matches the weight of your yarn. Typically, a 3.5 mm to 4.0 mm hook works best for amigurumi patterns, ensuring tight, uniform stitches that hold the stuffing inside your rooster securely.
Another crucial material is the stuffing. Polyfill is an excellent choice for filling your rooster, providing it with a soft, squeezable texture. You’ll also need safety eyes for the rooster’s face, or you can choose to embroider them if you prefer a handmade look.
Finally, don’t forget scissors, a tapestry needle, and stitch markers. These tools will help you cut yarn, sew the parts of the rooster together, and track your progress through the pattern.
Once all your materials are ready, you’re prepared to start working on the Rooster Crochet Pattern – Full Size Rooster Amigurumi Pattern.
2. Crocheting the Body of Your Full-Size Rooster
The body of your rooster is the foundation of the Rooster Crochet Pattern – Full Size Rooster Amigurumi Pattern. Start by crocheting a simple oval or round shape, depending on the pattern instructions.
Begin with a magic ring and crochet in rounds, increasing stitches as you go to form the base of the body. The body should be firm and sturdy to support the other parts of the rooster. Use stitch markers to help track your rounds, ensuring your body shape remains even.
Once the base is established, continue crocheting upward, shaping the body as you go. Gradually decrease stitches to taper the top of the rooster’s body. This creates a more natural shape for the torso.
Stuff the body with polyfill as you near completion. Make sure to add enough stuffing for a solid shape, but avoid overstuffing, as this can stretch the stitches and create gaps.
Finish off the body by closing it securely, weaving in the yarn ends to prevent unraveling. With the body complete, you now have the base for attaching the other features of the Rooster Crochet Pattern – Full Size Rooster Amigurumi Pattern.
3. Crafting the Rooster’s Head and Comb
The rooster’s head and comb are key elements in the Rooster Crochet Pattern – Full Size Rooster Amigurumi Pattern, giving it a distinct and recognizable appearance.
Start by crocheting the head in a round shape, similar to the body. Use a smaller size for the head, and ensure it is proportional to the body. As you crochet, remember to stuff the head with polyfill for a firm, yet soft texture.
The rooster’s comb is typically red and sits atop the head. To crochet the comb, create small triangular or oval shapes that mimic the natural look of a rooster’s crown. You can attach these directly to the head using a tapestry needle and matching yarn.
Once the head and comb are complete, use your safety eyes or embroidery thread to add the rooster’s eyes. Position them evenly on either side of the head to create a balanced look. You can also embroider or crochet a small beak for the rooster using yellow or orange yarn.
With the head and comb finished, attach them securely to the body. Your rooster is starting to take shape as you move forward in the Rooster Crochet Pattern – Full Size Rooster Amigurumi Pattern.
4. Creating the Wings, Tail, and Finishing Touches
The final steps in your Rooster Crochet Pattern – Full Size Rooster Amigurumi Pattern involve creating the rooster’s wings, tail, and other small details that bring the project to life.
Start with the wings by crocheting two identical pieces in the same color as the body or using a contrasting shade for added visual interest. The wings can be simple, oval shapes or more detailed with small feathers. Once completed, sew them onto the sides of the rooster’s body, positioning them just below the neck.
Next, craft the rooster’s tail. The tail is one of the most colorful and striking features of a rooster, so feel free to experiment with different yarn colors and textures. Crocheting long feather-like pieces and arranging them in a fan shape will give the rooster a bold and dramatic tail.
Attach the tail securely to the back of the rooster’s body. Finally, check for any loose ends or uneven stitches. Weave in any remaining yarn ends, and make sure all parts are firmly attached to complete your Rooster Crochet Pattern – Full Size Rooster Amigurumi Pattern.
FAQ: Rooster Crochet Pattern – Full Size Rooster Amigurumi Pattern
Q1: What type of yarn is best for the Rooster Crochet Pattern? A: For the Rooster Crochet Pattern – Full Size Rooster Amigurumi Pattern, cotton or acrylic yarn is recommended. These types of yarn offer durability, ease of use, and come in a wide variety of colors to give your rooster a realistic and vibrant look.
Q2: How long does it take to complete this rooster pattern? A: The time to complete the Rooster Crochet Pattern – Full Size Rooster Amigurumi Pattern depends on your crochet experience and the size of the rooster. On average, it may take anywhere from a few days to a week.
Q3: Can I use safety eyes for the rooster? A: Yes, safety eyes are a great option for adding detail to the Rooster Crochet Pattern – Full Size Rooster Amigurumi Pattern. Alternatively, you can embroider the eyes for a more handmade appearance.
Q4: Is this pattern suitable for beginners? A: While the Rooster Crochet Pattern – Full Size Rooster Amigurumi Pattern includes some detailed steps, it is suitable for beginners with basic crochet skills. Following the pattern carefully will guide you through the process.
Q5: What hook size should I use? A: A 3.5 mm or 4.0 mm crochet hook works well for this pattern, as it creates tight, sturdy stitches ideal for amigurumi projects like the Rooster Crochet Pattern – Full Size Rooster Amigurumi Pattern.
Q6: How do I keep the stuffing inside the rooster? A: Use tight, uniform stitches and stuff the rooster gradually. Overstuffing can stretch the stitches, so add stuffing in small amounts as you crochet.
Join our VIP broadcast list and gain access to exclusive patterns, all for free. As a VIP member, you’ll receive the best patterns daily, delivered directly to your device. ✨📱 It’s a unique opportunity to stay up-to-date with the latest trends and designs, curated just for you. Don’t miss out on enhancing your projects and discovering new inspirations with the best patterns every day! 🎨🔝
Conclusion
In this article, we’ve walked through the process of creating a Rooster Crochet Pattern – Full Size Rooster Amigurumi Pattern, from gathering materials to crafting each part of the rooster.
With patience and careful attention to detail, you can complete a lifelike rooster that’s perfect for display or gifting. We hope you found this guide helpful! Please share your thoughts and any suggestions for future patterns in the comments below.