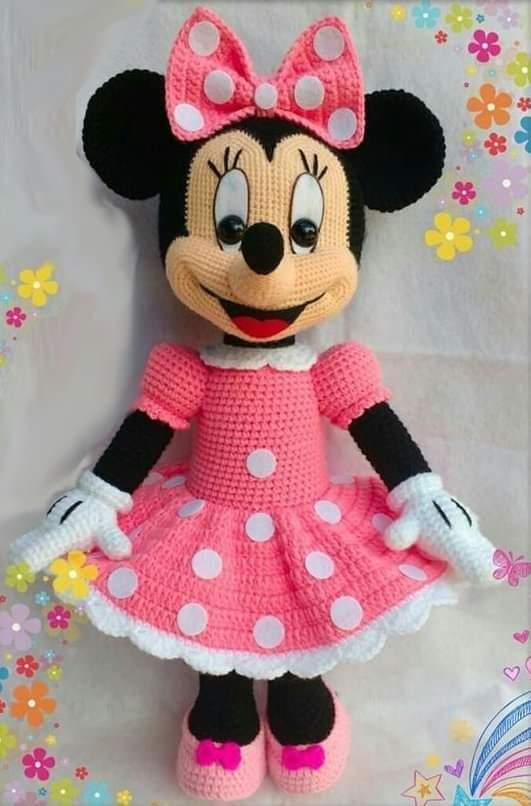
If you’re a fan of crochet and adorable characters, this Minnie Mouse Amigurumi – Free Pattern is perfect for you! This delightful crochet project allows you to create your very own Minnie Mouse, complete with her iconic bow and polka-dotted dress.
Amigurumi, the Japanese art of crocheting small stuffed toys, is a fun and rewarding way to express your creativity, and this Minnie Mouse pattern is sure to bring a smile to anyone who sees it.
Whether you’re making this as a gift, a decorative piece, or simply for your own enjoyment, this guide will help you through every step of the process.
Amigurumi patterns can vary greatly in complexity, but this Minnie Mouse Amigurumi – Free Pattern is designed to be accessible to crocheters of all skill levels.
Beginners will find it easy to follow, while experienced crafters can enjoy the nostalgic charm of this beloved character. The materials are simple and straightforward, allowing you to get started with just a few essential supplies.
In this article, we will take you through the process of creating your own Minnie Mouse Amigurumi.
From gathering materials and understanding basic crochet techniques to the step-by-step instructions for crafting each part of Minnie, we’ll ensure that you have all the information you need. Let’s dive into the fun world of crochet with this adorable pattern!
1. Gathering Your Materials for the Minnie Mouse Amigurumi
Before starting your Minnie Mouse Amigurumi – Free Pattern, it’s crucial to gather all the necessary materials. Having everything on hand will make the process smoother and more enjoyable.
- Yarn: Choose yarn in various colors, primarily black, white, red, and yellow. A worsted weight yarn is ideal for amigurumi projects. Look for soft, durable yarns that will hold their shape well.
- Crochet Hook: A size G (4.0 mm) crochet hook is commonly recommended for this pattern. However, you can adjust the hook size according to the yarn you select.
- Stuffing: Polyester fiberfill stuffing is essential for giving your Minnie Mouse structure and making her cuddly. Ensure it’s hypoallergenic if you plan to gift her to a child.
- Safety Eyes: If you want to add extra character to your amigurumi, consider using safety eyes. These are available in various sizes and can give Minnie a playful look.
- Stitch Markers: These will help you keep track of your stitches, especially in rounds. They are essential for maintaining the shape of your project.
- Tapestry Needle: A tapestry needle is necessary for weaving in ends and sewing together different parts of your amigurumi once it’s completed.
By gathering all these materials ahead of time, you’ll be well-prepared to start your Minnie Mouse Amigurumi – Free Pattern and avoid interruptions.
2. Basic Crochet Techniques for Amigurumi
Understanding basic crochet techniques is vital for successfully completing your Minnie Mouse Amigurumi – Free Pattern. Here’s a quick overview of some essential skills you’ll need:
- Magic Ring: This technique creates a tight starting loop for your crochet rounds. To make a magic ring, wrap the yarn around your fingers, insert your hook, and pull up a loop. Then crochet your first round into this loop.
- Single Crochet (sc): This is the foundation of most amigurumi projects. Insert your hook into the stitch, yarn over, pull up a loop, yarn over again, and pull through both loops on your hook.
- Increase (inc): This technique involves crocheting two single crochets in the same stitch to make your piece wider. It’s indicated in patterns as “inc” or “2 sc in the same stitch.”
- Decrease (dec): This method reduces the number of stitches and helps shape your amigurumi. To decrease, crochet two single crochets together by inserting your hook into both stitches and completing them as one.
- Joining Rounds: When working in rounds, it’s essential to join each round correctly to avoid gaps. Use a slip stitch to join to the first stitch of the round and then chain one to start the next round.
- Weaving in Ends: After completing your amigurumi, it’s important to weave in all loose ends for a neat finish. Use a tapestry needle to tuck the ends back into the stitches.
By mastering these techniques, you’ll find the Minnie Mouse Amigurumi – Free Pattern easier to follow, and your finished project will look polished and professional.
3. Step-by-Step Instructions for the Minnie Mouse Amigurumi
Now it’s time to dive into the fun part: creating your Minnie Mouse Amigurumi – Free Pattern! Follow these step-by-step instructions to crochet each part of Minnie Mouse.
Head and Body
- Start with the Magic Ring: Make a magic ring with black yarn and crochet 6 single crochets into the ring. Pull the tail to close the loop.
- Increase: In the next round, make 2 single crochets in each stitch for a total of 12 stitches.
- Continue Increasing: Work two single crochets in the next round (18 stitches), then the following round will have 2 single crochets in every third stitch (24 stitches).
- Crochet Even: Continue crocheting in rounds without increases until the body measures about 6 inches.
- Decrease for Shape: Start decreasing to shape the head by crocheting 2 single crochets together. Repeat this in the next few rounds until you have about 6 stitches left.
- Stuff and Close: Stuff the head and body with fiberfill, then pull the tail to close the hole and weave in the ends.
Ears
- Magic Ring for Ears: Create a magic ring with black yarn and make 6 single crochets into it.
- Increase: In the next round, make 2 single crochets in each stitch (12 stitches).
- Shape Ears: Continue to crochet evenly for about 3 more rounds, then decrease until you have 6 stitches. Stuff lightly and sew the ears onto the head.
Bow
- Crochet the Bow: Using red yarn, chain 10. Turn and make 1 single crochet in each chain across.
- Fold and Shape: Fold the bow in half and sew the center together. Attach to the top of Minnie’s head.
- Add Polka Dots: Use white yarn to add small stitches for polka dots on the bow, giving it that classic Minnie look.
Final Assembly
- Attach Eyes: Sew on safety eyes or embroider eyes using black yarn.
- Sew Together: Attach the head to the body securely.
- Dress Design: Optionally, you can crochet a dress using red yarn with white polka dots or any fabric scraps you have.
Following these steps will help you successfully complete your Minnie Mouse Amigurumi – Free Pattern, leaving you with a charming plush toy.
4. Tips for Perfecting Your Minnie Mouse Amigurumi
To ensure your Minnie Mouse Amigurumi – Free Pattern turns out beautifully, here are some helpful tips to keep in mind:
- Take Your Time: Don’t rush through the process. Enjoy each step of crocheting Minnie Mouse, and don’t hesitate to rip back stitches if something doesn’t look right.
- Experiment with Colors: While classic colors are great, don’t be afraid to get creative. Experiment with different yarns and colors to make your Minnie unique.
- Practice Makes Perfect: If you’re new to amigurumi, practice the basic techniques on smaller projects before diving into Minnie Mouse.
- Join Online Communities: Look for crochet groups or forums online where you can share your progress, ask questions, and get tips from fellow crocheters.
- Document Your Process: Take photos of each step to keep track of your work. This can be helpful for future reference or if you want to recreate the project later.
- Add Personal Touches: Feel free to personalize your Minnie Mouse with accessories or different outfits to make her truly your own.
These tips will enhance your crocheting experience and help you create a delightful Minnie Mouse Amigurumi that you can cherish or gift.
FAQ about Minnie Mouse Amigurumi – Free Pattern
1. Is this Minnie Mouse Amigurumi pattern suitable for beginners?
Yes, this pattern is designed to be accessible for crocheters of all skill levels, including beginners.
2. What yarn should I use for this pattern?
A worsted weight yarn in black, white, red, and yellow is recommended for making your Minnie Mouse.
3. How long does it take to complete the Minnie Mouse Amigurumi?
The time varies depending on your crochet skills, but most people can complete this project in a few hours.
4. Can I customize the pattern?
Absolutely! Feel free to change colors, add accessories, or modify the design to make it unique.
5. What size will my finished Minnie Mouse be?
The size will depend on the yarn and hook used, but typically, she will be around 8-10 inches tall.
6. Are safety eyes necessary, or can I embroider them?
Safety eyes are not necessary; you can embroider the eyes instead if you prefer a softer look.
Join our VIP broadcast list and gain access to exclusive patterns, all for free. As a VIP member, you’ll receive the best patterns daily, delivered directly to your device. ✨📱 It’s a unique opportunity to stay up-to-date with the latest trends and designs, curated just for you. Don’t miss out on enhancing your projects and discovering new inspirations with the best patterns every day! 🎨🔝
Conclusion
In this Minnie Mouse Amigurumi – Free Pattern, we’ve covered everything from gathering your materials to following the step-by-step instructions for creating this charming character.
Whether you’re a beginner or an experienced crocheter, this pattern provides a delightful project to showcase your skills. Remember to take your time, experiment with colors, and have fun during the process. We’d love to hear your thoughts on the pattern and any suggestions you might have. Please leave your feedback in the comments below, and happy crocheting!

