If you’ve been looking for a fun and creative crochet project, you’ve come to the right place. In this guide, we will show you how to make a cute amigurumi crochet owl.
Amigurumi, the Japanese art of crocheting small, stuffed toys, has taken the crafting world by storm, and this adorable crochet owl is the perfect project to get started with.
Making your own amigurumi crochet owl not only gives you a charming handmade item but also provides an opportunity to refine your crochet skills.
Whether you are a beginner or an experienced crocheter, this pattern is simple to follow and offers a rewarding end result. The little owl will bring a whimsical touch to your home or make a wonderful gift for a loved one.
In this tutorial, we will guide you step by step through the entire process, from choosing the right yarn to adding the final details to your cute amigurumi crochet owl.
By the end, you’ll be able to create a lovable, handcrafted owl that you can be proud of. Let’s dive into the world of amigurumi and bring this sweet owl to life!
1. Materials Needed to Make a Cute Amigurumi Crochet Owl
Before starting your cute amigurumi crochet owl, it’s important to gather the right materials to ensure your project is a success. The right tools will help you create a neat and professional-looking finished owl.
First, you will need yarn. Choose a soft, medium-weight yarn, such as worsted weight. You can opt for different colors to personalize your owl, but a classic combination of browns, whites, and yellows will give it a traditional look.
Next, grab a crochet hook. For worsted weight yarn, a 3.5mm or 4mm hook is ideal. A slightly larger hook will make your stitches looser, while a smaller one will give you tighter stitches, so pick according to the tension you prefer.
You’ll also need some stuffing to give your owl shape. Polyester fiberfill is the most commonly used stuffing for amigurumi projects, as it is lightweight and holds its shape well.
For the eyes, you can use safety eyes, which are easy to attach and give your owl an adorable, professional appearance. Alternatively, you can crochet the eyes if you prefer.
In addition to these basic materials, you’ll need a yarn needle to sew pieces together, some stitch markers to help keep track of your rounds, and scissors for trimming.
Finally, gather any other small details you’d like to add to your owl, such as felt or embroidery floss for the beak and feet. With these materials in hand, you’re ready to start your cute amigurumi crochet owl.
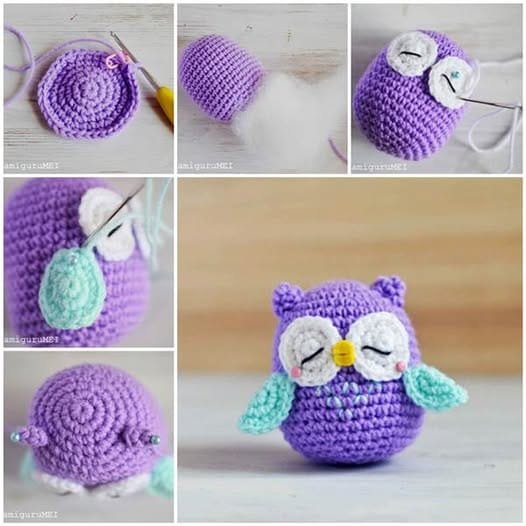
2. Step-by-Step Instructions for Crocheting the Body of the Owl
Now that you have your materials ready, it’s time to begin crocheting the body of your cute amigurumi crochet owl. The body is worked in the round, which means you’ll be crocheting in a spiral, making sure that each round is closed with a stitch marker.
Start by making a magic ring to begin the owl’s body. This technique allows you to work in the round without leaving a hole in the center. Chain two, and then work the required number of single crochet stitches into the ring (usually six). Pull the tail of the yarn to tighten the ring.
Once the first round is complete, you’ll need to increase in each stitch. This means that for the next round, you will crochet two single crochet stitches in each stitch of the previous round. This will gradually make the body of your owl larger. Continue working in the round, alternating between single crochet and increases until you reach the desired size for the owl’s body.
After finishing the increasing rounds, switch to crocheting in straight rounds without increasing. This will give the owl its shape. Continue crocheting in rounds until the body is the right length. Don’t forget to stuff the body as you go to keep it firm and plump.
When the body is complete, leave a long tail of yarn for sewing, and set it aside to start on the owl’s wings and face. This basic amigurumi technique will form the foundation of your cute amigurumi crochet owl.
3. Making the Owl’s Wings and Features
To bring your cute amigurumi crochet owl to life, you’ll need to add wings, a beak, and eyes. These details are what give your owl its character and charm.
Start with the wings. To create the wings, crochet two identical pieces. These will be worked in rows instead of in the round. You can start by chaining a few stitches, then turn your work and crochet back and forth, making sure to increase and decrease as necessary to give the wings a nice shape.
Next, make the eyes. If you’re using safety eyes, simply attach them to the owl’s face. Position them about halfway down the body and spaced evenly apart. If you’re crocheting the eyes, use a contrast color and crochet small circles or ovals for the eyes, adding black embroidery floss for the pupils.
For the beak, crochet a small triangle, and then sew it onto the center of the owl’s face. Make sure it’s positioned below the eyes, creating the classic owl look.
Finally, add the feet. Crochet two small pieces for the feet, making sure to add a little shape with a few small stitches to create the “toes.” Sew them securely to the bottom of the owl’s body.
These small details are what make your cute amigurumi crochet owl stand out and give it personality.
4. Assembling and Finishing the Owl
With the body, wings, eyes, beak, and feet completed, it’s time to put everything together to create your finished cute amigurumi crochet owl. This step involves sewing all the pieces securely to ensure they stay in place.
Start by sewing the wings onto the sides of the owl’s body. Position them evenly on both sides and stitch them securely with a yarn needle.
Next, attach the eyes to the face. If you used safety eyes, they are already in place. If not, sew the crocheted eyes onto the body, ensuring that they are positioned symmetrically.
Sew the beak onto the face, making sure it is centered between the eyes. Then, attach the feet to the bottom of the body, placing them evenly spaced to give the owl balance.
Now that all the pieces are attached, it’s time to give your owl its final touches. You can add a little embroidery or felt accents, like small feathers or a heart on the chest, to make your owl even cuter. You can also crochet a small scarf or hat for a seasonal touch.
Once everything is in place, take a moment to trim any loose yarn tails and give your cute amigurumi crochet owl a final inspection. You now have a charming, handmade owl that you can proudly display or gift to someone special.
FAQ
Q1: What yarn is best for making an amigurumi crochet owl?
For amigurumi projects, it’s recommended to use medium-weight yarn like worsted weight. Cotton or acrylic yarns work well, as they are soft and hold their shape.
Q2: Can I make a larger or smaller owl?
Yes! To make a larger owl, simply increase the number of stitches in each round. To make a smaller owl, reduce the stitch count and use a thinner yarn.
Q3: How do I stuff my amigurumi owl?
Stuff your owl gradually as you crochet by pushing small amounts of stuffing into the body, wings, and other parts. This will help it maintain its shape and firmness.
Q4: What can I use instead of safety eyes for my owl?
If you don’t have safety eyes, you can crochet the eyes or use buttons or felt circles. Just make sure they are securely attached.
Q5: How do I add facial details like eyebrows or eyelashes?
You can embroider small stitches above the eyes to create eyebrows or add long stitches for eyelashes using embroidery floss or yarn.
Q6: Can I make a whole family of owls?
Absolutely! You can make a whole set of owls in different sizes, colors, and accessories to create a charming family of amigurumi owls.
Join our VIP broadcast list and gain access to exclusive patterns, all for free. As a VIP member, you’ll receive the best patterns daily, delivered directly to your device. ✨📱 It’s a unique opportunity to stay up-to-date with the latest trends and designs, curated just for you. Don’t miss out on enhancing your projects and discovering new inspirations with the best patterns every day! 🎨🔝
Conclusion
In this tutorial, we’ve covered how to make a cute amigurumi crochet owl from start to finish. From choosing the right materials to adding those finishing touches, you’ve learned the basics of creating a beautiful, handmade owl. Whether you’re a beginner or an experienced crocheter, this project provides an enjoyable way to enhance your skills and make something delightful.
We’d love to hear about your experience! Feel free to share your thoughts, suggestions, and any modifications you made to your owl. Your feedback helps us improve and create more tutorials for fellow crafters. Happy crocheting!

