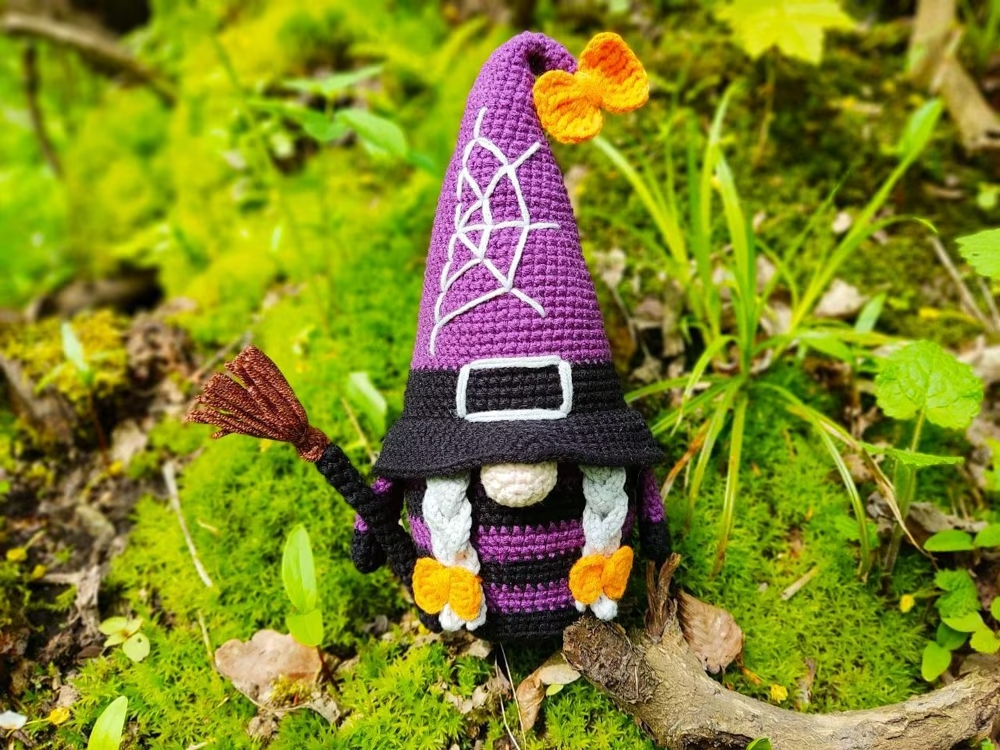
Creating a Halloween gnome (girl) with a broom is a fun and creative way to add a handmade touch to your Halloween decorations. This project allows you to craft a unique, spooky, yet adorable gnome perfect for the season.
Whether you’re an experienced crafter or just starting, this tutorial will guide you step-by-step through the process of creating your very own gnome.
This Halloween gnome (girl) with a broom can be customized to match your Halloween theme, whether you’re going for a cute, witchy, or spooky vibe. It’s a project that is fun to work on and will become a centerpiece in your Halloween display.
Plus, making a gnome with a broom gives it that extra magical touch, making it feel like your gnome is ready to fly off into the night!
In this tutorial, we’ll go over everything from the materials you’ll need, how to assemble the gnome, and some tips on adding your own personalized flair.
With Halloween just around the corner, now is the perfect time to get started on this festive project. So, let’s grab our materials and get crafting!
1. Materials Needed to Make Your Halloween Gnome (Girl) with a Broom
Before starting your Halloween gnome (girl) with a broom, it’s important to gather all the materials you’ll need. Having everything on hand will ensure that the process is smooth and enjoyable, without interruptions.
Basic Gnome Supplies:
To make the gnome’s body, you’ll need fabric or felt for the hat and body, stuffing to give it shape, and a wooden bead for the nose. You can find gnome-making kits online, or gather individual materials yourself. Be sure to pick Halloween-themed colors like black, orange, or purple to enhance the spooky look.
Yarn for Hair or Braids:
For the gnome girl’s hair, use yarn that matches the Halloween theme. Black, orange, or gray yarn can give your gnome a witchy feel. You’ll need to cut strands of yarn and either braid or attach them directly to the gnome’s head.
Broom Materials:
To make the broom, you’ll need a small wooden stick and some natural raffia or straw. You can easily find these materials at a craft store. The broom is a key detail that will give your Halloween gnome (girl) with a broom an extra festive touch.
Glue Gun and Scissors:
A glue gun will be essential for assembling the gnome and attaching various parts like the hat, nose, and hair. Scissors will be needed to cut the fabric, yarn, and raffia. Make sure you have these tools handy as you work through the tutorial.
Accessories for Decoration:
Add some personality to your gnome with Halloween-themed accessories such as mini pumpkins, bat stickers, or even a tiny witch hat for added flair. These small details make your gnome stand out and align with the Halloween spirit.
Patterns and Templates:
Having a pattern or template for your gnome can help keep the design consistent and make it easier to cut out the fabric pieces. You can either draw your own or find a pattern online specifically for a Halloween gnome (girl) with a broom.
2. Assembling the Gnome’s Body and Hat
Once you have all your materials ready, it’s time to start assembling your Halloween gnome (girl) with a broom. This part of the tutorial focuses on constructing the body and hat, which are the foundational elements of your gnome.
Creating the Gnome Body:
Start by cutting out a rectangular piece of felt or fabric for the body. Roll it into a cone shape, and glue or stitch the edges together. Stuff the inside with polyfill or another type of stuffing to give it a firm, rounded shape. The body should be sturdy enough to support the gnome’s head and hat.
Making the Hat:
Cut out a triangular piece of fabric for the hat, and shape it into a cone. You can use a hot glue gun or needle and thread to close the seam. The hat should be a bit floppy to give it that cute, whimsical look associated with gnomes. Make sure to use Halloween colors like black or orange for the hat to match the spooky theme.
Attaching the Nose:
Take a wooden bead and glue it right at the base of the hat where the head would be. This bead serves as the gnome’s nose, which is one of the key characteristics of any gnome. Position it well so it peeks out from under the hat just enough to be visible.
Adding the Hair or Braids:
For a gnome girl, you’ll want to add long hair or braids. Cut several strands of yarn, and either glue them on the sides of the head or braid them for a more finished look. Secure the ends with small pieces of yarn or tiny ribbons in Halloween colors.
Assembling the Body and Hat:
Now that you have the body, hat, nose, and hair ready, it’s time to put everything together. Place the hat on top of the head and use a hot glue gun to secure it. The hat should sit loosely but not fall off, giving your gnome that classic, cozy look.
Decorating the Gnome’s Outfit:
Once your Halloween gnome (girl) with a broom is assembled, you can add accessories and decorations to the body and hat. Consider using small Halloween-themed items like spiders, pumpkins, or witch-themed decorations to make your gnome stand out.
3. Crafting the Gnome’s Broom
The broom is what makes your Halloween gnome (girl) truly special. Crafting the broom is simple and can be done with just a few materials, but it adds an essential touch to the Halloween theme.
Choosing the Right Stick for the Broom:
Find a small wooden stick or dowel to serve as the broom’s handle. You want something that looks rustic and witchy, so avoid perfectly straight or smooth sticks. A natural twig from outside can work perfectly for this project.
Preparing the Raffia or Straw:
Take some raffia or natural straw and cut it into small pieces. These will form the bristles of the broom. You can also use craft straw or thin strips of brown paper if you can’t find raffia. The key is to use something that looks natural and rustic.
Attaching the Bristles to the Stick:
Gather the raffia or straw into a small bundle and glue it to the bottom of the stick. Use a small piece of twine or string to tie the bristles together tightly, about an inch from the end of the stick. Secure the bundle with hot glue to ensure it stays in place.
Trimming the Broom:
Once the bristles are attached, trim them to the desired length. You want the broom to be in proportion to the size of your gnome, so keep the bristles short and neat. You can also add more bristles if you prefer a fuller broom.
Decorating the Broom:
To give the broom a more festive feel, consider wrapping the handle with some orange or black string. You can also glue on tiny Halloween decorations like bats or spiders to add even more detail to the broom.
Positioning the Broom with the Gnome:
Now that the broom is complete, place it in the gnome’s hands or lean it against the gnome’s body. You can glue it in place to ensure it stays secure. The broom is a key element that ties the whole Halloween gnome (girl) with a broom theme together.
4. Adding Final Details to Your Halloween Gnome (Girl) with a Broom
Now that your Halloween gnome (girl) with a broom is almost finished, it’s time to add some final touches to make it truly unique. These last details are what will make your gnome stand out and reflect your personal style.
Adding Facial Features:
While many gnomes are traditionally made without eyes, you can choose to add small beads or buttons to create eyes if you prefer. This can give your gnome a more animated and lifelike appearance. Alternatively, leave the gnome faceless for a more classic and mysterious look.
Attaching Halloween-Themed Accessories:
Incorporate small Halloween elements like tiny pumpkins, spider webs, or witch hats. These accessories can be glued onto the gnome’s hat, broom, or body to emphasize the Halloween theme.
Using Fabric Patterns:
For an extra pop of detail, you can use patterned fabric for the gnome’s hat or body. Choose Halloween-themed patterns like stripes, polka dots, or bat prints to make your gnome more festive.
Displaying Your Gnome:
Once your Halloween gnome (girl) with a broom is complete, display it proudly! You can place it on a mantel, use it as part of a Halloween centerpiece, or even place it by your front door to greet trick-or-treaters. Its handmade charm will definitely catch people’s attention.
Creating a Family of Gnomes:
If you enjoyed making this gnome, consider creating a whole family of Halloween gnomes. Vary the sizes and colors to make each gnome unique, and give each one its own Halloween-themed accessory.
Storing the Gnome for Future Use:
After Halloween, be sure to store your gnome carefully so you can use it again next year. Place it in a box with some padding to protect the hat, nose, and broom. With proper care, your handmade Halloween gnome (girl) with a broom can be part of your decorations for years to come.
FAQ
1. How long does it take to make a Halloween gnome (girl) with a broom?
The time depends on your crafting skills and the complexity of the design, but on average, it should take about 1-2 hours to complete the gnome.
2. Can I use different colors for the gnome’s hat and body?
Yes! While Halloween colors like black and orange are recommended, you can use any color combination that fits your style or existing Halloween decor.
3. Where can I find materials for the gnome?
You can find most materials, such as fabric, yarn, and felt, at craft stores or online. For the broom, you can use natural materials like sticks and straw, which you may already have at home.
4. Is this project suitable for beginners?
Yes, this Halloween gnome (girl) with a broom is a beginner-friendly project. The steps are simple and can be followed by anyone, even those with minimal crafting experience.
5. How can I personalize my Halloween gnome?
You can personalize your gnome by adding different accessories, using various fabric patterns, or changing the size and shape of the hat and body. Feel free to get creative!
6. Can I make a male Halloween gnome instead?
Absolutely! You can follow the same steps but omit the braids or add a different hairstyle for a male gnome. The key is to have fun and let your creativity shine.
Join our VIP broadcast list and gain access to exclusive patterns, all for free. As a VIP member, you’ll receive the best patterns daily, delivered directly to your device. ✨📱 It’s a unique opportunity to stay up-to-date with the latest trends and designs, curated just for you. Don’t miss out on enhancing your projects and discovering new inspirations with the best patterns every day! 🎨🔝
Conclusion
Congratulations on completing your Halloween gnome (girl) with a broom – tutorial! You’ve created a charming, spooky, and festive decoration that will add a handmade touch to your Halloween decor. Whether you display it indoors or outdoors, your gnome is sure to be a hit with guests and trick-or-treaters alike.
We’d love to hear about your experience making this gnome! Please leave a comment with your thoughts or suggestions on how we can improve this tutorial for future projects. Happy Halloween crafting!