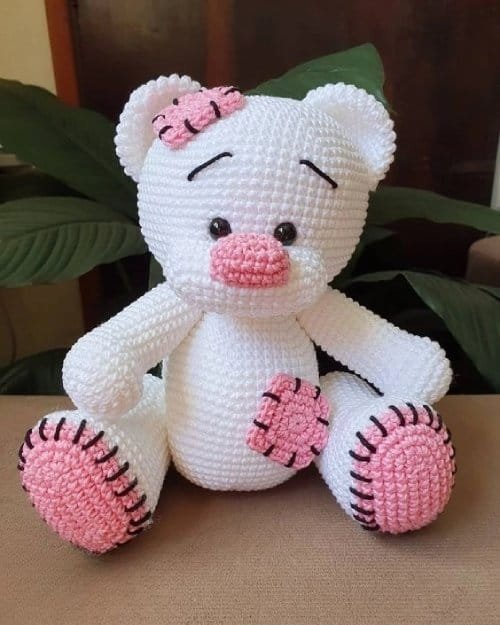
If you’re looking for a cute, handmade gift or a fun project to challenge your crochet skills, this Free Teddy Bear Crochet Pattern is perfect for you! This delightful project is beginner-friendly and customizable, allowing you to create a unique teddy bear that anyone will love.
Whether you’re crafting for a child or simply adding to your own collection of crocheted toys, this pattern is a great way to practice new techniques while producing something adorable.
In this Free Teddy Bear Crochet Pattern, we’ll guide you through each step to ensure you have all the information you need.

You’ll learn how to create the bear’s body, head, limbs, and ears, along with tips for assembling your teddy. Crocheted teddy bears make fantastic gifts for birthdays, baby showers, or holidays, and they’re a beautiful way to show someone you care.
This project uses basic stitches and simple techniques, making it approachable for beginners, yet enjoyable for more experienced crocheters.
You can use any type of yarn, but medium-weight yarn works best for a classic teddy bear look. Ready to get started? Let’s dive into the details of this Free Teddy Bear Crochet Pattern!
1. Materials Needed for Your Teddy Bear
Before you begin working on your Free Teddy Bear Crochet Pattern, it’s important to gather all the materials you’ll need for the project. Having everything ready will help you stay organized and focused as you crochet.
- Yarn: For this project, medium-weight yarn is ideal. You can choose a traditional brown or beige for a classic teddy bear look, or get creative with colors like pink, blue, or even multicolored yarn.
- Hook: A 4.0 mm (G) crochet hook works well with medium-weight yarn, creating a tight stitch to keep the stuffing inside your teddy bear.
- Stuffing: Polyester fiberfill or cotton stuffing will help shape your teddy bear and give it a soft, cuddly texture.
- Safety Eyes or Embroidery Thread: For the bear’s eyes, you can use safety eyes (which are child-safe) or embroider the eyes with black thread.
- Stitch Marker: To keep track of your rounds, especially in the body and head, a stitch marker is essential.
- Yarn Needle: You’ll need a yarn needle to sew the bear’s pieces together and to weave in any loose ends.
By having these materials on hand, you can dive into the pattern smoothly. Let’s now move on to creating the different parts of your teddy bear.
2. Crocheting the Body and Head
The body and head of the teddy bear are usually worked in continuous rounds, which means you won’t join at the end of each round. Instead, you’ll work in a spiral, which helps avoid any visible seams.
- Starting with the Body: To begin the Free Teddy Bear Crochet Pattern, create a magic ring and work several single crochets into the ring. Gradually increase the number of stitches in each round until the body reaches the desired width. Once you’ve reached the widest point, start decreasing to shape the bottom of the teddy bear.
- Working in the Round: Using a stitch marker will help you keep track of where each round begins and ends. Be sure to count your stitches carefully to maintain the symmetry of the body.
- Stuffing the Body: As you work, stuff the body with fiberfill, making sure it’s firm but not too tightly packed. This will give the teddy bear a soft, plush feel while maintaining its shape.
- Creating the Head: For the head, you’ll follow a similar process as the body, starting with a magic ring and working in single crochets. As the head starts to take shape, you can add the safety eyes or embroider the eyes before completing the head.
- Attaching the Head to the Body: Once both the body and head are completed and stuffed, use a yarn needle to sew them together. Make sure the head is centered on the body to give your teddy bear a balanced look.
- Shaping the Face: You can embroider a small nose and mouth with black yarn or thread. A simple triangle shape works well for the nose, and a small curved line creates a cute, happy expression for your bear.
3. Crocheting the Limbs and Ears
Now that the body and head are complete, it’s time to move on to the bear’s arms, legs, and ears. These smaller pieces are also worked in rounds and can be quickly finished.
- Creating the Arms: To crochet the arms, start with a magic ring and work in single crochets, just as you did for the body. The arms should be slightly thinner than the body but still plush. Stuff the arms lightly as you go.
- Shaping the Legs: The legs will be similar to the arms but slightly longer and thicker. You can crochet them flat at the top to make sewing them onto the body easier.
- Stuffing the Limbs: As you work, stuff the arms and legs with fiberfill, but not too tightly. You want the limbs to be flexible so the teddy bear can sit and move.
- Attaching the Limbs: Use your yarn needle to sew the arms and legs onto the body. Make sure the limbs are evenly spaced and securely attached. Position the arms at the sides and the legs at the bottom for a seated look.
- Creating the Ears: The ears are small circles worked in rounds. After crocheting two ears, sew them onto the top sides of the teddy bear’s head. You can slightly fold the ears to give them a more realistic shape.
- Finishing Touches: Once all the pieces are attached, check that everything is secure and the stuffing is evenly distributed. Your teddy bear is almost ready!
4. Personalizing Your Teddy Bear
One of the best parts of working with this Free Teddy Bear Crochet Pattern is the ability to customize it to your liking. From colors to accessories, you can make your teddy bear unique.
- Choosing Colors: While traditional teddy bears are brown, you can make yours any color you like! Pastel shades like pink, blue, and yellow are perfect for baby gifts, while bright, bold colors make fun toys for older children.
- Adding Accessories: Personalize your teddy bear with accessories like a crocheted scarf, hat, or even a tiny sweater. These small details can add character and charm to your creation.
- Using Different Yarns: Experiment with different yarn types to give your teddy bear a unique texture. Soft, fuzzy yarns will give the bear a more huggable feel, while smooth yarns offer a cleaner look.
- Customizing Facial Features: You can give your teddy bear a playful or serious expression by adjusting the shape of the eyes and mouth. You might also add eyebrows or blush for a cute touch.
- Crocheting Clothes: If you enjoy crocheting garments, why not make a small outfit for your teddy bear? A simple vest or dress can turn your teddy into a stylish companion.
- Embroidering Details: Beyond the face, you can add embroidered patches, hearts, or initials to the bear’s body for an extra special, personalized touch.
FAQ About the Free Teddy Bear Crochet Pattern
Q: What size hook should I use for the teddy bear?
A: A 4.0 mm crochet hook is ideal for medium-weight yarn, but you can adjust the size depending on your yarn choice.
Q: Can I use different yarn for the teddy bear?
A: Absolutely! You can experiment with different yarn textures and weights, though medium-weight yarn works best for this pattern.
Q: How do I make sure my teddy bear’s limbs are even?
A: Use stitch markers to ensure your arms and legs are evenly spaced when attaching them to the body.
Q: Can I add safety eyes to my teddy bear?
A: Yes, safety eyes are a great option, especially if you’re making the bear for a child. Just attach them before stuffing the head.
Q: How do I stuff the teddy bear without it being too firm?
A: Stuff the bear gradually and evenly, making sure it’s firm enough to hold its shape but still soft to the touch.
Q: Can I wash my crocheted teddy bear?
A: Yes, but it’s best to hand wash it with mild soap and let it air dry to prevent any damage to the stuffing or yarn.
Join our VIP broadcast list and gain access to exclusive patterns, all for free. As a VIP member, you’ll receive the best patterns daily, delivered directly to your device. ✨📱 It’s a unique opportunity to stay up-to-date with the latest trends and designs, curated just for you. Don’t miss out on enhancing your projects and discovering new inspirations with the best patterns every day! 🎨🔝
Conclusion
This Free Teddy Bear Crochet Pattern is a fun and rewarding project that allows you to create a timeless toy for any occasion. From choosing colors to adding accessories, you can personalize your teddy bear in countless ways. We hope this tutorial has inspired you to start crocheting your own bear!
We’d love to hear how your project turned out! Please feel free to leave a comment with your thoughts, suggestions, and any creative ideas you’ve incorporated into your teddy bear. Happy crocheting!


