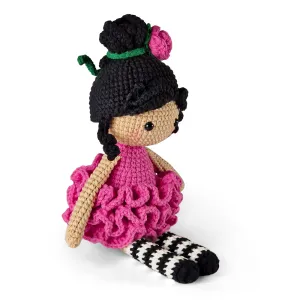
Creating your own toys can be a rewarding experience, and with this Free Carmen Doll crochet pattern, you’ll be able to craft a charming doll that any child would love. This pattern is designed for crocheters of all skill levels, making it a great project whether you’re a seasoned pro or just starting.
The Carmen Doll is not just a toy; it’s a perfect gift that can be customized to reflect your style or the preferences of the child receiving it.
In this tutorial, we’ll walk you through everything you need to know to create your very own Carmen Doll. From gathering materials to following the step-by-step instructions, you’ll be equipped to crochet this delightful doll in no time.
The beauty of this pattern lies in its simplicity and versatility, allowing for a wide range of customization options.
With just a few basic crochet stitches and some creativity, the Free Carmen Doll crochet pattern will help you make a delightful addition to any toy collection. Let’s get started on this fun and engaging crochet project!
1. Materials Needed
Before diving into the crochet process, it’s essential to gather all the materials you will need for the Free Carmen Doll crochet pattern. Start with your yarn. Choose a soft, medium-weight yarn for the body of the doll; popular choices include cotton or acrylic blends. You can also choose various colors for hair, clothing, and accessories, allowing for a unique creation.
Next, you will need a crochet hook. A size G (4.0 mm) hook is typically recommended for medium-weight yarn, but you should always check your yarn label for the best fit. Additionally, a yarn needle will be necessary for weaving in ends and assembling your doll.
Don’t forget about stuffing! High-quality polyester fiberfill is ideal for giving your doll a plush feel. If you’re making this doll for a young child, consider using hypoallergenic stuffing for added safety.
You might also want to include some decorative elements like buttons or fabric scraps for the doll’s clothing. Safety eyes can be added to give the doll a friendly expression, but if you prefer a more traditional look, you can simply embroider the eyes.
Lastly, a stitch marker will be useful to keep track of your rounds if you’re working in the round. With your materials assembled, you’re all set to start crocheting your Carmen Doll!
2. Crochet Instructions
Now that you have all your materials, let’s move on to the crochet instructions for the Free Carmen Doll crochet pattern. The body of the doll is worked in one piece, starting from the bottom and working up to the head.
Round 1: Begin with a magic ring and crochet 6 single crochets (sc) into the ring. Pull the tail to close it.
Round 2: Work 2 sc in each stitch around (12 sc). This will create the base for your doll’s body.
Round 3: 1 sc in the next stitch, 2 sc in the following stitch and repeat around (18 sc). Continue to increase in this manner until the body reaches your desired width.
As you work upward, remember to periodically check the shape of the body. You can customize the length to fit your vision for the Carmen Doll. When you reach the desired height, fasten off and weave in the ends securely.
Next, it’s time to create the head. This is typically done in a similar manner as the body, but you will want to decrease in the last few rounds to give the head a rounded shape. Once you finish, attach the head to the body using the yarn needle, making sure it’s securely fastened.
3. Adding Hair and Features
With the body and head completed, it’s time to bring your Carmen Doll to life by adding hair and facial features. Start by crocheting or attaching hair using the yarn of your choice. You can create simple strands or more elaborate styles depending on your preference.
For yarn hair, cut several strands to your desired length and attach them at the top of the head using your yarn needle. Braid or style the hair as you like, or leave it loose for a playful look.
Next, add the eyes. If you’re using safety eyes, insert them into the head, ensuring they’re secure. If you prefer to embroider the eyes, use a contrasting yarn color to stitch them on. For a more whimsical look, you can even add eyelashes!
Don’t forget the mouth! A simple straight stitch can create a smile, or you can get creative with different shapes. If you’re feeling adventurous, consider adding blushing cheeks with some fabric paint or blush to give your doll an even friendlier appearance.
Once the facial features are complete, step back and admire your work. This is the moment where your doll truly begins to take on its character.
4. Dressing Your Doll
The final step in completing your Free Carmen Doll crochet pattern is dressing her. You can either crochet a simple dress, shirt, and pants or use fabric scraps to create custom clothing.
If you’re crocheting clothes, start by measuring the doll to ensure a good fit. You can create a basic dress pattern by starting with a chain that fits around the body, then working in rounds or rows to create the desired length and shape.
For fabric clothing, consider using a sewing machine or hand-stitching pieces together. You can even create accessories like a hat, scarf, or shoes to give your Carmen Doll a more unique appearance.
Remember to use bright colors and fun patterns to make the outfit pop! Feel free to experiment with textures and layers, as this will add personality to your doll.
Once you’ve dressed your doll, give her a final inspection. Make sure all pieces are securely attached, and she’s ready for play or display!
FAQ
Q1: What skill level is needed for the Carmen Doll crochet pattern?
A: The Free Carmen Doll crochet pattern is suitable for all skill levels, including beginners.
Q2: Can I customize the colors and features of the doll?
A: Yes! You can use any yarn colors and customize the facial features and clothing to make the doll your own.
Q3: How long does it take to crochet the Carmen Doll?
A: The time will vary depending on your skill level, but most people can complete the doll in a few hours.
Q4: What type of yarn is best for this project?
A: A soft, medium-weight yarn is recommended for a cuddly and appealing doll.
Q5: Are safety eyes necessary?
A: Safety eyes are not necessary but can give the doll a cute look. You can also embroider eyes if you prefer.
Q6: How do I care for my finished doll?
A: It’s best to spot clean your doll with a damp cloth. Avoid washing in a machine to preserve its shape.
Join our VIP broadcast list and gain access to exclusive patterns, all for free. As a VIP member, you’ll receive the best patterns daily, delivered directly to your device. ✨📱 It’s a unique opportunity to stay up-to-date with the latest trends and designs, curated just for you. Don’t miss out on enhancing your projects and discovering new inspirations with the best patterns every day! 🎨🔝
Conclusion
In this article, we explored how to create a delightful Free Carmen Doll crochet pattern from start to finish. We covered the necessary materials, step-by-step instructions for crocheting the doll, tips for adding hair and features, and how to dress your doll. This charming toy is sure to bring joy to anyone who receives it!
We hope you found this guide helpful and inspiring. Please share your thoughts and suggestions in the comments below. Happy crocheting!