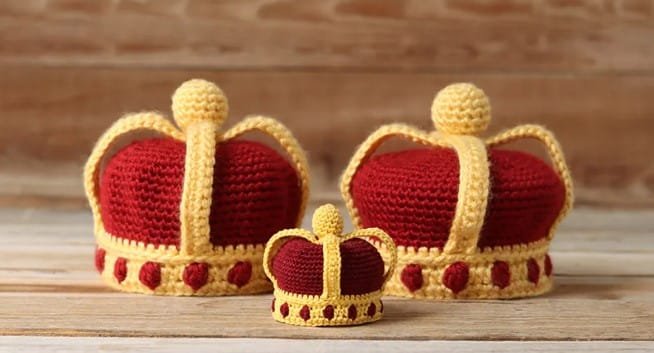
Are you looking for a Decorative Crochet Crown tutorial to create a beautiful and royal accessory? You’re in the right place! This guide will walk you through the steps to create a stunning crochet crown that’s perfect for all occasions, from birthdays to costume parties, or even as a special handmade gift.
By following this Decorative Crochet Crown tutorial, you’ll be able to make a lovely crown that will leave everyone impressed.
In this tutorial, we’ll explore the materials, techniques, and tips that will help you achieve the best results. Whether you’re a beginner or an experienced crocheter, this project is both fun and satisfying to complete. Get ready to enjoy a relaxing craft session and create something truly royal!
Let’s dive into the world of crochet crowns and bring your creativity to life. By the end of this Decorative Crochet Crown tutorial, you’ll have your own handmade crown that’s fit for a king or queen.
1. Choosing the Right Materials for Your Decorative Crochet Crown
Before starting your Decorative Crochet Crown, it’s essential to gather all the necessary materials. The right tools and yarn will make a significant difference in the outcome of your project.
- Yarn Selection: For a crochet crown, it’s best to use a yarn that provides structure but is still comfortable to wear. Cotton or acrylic yarn works well, especially in DK weight or thicker. Choose a color that represents royalty, such as gold, silver, or a vibrant shade of purple.
- Hook Size: Using the correct hook size is crucial for creating a crown that holds its shape. A 3.5mm or 4mm crochet hook is ideal, depending on the thickness of your yarn. Make sure to check the yarn label for hook recommendations.
- Stiffening Solution: To give your crown that regal, structured look, you might want to use a stiffening solution once the crocheting is done. This can be made using fabric stiffener or a DIY mix of water and glue.
- Optional Embellishments: Adding beads, pearls, or small gems to your crochet crown can elevate its appearance. These can be sewn on after the crown is completed to add a touch of sparkle.
- Measuring Tape: You’ll need a measuring tape to ensure the crown is the right size for the person who will wear it. Crowns can be custom-fitted, so be sure to measure the head circumference before starting.
- Scissors and Tapestry Needle: These are the basic tools every crocheter needs. Use the scissors to cut the yarn, and a tapestry needle to weave in the loose ends once the project is complete.
2. Basic Stitches for the Decorative Crochet Crown
Now that you have your materials, it’s time to familiarize yourself with the stitches used in the Decorative Crochet Crown tutorial. This project mostly uses simple stitches, making it beginner-friendly.
- Chain Stitch (CH): The chain stitch is the foundation of many crochet projects, including this one. It’s simple to create and provides the base for your crown.
- Single Crochet (SC): Single crochet is one of the basic stitches you’ll use to build the crown’s structure. It’s sturdy and provides a neat, clean look.
- Double Crochet (DC): Double crochet stitches will help add height and texture to your crown. This stitch is taller than single crochet and works up faster.
- Slip Stitch (SL ST): Slip stitches are used to join rounds or sections of the crown. They’re also used for finishing off the project cleanly.
- Picot Stitch (Optional): To add a decorative edge to your crown, you can use picot stitches. This creates small points or “spikes” that give the crown a more regal and ornate look.
- Magic Ring: If your crown design starts in the round, a magic ring can help you create a tight, closed loop without a noticeable hole in the center.
3. Step-by-Step Instructions for Making the Decorative Crochet Crown
With the materials ready and the basic stitches learned, let’s start crafting the Decorative Crochet Crown. Follow the steps below to complete your crown.
- Start with a Foundation Chain: Begin by chaining the number of stitches that match the head circumference. This will be the base of your crown, so make sure it’s neither too tight nor too loose.
- Work in Rounds: After the foundation chain, join the ends with a slip stitch to form a ring. From here, you will work in rounds, building the crown upwards.
- Create the Crown’s Base: For the first few rounds, use single crochet or double crochet stitches to create a sturdy base. This part should be a flat band that fits comfortably around the head.
- Form the Crown’s Peaks: After building the base, you’ll move on to forming the peaks or points of the crown. This is where the design gets interesting! Use a combination of chain stitches and double crochet stitches to form triangular shapes that create the crown’s peaks.
- Add Decorative Edging: If you want to make your crown more elaborate, add picot stitches along the edges of the peaks. This will give the crown a royal and delicate look.
- Finishing Touches: Once the crown is complete, cut the yarn and weave in all the loose ends using a tapestry needle. If you’re using stiffening solution, now is the time to apply it. Allow the crown to dry completely before adding any embellishments.
4. Tips for Customizing Your Decorative Crochet Crown
A crochet crown is a versatile project that allows for many customizations. Here are some tips on how to make your Decorative Crochet Crown unique.
- Size Adjustments: You can easily adjust the size of the crown by adding or subtracting stitches in the foundation chain. Measure the head circumference and adapt accordingly.
- Color Variations: Experiment with different colors to create a one-of-a-kind crown. You could even use multiple colors in one crown for a fun and playful look.
- Pattern Variations: Try using different crochet patterns or stitches, such as shells or clusters, to add more texture and complexity to your crown design.
- Add a Lining: If you want the crown to be extra comfortable to wear, consider adding a soft fabric lining on the inside. This is especially useful for crowns intended for young children.
- Beads and Gems: Sew small beads or gems along the peaks of the crown for added sparkle and elegance. Make sure they’re securely attached so they don’t come loose.
- Seasonal Themes: Create crowns themed for different holidays, like a green and red crown for Christmas or pastel colors for Easter. This is a great way to make your crochet project even more festive.
FAQ About Decorative Crochet Crown
Q: How long does it take to crochet a crown?
A: Depending on your skill level, a simple Decorative Crochet Crown can take anywhere from 2 to 4 hours to complete. More intricate designs may take longer.
Q: Can beginners make a crochet crown?
A: Yes, beginners can follow this Decorative Crochet Crown tutorial as it uses basic stitches. Just take your time and follow the instructions closely.
Q: How do I stiffen my crochet crown?
A: You can stiffen your crochet crown by applying a fabric stiffener or a homemade mix of water and glue. Let it dry completely to ensure it holds its shape.
Q: Can I wash my crochet crown?
A: If the crown is stiffened or contains embellishments, hand-washing is recommended. Be sure to handle it gently and reshape it while it’s still damp.
Q: How do I size the crown for a child?
A: To size a crown for a child, measure the child’s head circumference and adjust the foundation chain accordingly. You may also want to use a softer yarn for comfort.
Q: What types of yarn work best for crochet crowns?
A: Cotton and acrylic yarns are popular choices for crochet crowns. They provide good structure while remaining lightweight and comfortable to wear.
Join our VIP broadcast list and gain access to exclusive patterns, all for free. As a VIP member, you’ll receive the best patterns daily, delivered directly to your device. ✨📱 It’s a unique opportunity to stay up-to-date with the latest trends and designs, curated just for you. Don’t miss out on enhancing your projects and discovering new inspirations with the best patterns every day! 🎨🔝
Conclusion
In this Decorative Crochet Crown tutorial, we’ve covered everything you need to know to make your own beautiful and royal crochet crown. From selecting the right materials to mastering basic stitches, this project is both fun and rewarding. Whether you’re making it for a special event or just for fun, your handmade crown is sure to be a hit.
We’d love to hear your feedback! Share your thoughts and suggestions in the comments below and let us know how your crown turned out. Happy crocheting!