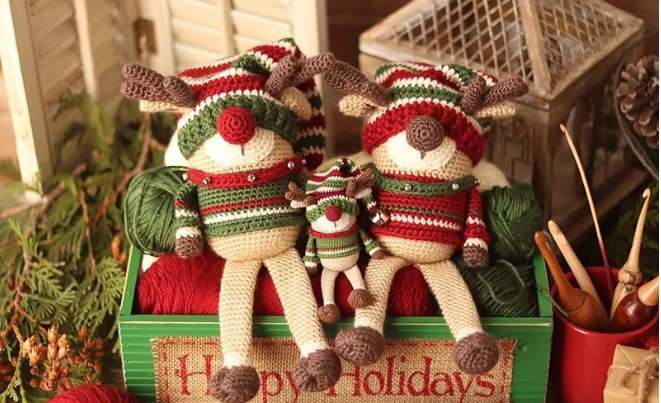
If you’re looking to create a cute holiday decoration, this Crochet Reindeer Gnome – tutorial is perfect for you! Gnomes have become a popular decor choice for Christmas, and adding a reindeer twist makes them even more festive.
This project is great for crochet enthusiasts, whether you’re a beginner or have some experience. In this article, we’ll guide you through the steps of making your own Crochet Reindeer Gnome from start to finish.
The materials you’ll need are easy to find, and with this detailed Crochet Reindeer Gnome – tutorial, you’ll have a fun and charming decoration in no time. This gnome can be used to add a whimsical touch to your holiday decor or even gifted to loved ones. Now, let’s dive into the tutorial and get started!
Before we get into the step-by-step instructions, let’s briefly discuss the materials you’ll need, the basic techniques involved, and why this particular project is a great addition to your holiday crafts.
The Crochet Reindeer Gnome can be personalized in different ways, from the color of the yarn to the size of the hat, giving you plenty of creative freedom.
1. Materials You’ll Need
To begin this Crochet Reindeer Gnome – tutorial, it’s essential to gather all the necessary materials. This ensures a smooth crafting process, so you won’t have to pause and look for anything once you start.
- Yarn: Choose medium-weight yarn in festive colors like red, brown, and white. You’ll also need a small amount of black for the nose and antlers.
- Hook size: A 4.5mm crochet hook works well for this project. However, you can adjust the size based on the thickness of the yarn.
- Stuffing: Polyester fiberfill is ideal for stuffing the body of the gnome and giving it a sturdy, plump shape.
- Scissors and needles: A good pair of scissors and a tapestry needle will help with trimming yarn and sewing the parts together.
- Safety eyes or buttons: These will be used to add a little personality to your gnome. If you’re making this for small children, embroidered eyes are a safer option.
- Pattern: While this tutorial provides a guide, having a printed pattern or a sketch can be helpful for reference, especially if you’re new to crochet.
With these materials on hand, you’ll be able to follow the Crochet Reindeer Gnome – tutorial seamlessly.
2. Step-by-Step Instructions
Now that your materials are ready, let’s get into the process. The steps in this Crochet Reindeer Gnome – tutorial are broken down to make it easy for you to follow.
- Start with the base: Crochet the base of the gnome in a round pattern, using brown yarn for a traditional reindeer look. This part will form the body, so make sure to create a solid, flat foundation.
- Create the gnome’s body: Once the base is complete, continue crocheting upward in a cylindrical shape. This is the main part of your gnome, so stuff it lightly as you go to give it a nice, round form.
- Add the hat: Switch to red yarn to create the iconic gnome hat. The hat can be a simple triangle or more elaborate, depending on your skill level. Make sure to leave a little room for the gnome’s nose and face to peek through.
- Craft the nose and antlers: For the nose, use a small amount of black yarn to crochet a small, round ball. The antlers can be made using a simple crochet chain or wire wrapped in yarn, depending on the look you want.
- Sew the parts together: After all the pieces are complete, use a tapestry needle to sew the hat, nose, and antlers onto the body. Make sure everything is securely attached.
- Finishing touches: Add the eyes, trim any excess yarn, and make sure the gnome is well-stuffed and balanced. Your Crochet Reindeer Gnome is now ready to spread some holiday cheer!
3. Customizing Your Reindeer Gnome
One of the best things about following a Crochet Reindeer Gnome – tutorial is the flexibility to add your personal touch. Here are some ideas for customization:
- Color choices: While traditional Christmas colors like red and green are common, you can switch things up with blues, pinks, or even metallic yarns for a modern twist.
- Size variations: If you want a smaller or larger gnome, adjust the number of stitches in each section. Using thinner or thicker yarn can also change the overall size.
- Hat designs: Get creative with the gnome’s hat by adding stripes, pom-poms, or even a little bell at the tip. A two-toned hat can add some extra flair.
- Reindeer details: You can enhance the reindeer aspect by adding a small crocheted scarf or even tiny reindeer hooves at the base of the gnome.
- Facial expressions: Play around with different eye placements and nose sizes to give your gnome a unique personality. Adding a smile or some blushing cheeks can make it more playful.
- Display options: Whether it’s standing by the Christmas tree or sitting on a shelf, you can adjust the structure to make sure your gnome stays put.
4. Common Crochet Techniques Used
As you follow this Crochet Reindeer Gnome – tutorial, it’s important to be familiar with some basic crochet techniques. If you’re a beginner, these will help you navigate the project more easily.
- Magic ring: This is a crucial technique for starting circular crochet projects. It allows you to create a tight, adjustable loop that forms the base of your gnome’s body.
- Single crochet (SC): The single crochet stitch is the foundation for most parts of this project. It’s simple and creates a tight, uniform fabric.
- Increasing and decreasing: These techniques are essential for shaping the body, nose, and hat. Increasing adds stitches, while decreasing narrows the shape as needed.
- Working in rounds: Much of the Crochet Reindeer Gnome is worked in continuous rounds, meaning you won’t turn your work after each row. This helps keep the shape smooth and consistent.
- Changing colors: Switching yarn colors, especially for the hat and body, is a simple technique that adds depth and character to your gnome.
- Finishing off: Tying off and weaving in loose ends is a must to ensure that your gnome looks neat and polished when completed.
FAQ: Frequently Asked Questions
Q: Can a beginner follow this Crochet Reindeer Gnome – tutorial?
A: Yes! This project is suitable for beginners who are comfortable with basic crochet stitches. The instructions are straightforward, and you can adjust the complexity based on your skill level.
Q: How long does it take to complete a Crochet Reindeer Gnome?
A: Depending on your experience and speed, it could take anywhere from 3 to 5 hours to complete the gnome.
Q: Can I use different types of yarn?
A: Absolutely! While medium-weight yarn is recommended, you can experiment with other types. Just be sure to adjust your hook size accordingly.
Q: What size should the finished gnome be?
A: The size can vary depending on your yarn and hook choice, but the average Crochet Reindeer Gnome is about 6 to 8 inches tall.
Q: Is it safe to add buttons for eyes if gifting to children?
A: If you’re giving this to small children, it’s safer to embroider the eyes instead of using buttons or safety eyes to avoid any choking hazards.
Q: Can I wash my Crochet Reindeer Gnome?
A: Since the gnome is mostly decorative, spot cleaning is recommended. If needed, hand wash it gently and let it air dry.
Join our VIP broadcast list and gain access to exclusive patterns, all for free. As a VIP member, you’ll receive the best patterns daily, delivered directly to your device. ✨📱 It’s a unique opportunity to stay up-to-date with the latest trends and designs, curated just for you. Don’t miss out on enhancing your projects and discovering new inspirations with the best patterns every day! 🎨🔝
Conclusion
This Crochet Reindeer Gnome – tutorial provides a fun and festive way to get into the holiday spirit. Not only is it a great addition to your decor, but it also makes for a heartfelt handmade gift. We hope you enjoyed this tutorial and found it easy to follow.
If you have any suggestions or feedback, please leave a comment below! We’d love to hear how your gnome turned out and if you made any customizations!