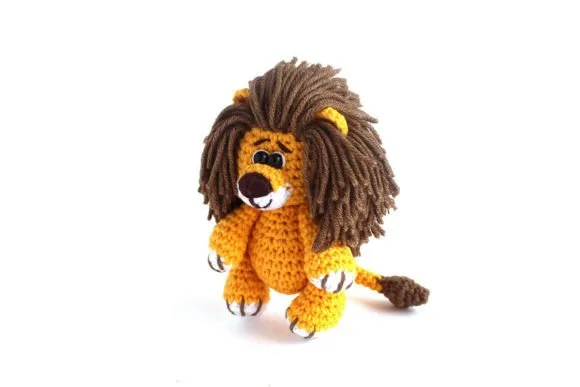
Are you looking for an adorable crochet pattern of a miniature Lion King? This cute little project is perfect for crochet enthusiasts who want to create something truly magical.
Whether you’re a beginner or an experienced crocheter, this pattern will guide you through every step. The crochet pattern of Miniature Lion King is designed to be simple yet detailed enough to bring the majestic lion cub to life in your hands. Follow along to learn how to make your own mini Lion King!
Creating the crochet pattern of Miniature Lion King will allow you to practice essential crochet skills while also giving you a rewarding project to complete. Plus, it’s a great gift for Lion King fans or a playful decoration for a kid’s room.
Ready to get started? Let’s dive into the materials and techniques you’ll need to complete this charming project.
1. Materials Needed for the Crochet Pattern of Miniature Lion King
Before diving into the actual crochet process, it’s essential to gather all the materials you’ll need. For this crochet pattern of Miniature Lion King, you’ll want to have the following items:
- Yarn Selection: Choose a soft yarn in golden yellow for the lion’s body, a darker brown for the mane, and a lighter color for the belly. Depending on the brand, a medium-weight yarn works best to maintain structure.
- Hook Size: Use a crochet hook suitable for your chosen yarn weight. Typically, a 3.5mm or 4mm hook works well for a miniature design.
- Stuffing Material: To give the lion its plush look, you’ll need some fiberfill or other stuffing material. Make sure to stuff evenly to avoid any lumps.
- Safety Eyes or Embroidery Thread: For the eyes, you can either use safety eyes for a more realistic look or embroider them with black thread.
- Tapestry Needle: You’ll need this to sew the different parts of your lion together, as well as to weave in any loose ends.
Once you have everything prepared, you’re ready to move on to the actual creation of your miniature Lion King. Having the right materials ensures your project comes out looking exactly how you envision it.
2. Basic Stitches for the Crochet Pattern of Miniature Lion King
Mastering the basic stitches is key to successfully completing the crochet pattern of Miniature Lion King. Here are the essential stitches you’ll be using:
- Chain (ch): This is the foundation for most crochet projects. You’ll start by making a slip knot and pulling yarn through the loop to create a chain.
- Single Crochet (sc): This stitch is the most common in amigurumi patterns. Insert your hook into the stitch, yarn over, pull through, yarn over again, and pull through both loops on your hook.
- Increase (inc): This means you’ll be making two single crochets in the same stitch to widen the area, used often when shaping the lion’s body and head.
- Decrease (dec): A decrease stitch is used to narrow the work. To do this, insert the hook into the next stitch, yarn over, pull through, then repeat in the next stitch. Finally, yarn over and pull through all three loops on your hook.
- Slip Stitch (sl st): This is used to join parts or to fasten off a section of your work.
Each of these stitches is crucial for shaping the lion’s various parts—body, head, legs, and tail. Mastering these basics will help you follow the crochet pattern of Miniature Lion King with ease.
3. Step-by-Step Guide for Crocheting the Lion’s Body
Now that you’re familiar with the materials and stitches, let’s move on to creating the body of your miniature lion. The body is the main part of this crochet pattern of Miniature Lion King, and it needs to be sturdy and well-shaped.
- Start with a Magic Ring: This is a circular foundation that allows you to crochet in the round without leaving a gap in the center. Make 6 single crochets into the magic ring and pull tight.
- Increasing Rounds: In the next few rounds, you’ll increase stitches to form the body. For instance, in round two, make two single crochets in each stitch for a total of 12 stitches.
- Shaping the Midsection: As you continue to crochet, alternate between regular rounds and increase rounds to shape the midsection of the body. Be mindful to stuff the body as you go to avoid any gaps.
- Narrowing the Body: After reaching the widest part of the body, you’ll begin to decrease in the following rounds, creating a nice rounded bottom.
- Fastening Off: Once the body is the desired size, use a slip stitch to fasten off the end and weave in the yarn tail.
This step creates the foundation of the crochet pattern of Miniature Lion King. The body will be the base for attaching other parts like the head, legs, and tail.
4. Creating the Lion’s Head and Mane
One of the most distinguishing features of the crochet pattern of Miniature Lion King is, of course, the lion’s majestic head and mane. Here’s how to create it:
- Crocheting the Head: Start the head just like the body, using a magic ring and working your way through increasing and regular rounds. This will form a spherical shape. Remember to stuff as you go.
- Shaping the Face: To give your miniature Lion King a defined face, you can make slight adjustments to your stitch counts around the nose and cheeks.
- Adding Safety Eyes: Insert the safety eyes between rounds before closing the head. Ensure they are evenly spaced for a cute and lifelike appearance.
- Creating the Mane: For the mane, use the darker brown yarn. You can crochet long strands that will be sewn around the head, or make loops with chain stitches to give a fluffy appearance.
- Attaching the Head: Once the head and mane are complete, sew them onto the body using your tapestry needle, ensuring they are securely attached.
This is the centerpiece of the crochet pattern of Miniature Lion King, and with some patience, your lion’s personality will shine through.
Frequently Asked Questions (FAQ)
Q: Is this crochet pattern beginner-friendly?
A: Yes, the crochet pattern of Miniature Lion King is suitable for beginners with basic knowledge of crochet stitches like single crochet, increase, and decrease.
Q: What yarn works best for this project?
A: A soft, medium-weight yarn in golden yellow for the body and brown for the mane works best to maintain shape and give the lion a plush look.
Q: How long does it take to complete this project?
A: Depending on your skill level, the crochet pattern of Miniature Lion King can take between 4 to 6 hours to complete.
Q: Can I customize the lion’s colors?
A: Absolutely! You can experiment with different colors for a unique look. However, using traditional colors will give it that iconic Lion King feel.
Q: What size will the finished lion be?
A: The completed lion is approximately 6 inches tall, making it the perfect size for a miniature display or gift.
Q: Do I need special tools to complete this project?
A: Aside from a crochet hook and yarn, you’ll need fiberfill stuffing and safety eyes or embroidery thread for the face details.
Join our VIP broadcast list and gain access to exclusive patterns, all for free. As a VIP member, you’ll receive the best patterns daily, delivered directly to your device. ✨📱 It’s a unique opportunity to stay up-to-date with the latest trends and designs, curated just for you. Don’t miss out on enhancing your projects and discovering new inspirations with the best patterns every day! 🎨🔝
Conclusion
The crochet pattern of Miniature Lion King is a fun and rewarding project that brings a beloved character to life in a creative and charming way. From selecting your yarn to mastering the stitches, this pattern is a delightful challenge for any crochet enthusiast.
We hope this guide has provided you with the confidence and knowledge to make your own mini Lion King. We’d love to hear your thoughts—feel free to leave a comment with your honest opinion and any suggestions you might have!