Crochet Girl Gnome – Tutorial
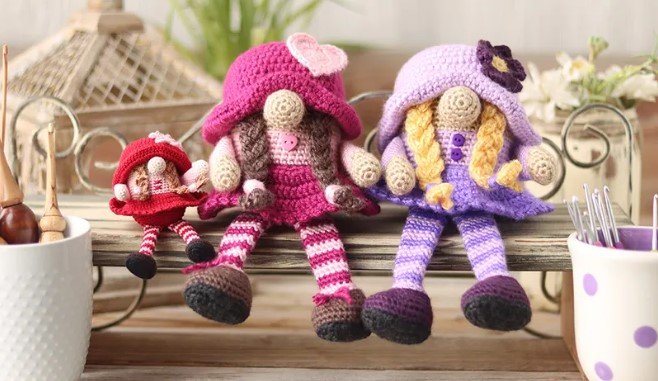
If you’re looking for a charming and fun crochet project, this Crochet Girl Gnome – Tutorial is perfect for you! These adorable gnomes add a whimsical touch to any space, whether you want to use them as home decor, gifts, or even as part of holiday decorations.
In this tutorial, I will walk you through the steps of creating your own crochet girl gnome. With simple instructions and a few materials, you’ll have a delightful project that’s easy to customize.
The Crochet Girl Gnome – Tutorial is suitable for both beginners and experienced crocheters. The pattern is easy to follow, and you can get creative by choosing different colors and styles for the gnome’s hair, hat, and outfit.
Whether you’re making one for yourself or as a gift, the result will be a unique piece that everyone will love.
In this guide, I’ll explain the entire process, from gathering materials to finishing touches. So, grab your crochet hook, yarn, and let’s get started on this Crochet Girl Gnome – Tutorial!
1. Materials Needed for Crochet Girl Gnome
To begin the Crochet Girl Gnome – Tutorial, you’ll first need to gather the necessary materials. These will vary slightly depending on the size and style of your gnome, but the basics remain the same.
- Yarn: Select a soft yarn for the gnome’s body, hat, and clothing. You can use different colors to personalize it.
- Crochet Hook: The size of the hook depends on the yarn weight. Typically, a 4.0 mm hook works well for this project.
- Polyfill Stuffing: This will be used to fill the body of the gnome and give it shape.
- Scissors and Yarn Needle: For trimming and weaving in ends.
- Stitch Markers: Helpful for keeping track of your stitches, especially for beginners.
Once you have these materials ready, you’re set to start crocheting your gnome. Remember that the choice of yarn color can greatly influence the appearance of your final piece. You can opt for traditional gnome colors or experiment with vibrant and playful hues.
For the hair, consider using textured yarn to give your gnome character. Braiding or leaving the yarn loose can create different effects, giving your gnome a personalized look. You can also use buttons or small decorations to enhance the outfit.
Before you start, make sure your work area is clean and organized. Having all the materials within reach will make the process much smoother and enjoyable. Now that we have everything we need, let’s move on to the next step!
2. Step-by-Step Instructions for Creating the Gnome Body
In this section of the Crochet Girl Gnome – Tutorial, I’ll guide you through creating the body. The body is the foundation of your gnome, so take your time to ensure it’s well-shaped.
Start with a magic circle to create a solid base for the body. This technique ensures there’s no hole at the bottom of your gnome, keeping the stuffing secure. After creating the circle, you’ll work in single crochet stitches around, gradually increasing the number of stitches as you go.
As you crochet the body, you’ll notice it taking on a rounded shape. Depending on your gnome’s desired size, you’ll either continue increasing stitches or start working without increases to create the cylindrical body shape. Keep in mind that you’ll need to stuff the body as you go along.
When the body reaches the height you want, it’s time to close the top. Gradually decrease your stitches to form a rounded head. Once finished, make sure to securely weave in any loose ends using your yarn needle.
If you want to add extra detail to the body, such as stripes or a belt, simply switch yarn colors at different points in the pattern. This allows you to create more intricate designs without complicating the basic body shape.
Don’t forget to keep your stitch count consistent, as uneven stitches can affect the final look of your gnome. Using stitch markers can help you keep track of rounds, especially when working on larger gnomes.
3. Creating the Hat and Hair for the Crochet Girl Gnome
No Crochet Girl Gnome is complete without its iconic hat! In this part of the tutorial, you’ll learn how to crochet the hat and add hair to give your gnome a unique personality.
Start by crocheting the hat in a cone shape, which is typical for gnomes. To do this, begin with a small circle and gradually increase the number of stitches in each round. As the hat gets larger, you’ll eventually stop increasing and continue crocheting until it’s long enough to cover the gnome’s head.
You can add a brim to the hat by working in the front loops only, creating a slight flare at the base. This adds a cute touch and gives the hat more character.
For the hair, you have multiple options. The simplest method is to attach strands of yarn to the gnome’s head and either braid them or leave them loose. To do this, cut several pieces of yarn, fold them in half, and pull them through the stitches at the top of the body. Once you have the desired amount of hair, trim it to the desired length.
You can get creative with the hair by adding accessories like bows or tiny flowers. This step is where you can really make your Crochet Girl Gnome stand out!
Finally, attach the hat securely by sewing it onto the head. Be sure it sits snugly, covering the hairline for a neat finish. If you prefer, you can also add a pompom or other embellishments to the tip of the hat for a playful look.
4. Adding the Finishing Touches to Your Crochet Girl Gnome
The final part of this Crochet Girl Gnome – Tutorial involves adding the last details to bring your gnome to life. These small touches will make your gnome truly unique and add personality to the design.
First, let’s work on the face. Most crochet gnomes don’t have detailed faces, but you can embroider eyes, a nose, or even a smile if you prefer. A simple nose can be made using a small ball of yarn stuffed and sewn onto the head.
Next, create the arms and legs by crocheting small tubes and attaching them to the body. For the arms, consider sewing them in a slightly curved position so they look more natural. Legs can either dangle or be shaped to help the gnome stand upright.
If you want your gnome to sit, lightly stuff the legs and sew them in a seated position. This is a great option if you plan to display your gnome on a shelf or table.
To add more charm, consider making tiny accessories like a purse, scarf, or even a miniature gnome friend. These extras can be crocheted with leftover yarn and will make your gnome even more lovable.
Once you’re satisfied with your gnome, give it one final check for any loose ends that need weaving in. Your Crochet Girl Gnome is now complete and ready to be displayed or gifted!
FAQ – Crochet Girl Gnome Tutorial
Q1: How long does it take to crochet a girl gnome? The time it takes to complete the project varies depending on your skill level and the size of the gnome. On average, it may take between 3 to 6 hours.
Q2: Can I use different yarn for the hat and body? Yes! Using different yarns adds more variety and character to your gnome. Just make sure the yarn weights are similar to keep the proportions right.
Q3: Is this pattern suitable for beginners? Absolutely. The Crochet Girl Gnome – Tutorial is beginner-friendly, with simple stitches and clear instructions.
Q4: Can I add eyes and facial details? Yes, you can embroider eyes or use safety eyes. Some people prefer leaving the face blank for a more traditional look.
Q5: What size should the finished gnome be? The size depends on the yarn and hook you use. A typical gnome can range from 6 to 10 inches in height.
Q6: Can I make the gnome without the hair? Yes, some gnomes look just as adorable without hair. You can simply attach the hat directly to the head.
Join our VIP broadcast list and gain access to exclusive patterns, all for free. As a VIP member, you’ll receive the best patterns daily, delivered directly to your device. ✨📱 It’s a unique opportunity to stay up-to-date with the latest trends and designs, curated just for you. Don’t miss out on enhancing your projects and discovering new inspirations with the best patterns every day! 🎨🔝
Conclusion
This Crochet Girl Gnome – Tutorial has shown you how to create an adorable and customizable crochet gnome, perfect for home decor or gifts. From gathering materials to adding finishing touches, we’ve covered everything you need to know. Now it’s your turn to get creative and make your own unique gnome!
We’d love to hear your thoughts! Did this tutorial help? Share your experience and any suggestions for improvement in the comments below.