Creating a Beautiful Amigurumi Bird is a fantastic way to enhance your crochet skills while making a charming and colorful decoration. The art of amigurumi, a Japanese term that refers to crocheting small, stuffed yarn creatures, has gained worldwide popularity.
Whether you’re a beginner or an experienced crocheter, making a Beautiful Amigurumi Bird is a rewarding project that combines creativity, patience, and skill. In this article, we will walk you through the steps to create your very own Beautiful Amigurumi Bird, from choosing the right materials to adding the finishing touches that make it truly special.
Amigurumi birds come in many different forms, from realistic depictions of actual birds to more whimsical, cartoonish interpretations.
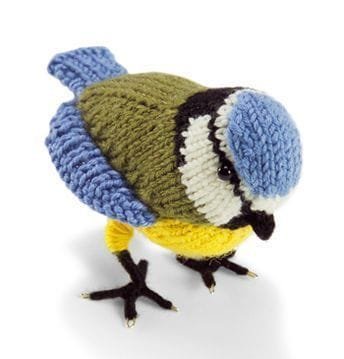
The flexibility of the technique allows you to experiment with colors, sizes, and shapes, giving you the freedom to create a bird that suits your personal style or the theme of your home décor.
The end result can serve as a lovely gift for someone special or as a delightful addition to your own collection of handmade crochet items.
Before diving into the detailed instructions for creating your Beautiful Amigurumi Bird, it’s important to understand the basic techniques involved. The foundation of amigurumi relies on the use of small, tight stitches that allow the crochet piece to be stuffed and hold its shape.
As we explore the steps and techniques, you will learn how to make the bird’s body, wings, beak, and eyes, as well as how to assemble all the parts into a cohesive, charming little creature.
1. Materials Needed for a Beautiful Amigurumi Bird
The first step in making a Beautiful Amigurumi Bird is gathering all the necessary materials. While amigurumi crochet can be done with various types of yarn, it’s best to choose a yarn that is suitable for small, intricate stitches. Cotton yarn or acrylic yarn are excellent choices for this type of project, as they are durable, come in a wide range of colors, and hold their shape well.
For a small to medium-sized bird, a light or medium-weight yarn (such as DK or worsted weight yarn) works perfectly. It’s also important to choose a crochet hook that matches the yarn weight, usually a 3.5mm to 4mm hook for medium-weight yarn. The size of the hook will influence the tightness of your stitches, so make sure to adjust accordingly.
In addition to yarn and a crochet hook, you will also need a few other tools to complete your Beautiful Amigurumi Bird. These include stuffing material to give your bird its shape, yarn needles for sewing pieces together, and safety eyes or yarn to create the eyes. If you wish to add extra details, like a beak or feet, consider using felt or additional yarn colors for the perfect touch.
When selecting your yarn colors, think about the overall look you want for your bird. Do you want to create a bright, tropical bird or a more subdued, natural one? The colors you choose will affect the overall aesthetic, so take some time to plan out the look of your Beautiful Amigurumi Bird before starting your crochet project.
2. Basic Stitches Used in Amigurumi for Birds
To crochet a Beautiful Amigurumi Bird, you will need to know a few key stitches that are commonly used in amigurumi. The foundation of many amigurumi projects, including birds, involves the magic ring, which creates a tight, secure circle to start crocheting in the round. This is particularly useful when making the body of the bird, as it helps maintain a clean, seamless look.
Once you master the magic ring, you will work in spirals to create the bird’s body, wings, and other features. To increase or decrease the number of stitches as you crochet, you’ll use increase stitches (sc2tog) and decrease stitches (sc2inc) to shape the bird’s body. It’s important to keep the tension consistent to ensure that the stitches are tight enough to hold the stuffing but not so tight that they become difficult to crochet.
Some other essential stitches for amigurumi include the single crochet (sc) stitch, which is the most common stitch used in amigurumi, and the slip stitch (sl st), which is used to join parts or to close gaps in your work. The double crochet (dc) stitch can also be used for larger parts like the wings or tail feathers if you want to add extra texture or make the parts stand out.
As you create the different parts of your Beautiful Amigurumi Bird, you’ll use a combination of these stitches to form the bird’s body, wings, beak, and eyes. Practice these stitches as you go, and don’t be afraid to adjust the tension or stitch counts as needed to get the desired shape and size for your bird.
3. Assembling the Parts of Your Beautiful Amigurumi Bird
Once all the parts of your Beautiful Amigurumi Bird are crocheted, it’s time to assemble them. Start by sewing the bird’s head to the body using a yarn needle. Be sure to position the head at the right angle to give the bird its desired pose. Once the head is attached, you can move on to the wings, sewing them to the sides of the body.
Next, attach the bird’s beak. Depending on your design, you may crochet the beak separately and then sew it onto the face of the bird, or you can simply embroider a small triangle for the beak using yarn. Be careful to position the beak correctly, so it looks natural on the face.
The eyes are another important feature of your Beautiful Amigurumi Bird. You can either use safety eyes, which are simple and secure, or crochet the eyes using small stitches of black yarn. If you choose to crochet the eyes, you can use a small circle or oval shape and sew it onto the face of the bird.
If your bird design includes additional details like feet, you can crochet them separately and sew them onto the bottom of the body. You can also add embellishments like tiny wings, tail feathers, or even small accessories like a tiny scarf or hat for a more personalized touch.
Once all the parts are attached, gently stuff the body and head of your Beautiful Amigurumi Bird with stuffing material. Be sure to stuff it evenly, paying attention to the shape to ensure the bird stands up or sits comfortably. After everything is stuffed, sew up any open seams to finish the bird’s body.
4. Personalizing and Adding Final Touches
To make your Beautiful Amigurumi Bird truly unique, consider adding a few personal touches. For example, you can use embroidery to add small details like feathers, spots, or patterns on the bird’s body. This can give the bird more texture and make it look more realistic or artistic, depending on your style.
Another fun option is to experiment with different yarn textures. Consider using a variegated yarn to create a multicolored bird, or add a bit of glitter or metallic yarn to make your bird sparkle. You could also use a fluffy yarn to create a bird with a soft, feathery look. Adding texture and patterns can really make your Beautiful Amigurumi Bird stand out.
If you’re giving your bird as a gift, consider making a little nest for it to rest in. This adds an extra layer of creativity and charm to your crochet project. You can easily crochet a small basket or nest from yarn, and then place your finished bird inside. This will make your gift even more special and memorable.
Finally, you can display your Beautiful Amigurumi Bird as a decoration in your home. It makes a lovely addition to shelves, desks, or even as a part of a larger crochet bird collection. If you want, you can create a series of birds with different colors and styles, each with its own personality.
FAQ (Frequently Asked Questions)
1. What yarn is best for making an amigurumi bird? Cotton yarn or acrylic yarn is ideal for amigurumi birds. These yarns hold their shape well and come in a wide variety of colors.
2. How do I make the wings of an amigurumi bird? You can crochet the wings separately using the same techniques as the body. Use single crochet stitches to create a small, compact wing and sew it onto the sides of the bird’s body.
3. Can I add extra details to my amigurumi bird? Yes! You can add embroidery to create feathers, eyes, or other features, or experiment with different yarn textures to personalize your bird further.
4. How do I attach the parts of the bird together? Use a yarn needle to sew the parts together securely. Start with the head, then attach the wings, beak, and other parts as needed.
5. How do I create the eyes of the bird? You can use safety eyes or crochet the eyes yourself by creating small circles of black yarn. Attach them securely to the face of the bird.
Join our VIP broadcast list and gain access to exclusive patterns, all for free. As a VIP member, you’ll receive the best patterns daily, delivered directly to your device. ✨📱 It’s a unique opportunity to stay up-to-date with the latest trends and designs, curated just for you. Don’t miss out on enhancing your projects and discovering new inspirations with the best patterns every day! 🎨🔝
Conclusion
Creating a Beautiful Amigurumi Bird is a fun and rewarding project that allows you to showcase your crochet skills while making something charming and personalized. From selecting the right yarn and stitches to adding final touches like embroidery and accessories, each step of the process offers room for creativity. We hope this guide has inspired you to start your own Beautiful Amigurumi Bird and explore the endless possibilities of amigurumi crochet.
If you have any questions or would like to share your experiences with making your own bird, feel free to leave a comment below. We’d love to hear from you!

