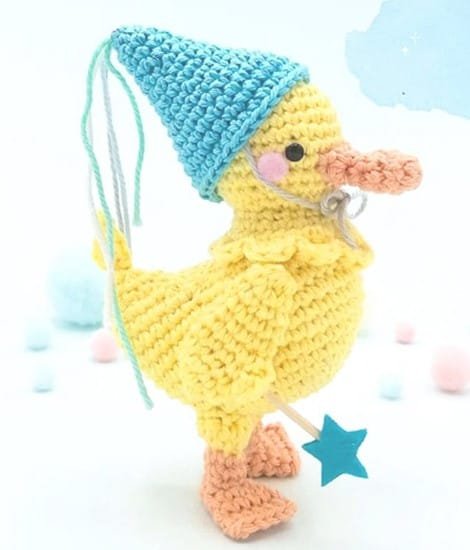
Are you ready to bring a little bit of magic into your life with this Amigurumi Wizard Duck – free pattern? In this detailed guide, we will walk you through the process of creating an enchanting wizard-themed duck that’s perfect for both beginners and experienced crocheters.
Whether you’re crafting it as a gift or for yourself, this magical duck will surely become a beloved piece in any amigurumi collection.
The Amigurumi Wizard Duck – free pattern is an excellent way to sharpen your amigurumi skills and add a unique, whimsical creature to your projects. This tutorial breaks down the steps to ensure that even the most intricate parts, like the wizard’s hat and robe, are simple and enjoyable to create.
We’ll also cover the materials needed and some helpful tips to ensure your little wizard comes out just right.
If you’re new to amigurumi, don’t worry! This Amigurumi Wizard Duck – free pattern is designed to be beginner-friendly, with clear instructions and plenty of details to make sure you succeed. So grab your yarn, hook, and magical crafting spirit as we embark on this fun journey together!
1. Materials and Tools for Your Amigurumi Wizard Duck
When preparing to crochet your Amigurumi Wizard Duck, it’s important to gather the right materials and tools. This will not only make the process smoother but also ensure your creation looks its best.
- Yarn: Choose a high-quality, medium-weight yarn for both the body and accessories. For a classic look, opt for yellow for the duck’s body and purple or blue for the wizard’s hat and robe.
- Crochet Hook: A size 3.5mm (E) hook is ideal for this project. If you crochet tightly, consider a larger hook to avoid overly stiff stitches.
- Stuffing: Polyester fiberfill works best for stuffing amigurumi, ensuring your wizard duck is soft but holds its shape.
- Safety Eyes: For a magical touch, 10mm safety eyes will give your duck a whimsical and friendly look.
- Needle: A darning needle will help you weave in ends and sew the pieces together, like the hat and robe.
- Stitch Markers: Essential for keeping track of rounds, especially in the head and body.
Having these materials ready will make your crocheting experience more enjoyable and keep you organized.
2. How to Crochet the Body of Your Wizard Duck
Now that you have your materials ready, it’s time to start crocheting the body of your Amigurumi Wizard Duck. The body is the core of your project, so take your time with these steps to ensure a smooth and even shape.
- Magic Ring Start: Begin with a magic ring, as this will create a tight and clean start for the duck’s body. Single crochet (sc) 6 stitches into the ring to begin the round.
- Increase Rounds: Over the next few rounds, increase your stitch count to shape the body. For example, increase by 6 stitches per round until you have about 36 stitches.
- Creating the Shape: After reaching the desired width, crochet several rounds without increasing to give the duck its height.
- Stuffing the Body: As you reach the final rounds of the body, begin stuffing it with polyester fiberfill. Be sure to stuff evenly and not too tightly, allowing for a soft yet structured finish.
- Closing the Body: When you’ve stuffed the body, continue decreasing stitches until you’re left with a small opening. Use a darning needle to sew it closed neatly.
- Finishing Touches: To give your duck a smooth and professional look, gently shape the body with your hands after stuffing to ensure it’s evenly rounded.
3. Crafting the Wizard Hat and Robe
No Amigurumi Wizard Duck is complete without a magical hat and robe! These accessories are what set your creation apart and give it a true wizardly charm.
- Creating the Hat: Start with a magic ring, and increase stitches just like you did with the body. This time, though, you’ll want to form a cone shape. The key is to increase less frequently to ensure the hat narrows as it gets taller.
- Adding the Brim: Once your cone is the desired height, crochet a few rounds where you increase more rapidly to create the wide brim of the wizard hat.
- Wizardly Colors: To make the hat stand out, use colors like deep purple or midnight blue. You can also add a stripe or star for an extra magical effect.
- Creating the Robe: The robe is crocheted similarly to a small cape. Start by chaining a row long enough to wrap around the duck’s neck, then crochet in rows to create the robe.
- Attaching the Robe: After completing the robe, use your darning needle to sew it carefully onto the back of the duck. Ensure the robe drapes naturally.
- Final Details: Consider adding a tiny wand or a staff, which can be crocheted or made from a small wooden dowel, to complete the wizardly look.
4. Assembling and Finalizing Your Wizard Duck
With all the pieces complete, it’s time to assemble your Amigurumi Wizard Duck and bring your magical friend to life!
- Attaching the Head: Using a darning needle, securely sew the head to the body. Be sure to stuff the neck area a little more if needed to maintain the shape.
- Adding the Beak and Wings: Crochet small pieces for the beak and wings. These can be sewn onto the body with small stitches to ensure they are securely attached.
- Positioning the Hat: Once the head is in place, sew or position the wizard hat onto the duck’s head. Use a small amount of glue if you prefer not to sew.
- Detailing the Face: After attaching the safety eyes, you can embroider small eyebrows or a little smile to give your duck a more expressive face.
- Attaching the Robe: Drape the robe over the duck’s body and sew it in place. Be sure it fits snugly but still allows some movement.
- Final Adjustments: Take a moment to look over your creation. Make any final adjustments to the positioning of the hat, robe, and wings, ensuring everything looks just right.
FAQ
1. What is the best yarn for making an Amigurumi Wizard Duck?
The best yarn to use is a medium-weight cotton or acrylic yarn. Cotton provides a firm, structured finish, while acrylic is softer and fluffier, ideal for a cuddly toy.
2. Can beginners make this Amigurumi Wizard Duck – free pattern?
Absolutely! This pattern is designed to be accessible for beginners, with simple stitches like single crochets and easy-to-follow instructions.
3. How long does it take to complete the project?
On average, it takes around 5 to 7 hours to complete, depending on your crocheting speed and experience.
4. Can I customize the colors of my wizard duck?
Yes! Feel free to experiment with different colors for the hat, robe, or even the body to create a unique version of your Amigurumi Wizard Duck.
5. Do I need safety eyes, or can I embroider the eyes?
You can use either safety eyes or embroidery. Safety eyes provide a more polished look, but embroidery allows for more customization.
6. What size should the finished wizard duck be?
Using the recommended materials, your wizard duck should stand about 6 to 8 inches tall, making it the perfect size for a cute display or toy.
Join our VIP broadcast list and gain access to exclusive patterns, all for free. As a VIP member, you’ll receive the best patterns daily, delivered directly to your device. ✨📱 It’s a unique opportunity to stay up-to-date with the latest trends and designs, curated just for you. Don’t miss out on enhancing your projects and discovering new inspirations with the best patterns every day! 🎨🔝
Conclusion
Congratulations! You’ve now learned how to create your very own Amigurumi Wizard Duck. This project is a fun and rewarding way to bring a little magic into your crochet routine.
Whether you’re new to amigurumi or an experienced crocheter, this pattern offers the perfect balance of simplicity and charm. We’d love to hear about your experience and see your creations, so please feel free to leave a comment with your thoughts and any suggestions for future projects. Happy crocheting!