If you are looking for a fun and creative craft project, the Amigurumi Pumpkin Free Pattern is perfect for both beginners and experienced crocheters.
The charm of Amigurumi Pumpkin lies in its simplicity and versatility. You can make it in various sizes, colors, and styles, which allows for endless creativity.
Creating a handmade Amigurumi Pumpkin also brings a sense of accomplishment and relaxation. Crocheting is known for its therapeutic benefits, helping reduce stress and improve focus.
Materials Needed for Your Amigurumi Pumpkin
To start your Amigurumi Pumpkin, gather the necessary materials. You will need yarn in orange, green, and brown colors, a suitable crochet hook, a yarn needle, stitch markers, and fiberfill stuffing. Using high-quality yarn ensures your pumpkin is soft and durable.
Different yarn weights can produce different effects. For example, using worsted weight yarn creates a larger pumpkin, while sport or DK weight yarn results in smaller, delicate pumpkins. Choosing the right yarn for your Amigurumi Pumpkin helps you achieve the desired look and size.
A crochet hook that matches your yarn weight is essential. Using the wrong hook size can make your stitches too tight or too loose. Proper tension ensures that your Amigurumi Pumpkin keeps its shape and looks neat.
Fiberfill stuffing is crucial to give your pumpkin its plump and rounded form. Make sure to stuff it evenly without overfilling, which could distort the shape. A well-stuffed Amigurumi Pumpkin looks more professional and aesthetically pleasing.
Stitch markers are helpful, especially for beginners, to mark the beginning of each round. This prevents mistakes and ensures your pumpkin maintains symmetry. Using stitch markers makes following the Amigurumi Pumpkin Free Pattern much easier and more accurate.
Finally, a yarn needle is necessary to sew parts together and weave in ends. Proper finishing techniques are essential to make your Amigurumi Pumpkin look polished and complete. Taking the time to finish neatly enhances the overall quality of your project.
Step-by-Step Instructions to Crochet an Amigurumi Pumpkin
Start your Amigurumi Pumpkin by creating a magic ring and crocheting the first round of single crochets. This technique allows you to work in a circular pattern, gradually increasing stitches to form the pumpkin’s base.
After forming the base, continue with rounds of single crochet while gradually increasing stitches to give your pumpkin a round shape. Consistency in stitch tension is key for a uniform appearance. Following the Amigurumi Pumpkin Free Pattern step-by-step helps maintain the correct proportions.
Once you reach the desired width, continue with even rounds to form the body. This is where the pumpkin starts to take shape, becoming plump and round. Carefully counting your stitches ensures symmetry for a balanced Amigurumi Pumpkin.
Next, begin decreasing stitches to close the top of the pumpkin. Work slowly and evenly to maintain a smooth curve. Decreasing correctly is crucial to achieving the classic pumpkin shape that looks both cute and natural.
After closing the pumpkin, stuff it firmly with fiberfill. Ensure the stuffing reaches all corners for a well-rounded form. A properly stuffed Amigurumi Pumpkin has a solid yet soft texture, perfect for holding shape over time.
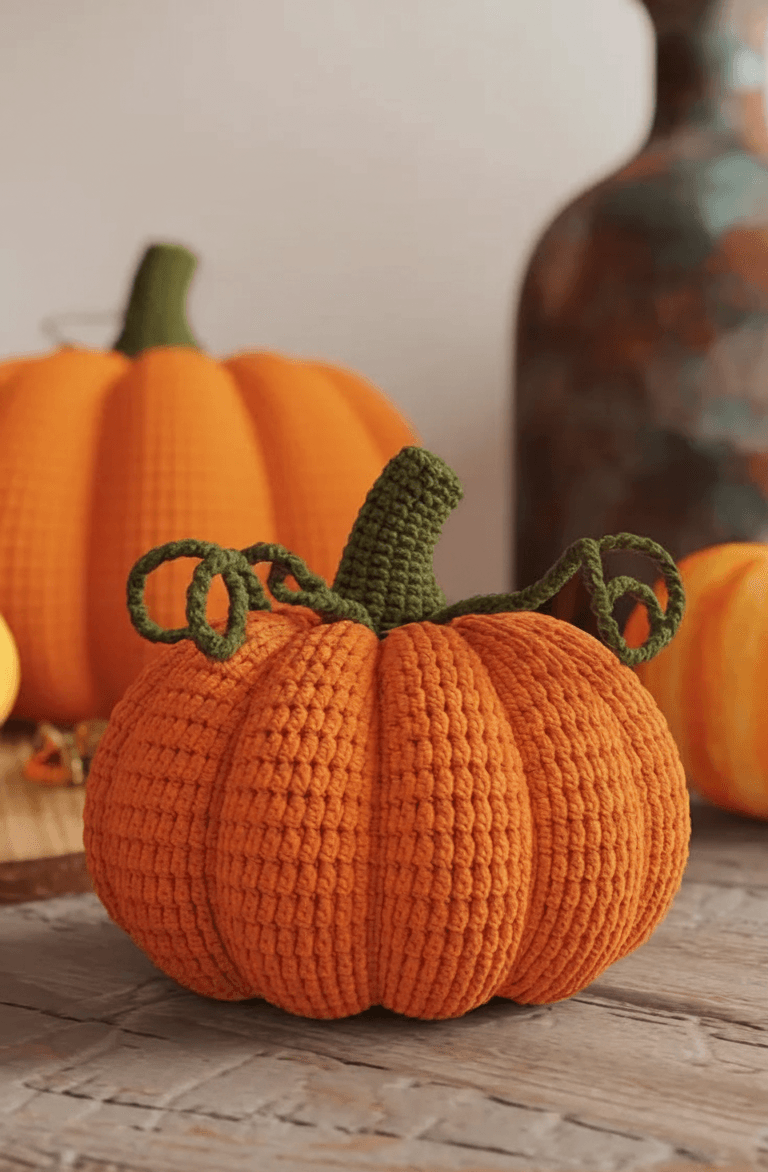
Finally, add the stem and leaf details using green and brown yarn. These finishing touches give your pumpkin character and charm. Attaching stems and leaves securely completes your Amigurumi Pumpkin and makes it ready for display or gifting.
Tips for Customizing Your Amigurumi Pumpkin
One of the joys of making Amigurumi Pumpkin is personalization. You can experiment with different yarn colors, patterns, and textures to make your pumpkin unique. Bright oranges, soft pastels, or even variegated yarn can produce fun effects.
Adding embellishments like buttons, embroidery, or tiny faces can transform a simple Amigurumi Pumpkin into a whimsical decoration. Personal touches make your creation stand out and show off your creativity.
Consider making a set of pumpkins in various sizes for a charming autumn display. Small, medium, and large Amigurumi Pumpkin can be arranged together for a table centerpiece or mantel decoration.
Changing the shape slightly, such as making it rounder or more elongated, can also produce interesting variations. Experimenting with shapes allows you to tailor the Amigurumi Pumpkin to your desired style.
You can also create themed pumpkins, like Halloween versions with cute jack-o’-lantern faces. These seasonal adaptations make your Amigurumi Pumpkin Free Pattern even more fun and engaging.
Finally, consider using different yarn textures like cotton, wool, or acrylic blends. Texture can add depth and visual interest to your Amigurumi Pumpkin, enhancing its overall aesthetic appeal.
Common Mistakes to Avoid While Making an Amigurumi Pumpkin
Many beginners make mistakes with tension, which can distort the Amigurumi Pumpkin shape. Make sure your stitches are even and consistent for the best results. Proper tension ensures a neat, professional-looking finished pumpkin.
Skipping or miscounting stitches is another common issue. Carefully following the Amigurumi Pumpkin Free Pattern and using stitch markers helps prevent errors. Counting stitches regularly ensures the pumpkin retains its intended proportions.
Overstuffing or understuffing can affect the pumpkin’s form. Stuff evenly, making sure it is plump without being overly firm. Balanced stuffing gives the Amigurumi Pumpkin its classic rounded shape.
Neglecting finishing touches, like securing ends or sewing the stem properly, can lead to unraveling. Taking time for proper finishing ensures your Amigurumi Pumpkin is durable and long-lasting.
Using the wrong hook size can result in a pumpkin that is too tight or too loose. Match your crochet hook to your yarn for optimal results. Correct hook size is essential for a consistent Amigurumi Pumpkin texture.
Finally, not personalizing your pumpkin can make it look generic. Adding details like leaves, stems, or small embellishments enhances the visual appeal. Custom touches make your Amigurumi Pumpkin Free Pattern truly unique and enjoyable to create.
FAQ About Amigurumi Pumpkin
Q: What is an Amigurumi Pumpkin?
A: An Amigurumi Pumpkin is a small crocheted pumpkin, often made as a decoration or toy. It is created using basic crochet stitches in a round, stuffed with fiberfill, and sometimes adorned with a stem and leaf.
Q: Can beginners make an Amigurumi Pumpkin?
A: Yes! The Amigurumi Pumpkin Free Pattern is beginner-friendly, using simple stitches like single crochet and magic rings. Step-by-step instructions make it easy to follow.
Q: What yarn is best for an Amigurumi Pumpkin?
A: Worsted weight yarn works well for larger pumpkins, while DK or sport weight yarn creates smaller versions. Cotton, acrylic, or blends can be used based on your preference.
Q: How do I stuff my Amigurumi Pumpkin?
A: Use fiberfill stuffing, inserting it evenly to maintain a round shape. Avoid overstuffing, which can distort the pumpkin’s shape.
Q: Can I make different sizes of Amigurumi Pumpkin?
A: Absolutely! Adjusting yarn weight, hook size, and stitch counts allows you to create small, medium, or large pumpkins. Multiple sizes look great together for displays.
Q: How do I finish and secure my Amigurumi Pumpkin?
A: Use a yarn needle to weave in ends and sew on the stem and leaf securely. Proper finishing ensures durability and prevents unraveling.
Conclusion
From selecting the right materials to personalizing your pumpkin, this guide covers all essential steps for a successful project.
Remember to pay attention to tension, stitch counts, and finishing touches to ensure your Amigurumi Pumpkin looks polished and professional.
Share your experiences, leave a sincere opinion, and feel free to suggest improvements or variations to make your Amigurumi Pumpkin truly unique.

