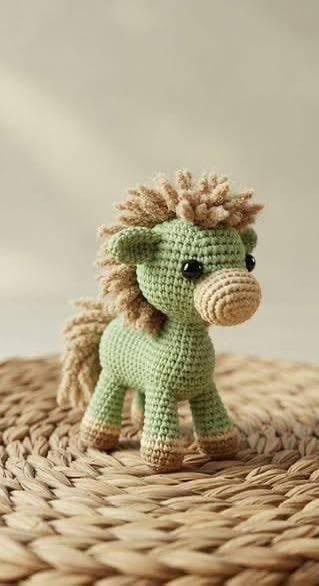
If you are looking to create a delightful crochet project, the Amigurumi Horse Pattern is a perfect choice. Amigurumi, the Japanese art of crocheting small stuffed animals and characters, has grown immensely popular among crafters worldwide.
The Amigurumi Horse Pattern is versatile, allowing you to customize your horse with different colors, textures, and accessories. Whether you choose soft pastel yarns for a gentle look or bold shades for a playful design, this pattern adapts beautifully.
Understanding the Amigurumi Horse Pattern requires learning some essential crochet techniques, including basic stitches, increases, and decreases. This pattern is designed to be beginner-friendly, with step-by-step instructions to guide you through each stage.
Understanding the Amigurumi Horse Pattern
The Amigurumi Horse Pattern begins with a detailed explanation of materials required, such as yarn types, hook sizes, and safety eyes. Using the correct materials ensures the final product is durable and visually appealing. Choosing the right yarn can impact the softness and structure of your horse, while the hook size influences the tightness of the stitches, affecting the stuffing and shaping of your project.
This pattern emphasizes learning fundamental crochet stitches. Key stitches include single crochet, slip stitch, chain stitch, and magic ring. Mastering these basic techniques will make the pattern easier to follow and allow you to create consistent, neat stitches. Even beginners can achieve professional-looking results with proper guidance.
In addition to stitches, the Amigurumi Horse Pattern teaches how to create different shapes for the horse’s body, head, and legs. The pattern explains how to crochet each part separately and then assemble them accurately. Following the steps carefully ensures that the horse maintains its intended proportions and looks charming.
Color choices and yarn textures play a significant role in making your horse unique. By experimenting with shades and patterns, you can add personality and flair to your creation. Some crafters enjoy adding accessories like tiny bows, manes, or saddles to enhance the overall design.
Another essential aspect of the pattern is stuffing and finishing techniques. Proper stuffing ensures the horse retains its shape without being too stiff or too soft. The Amigurumi Horse Pattern provides tips on evenly distributing stuffing and closing seams neatly for a polished look.
Finally, attention to detail is crucial when following the Amigurumi Horse Pattern. Small touches, like positioning eyes symmetrically and securing limbs firmly, can significantly impact the final appearance. This pattern guides you through these details to achieve the perfect amigurumi horse.
Benefits of Making an Amigurumi Horse
Creating an Amigurumi Horse Pattern offers numerous benefits beyond crafting a cute toy. One significant advantage is enhancing your fine motor skills. Crocheting requires precise hand movements, which improve coordination and dexterity over time.
Following the pattern also stimulates your mind. Learning to read and interpret crochet instructions engages problem-solving skills and encourages patience and perseverance. Completing the project fosters a sense of achievement and boosts self-confidence.
The Amigurumi Horse Pattern also makes a thoughtful handmade gift. Personalized with favorite colors or custom accessories, your crocheted horse becomes a meaningful present for birthdays, holidays, or special occasions. Handmade gifts are treasured for their personal touch and effort.
Using this pattern can also be a social activity. Many crocheters join online communities or local craft groups to share progress, tips, and ideas. Discussing the Amigurumi Horse Pattern with fellow enthusiasts fosters creativity and encourages learning new techniques.
Another benefit is stress relief. Crocheting helps focus the mind, creating a meditative effect. Working on your Amigurumi Horse Pattern can provide relaxation after a busy day, reducing anxiety and promoting mindfulness.
Lastly, completing the pattern allows you to build a collection of amigurumi figures. Each horse you make can be part of a larger display, a themed collection, or even sold as part of a small handmade business. This pattern is the first step to exploring more complex amigurumi projects.
Tips for Perfecting Your Amigurumi Horse
To get the best results with the Amigurumi Horse Pattern, start by selecting high-quality yarn. Quality yarn not only improves appearance but also ensures the durability of your finished horse. Soft yarns create a cuddly texture, while vibrant colors bring your horse to life.
Choosing the correct hook size is equally important. Using a hook that is too large may result in loose stitches and a floppy horse, whereas a smaller hook creates tighter stitches and better structure. The pattern provides recommended hook sizes for ideal results.
Consistent tension is essential in amigurumi projects. Maintaining uniform tension while following the Amigurumi Horse Pattern ensures that each part of the horse has a consistent appearance. Practice adjusting your grip to maintain even tension throughout.
Take your time assembling the parts. The pattern outlines how to attach the legs, head, and tail accurately. Using pins before sewing parts together helps position them correctly and prevents mistakes that may affect the horse’s proportions.
Adding small details like eyes, ears, and mane enhances the horse’s personality. The Amigurumi Horse Pattern includes tips on placement and styling, giving your horse character and charm. You can also experiment with different expressions to create unique horses.
Finally, finishing touches are crucial. Secure all loose ends, weave in yarn tails, and smooth out any uneven areas. Following these finishing steps ensures your Amigurumi Horse Pattern project looks polished and professional, ready to display or gift.
Common Mistakes to Avoid
While working on the Amigurumi Horse Pattern, beginners often make mistakes that can affect the final outcome. One common issue is skipping rows or stitches, which can distort the shape of the horse. Carefully counting stitches prevents this problem.
Incorrect stuffing is another frequent mistake. Overstuffing makes the horse stiff, while understuffing creates a floppy figure. The pattern provides guidance on the proper amount of stuffing for each part.
Not securing parts firmly can cause limbs or ears to detach. Following the Amigurumi Horse Pattern instructions for stitching pieces together ensures stability and durability.
Using the wrong yarn or hook size can affect proportions and texture. Stick to the recommended materials in the pattern for the best results.
Ignoring small details, such as uneven eyes or asymmetrical limbs, can impact the horse’s overall look. Paying attention to detail while following the Amigurumi Horse Pattern ensures a professional appearance.
Finally, rushing through the pattern may result in mistakes. Take your time, enjoy the process, and follow each step carefully for the best outcome. Patience is key to successfully completing your amigurumi horse.
FAQ About Amigurumi Horse Pattern
Q: Is this pattern suitable for beginners?
A: Yes, the Amigurumi Horse Pattern is designed to be beginner-friendly with step-by-step instructions and explanations of all basic stitches.
Q: What materials do I need?
A: You will need yarn, a crochet hook, stuffing, safety eyes, a yarn needle, and scissors. The pattern specifies recommended yarn types and hook sizes.
Q: How long does it take to complete?
A: The time varies depending on skill level. Beginners may take several hours, while experienced crocheters can complete it faster.
Q: Can I customize the horse?
A: Absolutely! You can use different yarn colors, add accessories, or adjust sizes to make each horse unique.
Q: How do I assemble the parts?
A: The pattern provides step-by-step guidance on sewing limbs, head, and tail securely. Using pins to hold pieces in place before stitching is recommended.
Q: Can I sell the finished horse?
A: Yes, you can sell your creations, but it is important to respect copyright and mention that it was made using the Amigurumi Horse Pattern.
Q: How do I care for my amigurumi horse?
A: Hand washing with mild soap and air drying is recommended to maintain the shape and softness of your horse.
Conclusion
In this article, we explored the Amigurumi Horse Pattern, providing detailed guidance on materials, stitches, assembly, and finishing techniques. By following this pattern, you can create a charming and durable crochet horse suitable for gifts, decoration, or personal enjoyment. We also discussed the benefits of amigurumi, tips for perfecting your project, and common mistakes to avoid. Crafting an amigurumi horse is not only a creative activity but also a rewarding and relaxing hobby. We invite you to share your experiences, provide honest feedback, and suggest ideas for future patterns. Your insights help improve the crafting community and inspire new creations.