The Attic Window Quilt Pattern is one of the most visually striking designs in the world of quilting. Known for its unique ability to create an illusion of depth and perspective, this pattern gives your fabric pieces the appearance of three-dimensional windows looking out into a beautiful world.
At first glance, the Attic Window Quilt Pattern looks complex, but with patience and a little guidance, anyone can master this timeless design. It’s all about using the right color contrasts and understanding how light and shadow work together.
Another reason why this quilt pattern remains so popular is its storytelling potential. Each “window” can display a small part of a larger narrative, allowing the quilter to express creativity through fabric.
Understanding the Attic Window Quilt Pattern
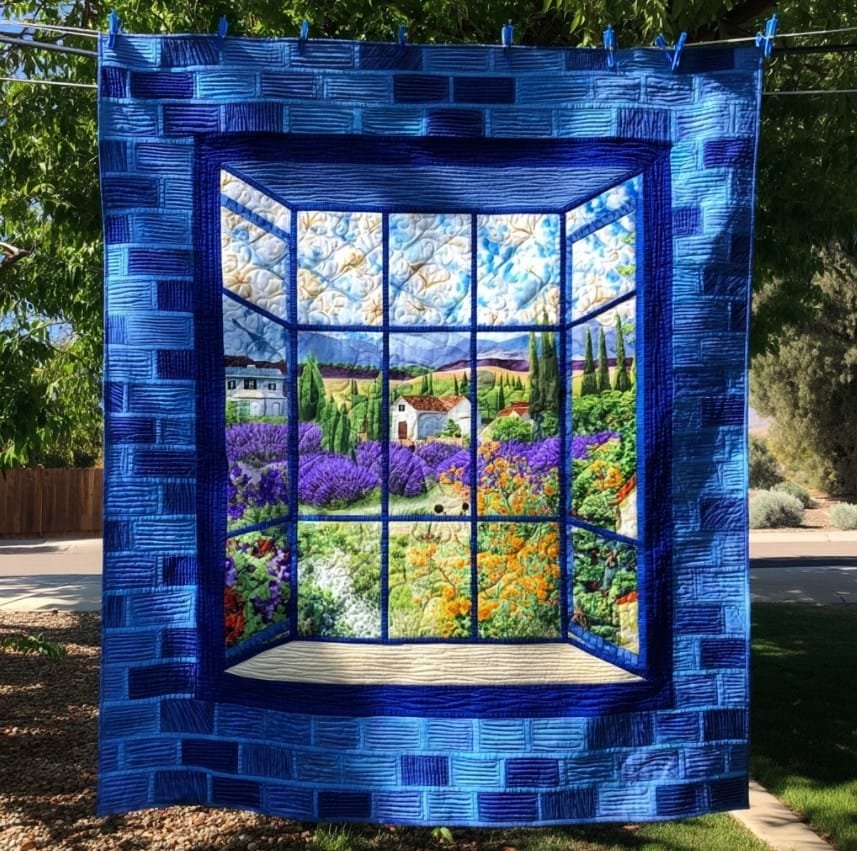
The Attic Window Quilt Pattern is designed to mimic the view from a real window, giving your quilt a beautiful 3D effect. The technique relies heavily on creating contrast with light, medium, and dark fabrics. The “window panes” are often represented by angled fabric strips that make the blocks look like they are set into walls.
When planning your project, color selection plays a vital role. The lightest color represents the area where sunlight hits, while the darkest color forms the shadow that gives the illusion of depth. By arranging these pieces carefully, you can transform a flat quilt block into something that seems to pop off the surface.
This design works wonderfully with printed fabrics that feature scenic or thematic images. For example, a winter landscape print placed behind each “window” can make your quilt look like a view from a cozy cabin. Similarly, floral or nature-themed prints create a soft and calming effect perfect for home décor.
One of the most appealing features of the Attic Window Quilt Pattern is how customizable it is. You can adjust the block size, fabric theme, and color combination to suit any style—from vintage and rustic to modern and minimalist. The pattern adapts beautifully to any quilting project.
Many quilters enjoy combining different “window scenes” within one quilt. This technique transforms your project into a patchwork gallery, each window telling its own story. The result is both artistic and deeply personal, showcasing your creativity in every block.
Above all, understanding how to balance contrast and layout is key. Once you master that, the Attic Window Quilt Pattern becomes an exciting and rewarding project that continues to captivate anyone who sees it.
Materials and Tools You’ll Need
Before beginning your Attic Window Quilt Pattern, it’s essential to gather all the necessary materials and tools. This preparation ensures that your project goes smoothly from start to finish.
Start with your fabric selection. You’ll need at least three shades for each block—light, medium, and dark. The light fabric typically represents sunlight, the medium tone is used for the window frame, and the dark one creates the illusion of shadow. Choosing high-quality cotton fabric ensures durability and easy handling.
You’ll also need a rotary cutter, self-healing cutting mat, and quilting ruler to achieve precise cuts. Accuracy is key in this pattern because even small misalignments can disrupt the 3D illusion. Always double-check your measurements before cutting.
A reliable sewing machine with a ¼-inch foot attachment makes assembling your blocks much easier. Consistency in seam allowance keeps your blocks uniform and makes joining them together seamless. Don’t forget extra thread and sharp needles to maintain clean stitching.
Batting and backing fabric are crucial for giving your quilt softness and structure. Choose a batting that complements your desired thickness and texture. For beginners, a medium-weight cotton batting is usually ideal.
Lastly, pressing tools like an iron and ironing board help flatten seams and keep your quilt top neat. Pressing after each step enhances precision and gives your Attic Window Quilt Pattern a professional finish.
Step-by-Step Guide to Making an Attic Window Quilt
Creating an Attic Window Quilt Pattern may look intimidating, but breaking it down step by step makes it achievable for any skill level. Here’s a simplified process to help you get started.
Begin by cutting your center fabric squares, which will serve as the “view” behind each window. These squares can feature prints like flowers, animals, or scenic patterns. Each window becomes a frame for your chosen design.
Next, cut the window frames. These consist of two strips—one for the bottom (shadow) and one for the side (light). Sew these strips onto the center square, starting with the lighter one on the side and then the darker one at the bottom. This sequence is essential to achieving the illusion of depth.
Once all your blocks are assembled, arrange them on a flat surface before sewing them together. This allows you to adjust placement and balance colors across your quilt. Play with the direction of light and shadow to enhance the 3D effect.
After finalizing your layout, sew the blocks together in rows, then join the rows to complete your quilt top. Press your seams flat after each step for a clean finish.
Add borders if desired to frame your quilt design. Borders can be solid or patterned, depending on your aesthetic preference. A darker border can make your windows stand out even more dramatically.
Finally, layer your quilt top with batting and backing, then quilt through all layers using straight lines or free-motion designs. Bind the edges, and your Attic Window Quilt Pattern masterpiece is complete!
Tips for Perfecting Your Attic Window Quilt Pattern
To make your Attic Window Quilt Pattern stand out, pay attention to small details that have a big impact. One of the most important aspects is color placement. Always test your fabric combinations before sewing to ensure the desired contrast.
Lighting and directionality also play a significant role. Choose one consistent light source throughout your quilt so that all window shadows fall in the same direction. This consistency reinforces the 3D illusion.
Another valuable tip is to use a design wall or digital layout tool. Seeing all your blocks together before stitching helps you visualize the finished piece and avoid repeating color mistakes.
If you’re new to quilting, practice sewing a few test blocks first. This lets you perfect your technique and confirm your measurements before committing to the full project. It’s better to make small adjustments early than to unpick seams later.
For extra visual appeal, consider adding sashing between the blocks. This creates a framed effect around each window, making the quilt look more structured and refined.
Finally, patience and precision are your best tools. Take your time with each block, double-check your alignment, and press your seams carefully. These small efforts lead to a flawless Attic Window Quilt Pattern that will impress everyone who sees it.
FAQ: Attic Window Quilt Pattern
1. What is the Attic Window Quilt Pattern?
The Attic Window Quilt Pattern is a quilt design that creates a 3D illusion of looking through a window. It uses light, medium, and dark fabrics to simulate sunlight and shadow.
2. Is the Attic Window Quilt suitable for beginners?
Yes! While it looks complex, beginners can make it by following step-by-step instructions and starting with larger blocks for easier handling.
3. What fabrics work best for this pattern?
High-quality cotton fabrics are ideal. Choose prints that create interesting “scenes” behind each window, such as florals, animals, or landscapes.
4. How can I make the 3D effect more realistic?
Ensure consistent lighting direction and use strong contrast between your light and dark fabrics to enhance the illusion of depth.
5. What size should the blocks be?
You can customize block sizes depending on your project. Larger blocks are easier for beginners, while smaller ones create a more intricate look.
6. Can I use the Attic Window design for wall hangings?
Absolutely! Many quilters use this pattern to make decorative wall pieces because of its dimensional and artistic effect.
7. Do I need to use sashing between blocks?
Sashing is optional but can help separate scenes and make your quilt appear more organized and visually balanced.
8. How long does it take to complete?
The time depends on your experience level and the quilt’s size. A small wall hanging can take a few days, while a full bed quilt may take several weeks.
Conclusion
The Attic Window Quilt Pattern remains one of the most fascinating and versatile designs in quilting. Its combination of geometric precision and artistic storytelling makes every finished piece unique. By carefully selecting fabrics, mastering contrast, and following the right techniques, anyone can create a quilt that truly stands out.

