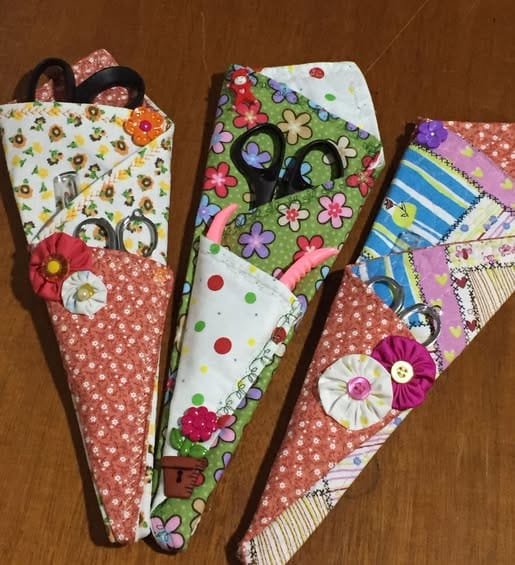
Creating a 3 Pocket Scissor Case Tutorial is an exciting way to combine practicality and creativity. Many crafters and sewing enthusiasts often look for ways to keep their tools organized, and a scissor case with multiple pockets is a perfect solution.
A 3 Pocket Scissor Case is more than just a storage solution. It allows you to organize scissors, sewing tools, and other small crafting items efficiently. Having three separate pockets means each tool has its dedicated space, preventing damage and making your crafting process smoother.
In this 3 Pocket Scissor Case Tutorial, we will cover every detail, from the materials needed to the finishing touches. You will understand why each step is important and how it contributes to the overall quality of your scissor case.
Materials and Tools Needed
To start this 3 Pocket Scissor Case Tutorial, you need to gather some basic materials and tools. First, you will need fabric. Cotton, canvas, or any sturdy material works best for durability. For the pockets, consider using a slightly stiffer fabric to maintain structure. You will also need matching thread, scissors, pins, and a sewing machine. These tools will make the sewing process easier and faster.
The importance of choosing quality fabric cannot be overstated in this 3 Pocket Scissor Case Tutorial. A strong fabric ensures that your scissor case will last longer and withstand regular use. Soft fabrics may feel nice but can stretch and distort over time. By picking the right material at the start, you set the foundation for a professional-looking case.
Next, you need to measure and cut your fabric pieces accurately. In this 3 Pocket Scissor Case Tutorial, we recommend using a ruler or measuring tape to get precise dimensions. Accurate cutting is essential because it ensures all pockets align properly and the case folds neatly.
For this 3 Pocket Scissor Case Tutorial, interfacing can be used to give extra stiffness to the case. Interfacing is optional but highly recommended if you want your scissor case to hold its shape over time. Iron-on interfacing is particularly convenient for beginners.
Additionally, you may want to include decorative elements such as ribbons or embroidery. These personal touches make your 3 Pocket Scissor Case unique and customized to your style. Handmade touches often make a project feel more special and valued.
Finally, prepare all tools before starting. Ensure your sewing machine is threaded correctly, pins are at hand, and scissors are sharp. Organization at this stage will save time and frustration in the later steps of this 3 Pocket Scissor Case Tutorial.
Step-by-Step Assembly
In this section of the 3 Pocket Scissor Case Tutorial, we will begin assembling the pieces. Start by folding the main fabric to form the outer structure of the case. Pin the edges in place to prevent shifting during sewing. Ensuring the fabric is aligned is crucial for a neat finish.
Next, attach the pocket pieces to the main body. In this 3 Pocket Scissor Case Tutorial, we recommend sewing each pocket separately before combining them. This method allows for precise alignment and prevents uneven spacing. Each pocket should be evenly stitched to avoid twisting or uneven surfaces.
Sew the bottom edges first, followed by the side seams. Reinforce the corners for extra durability. In this 3 Pocket Scissor Case Tutorial, double-stitching these critical areas can prevent tearing and ensures your case withstands regular use.
After sewing the pockets, fold the top edges and hem them neatly. A clean hem prevents fraying and gives your 3 Pocket Scissor Case a professional look. Use matching thread to blend with the fabric or contrast for a decorative effect.
Now it’s time to assemble the full case. Align the front and back panels, ensuring pockets face inward. Pin all edges, then sew around the perimeter. This step combines all parts into the final structure in this 3 Pocket Scissor Case Tutorial.
Finally, turn the case inside out and press it with an iron. Pressing sets the seams and gives the case a crisp finish. Your 3 Pocket Scissor Case is now taking shape, and you can move to adding final details like closures or embellishments.
Adding Closures and Finishing Touches
A functional closure is essential in the 3 Pocket Scissor Case Tutorial. Common options include buttons, snaps, or Velcro. Choose a closure that is secure yet easy to operate. Proper closure prevents scissors from falling out and keeps your tools organized.
Attach the closure carefully by marking its placement first. In this 3 Pocket Scissor Case Tutorial, precise placement ensures the case folds neatly and closes securely. Misaligned closures can make the case difficult to use and affect its appearance.
If desired, add decorative stitching or embroidery to personalize your 3 Pocket Scissor Case. This extra touch adds charm and uniqueness to your finished project. It also showcases your creativity and craftsmanship.
Check all seams and reinforce any weak points. This final step in the 3 Pocket Scissor Case Tutorial ensures your case is durable and ready for use. Pay special attention to the pocket edges and corners where stress is greatest.
Press the entire case once more to set the stitches and remove wrinkles. A well-pressed 3 Pocket Scissor Case looks professional and polished. The effort you put into finishing touches significantly impacts the overall quality of your project.
Finally, test the case by placing scissors in each pocket. Ensure the closure functions properly and that pockets are roomy enough for different sizes of scissors. Making small adjustments at this stage guarantees functionality and satisfaction with your 3 Pocket Scissor Case.
Tips for Customization and Care
This 3 Pocket Scissor Case Tutorial also includes tips for customization. You can experiment with fabric patterns, colors, and textures. Mix and match fabrics for a unique design that reflects your personal style. Customization makes each scissor case truly one-of-a-kind.
Consider adding extra pockets for small tools like seam rippers or measuring tapes. In this 3 Pocket Scissor Case Tutorial, a few additional compartments can greatly increase functionality without complicating the assembly process.
Use high-quality thread to prevent breakage. Strong thread ensures seams hold up over time, especially in frequently used areas like pocket openings. Your 3 Pocket Scissor Case will remain sturdy and reliable with proper materials.
FAQ
Q: Can I use any type of fabric for the 3 Pocket Scissor Case?
A: Yes, but it’s recommended to use durable fabrics like cotton, canvas, or denim to ensure longevity. Soft fabrics may not hold shape well.
Q: Is a sewing machine required?
A: While a sewing machine speeds up the process, you can hand sew the case if needed. Just ensure seams are strong and evenly stitched.
Q: How can I make the pockets stiffer?
A: Adding interfacing to the pocket fabric or using thicker materials will make the pockets more rigid and durable.
Q: What closure works best for a scissor case?
A: Buttons, Velcro, or snaps all work well. Choose based on ease of use and security.
Conclusion
In this 3 Pocket Scissor Case Tutorial, we covered everything from gathering materials to finishing touches. You learned how to create a durable, functional, and stylish scissor case that keeps your tools organized. By following the step-by-step instructions, you can achieve professional results, even as a beginner. Remember, the key to a successful project is precise measurement, careful stitching, and attention to detail. Share your experience, leave your honest opinion, and suggest improvements for future tutorials. Your feedback helps create better crafting guides for everyone.

