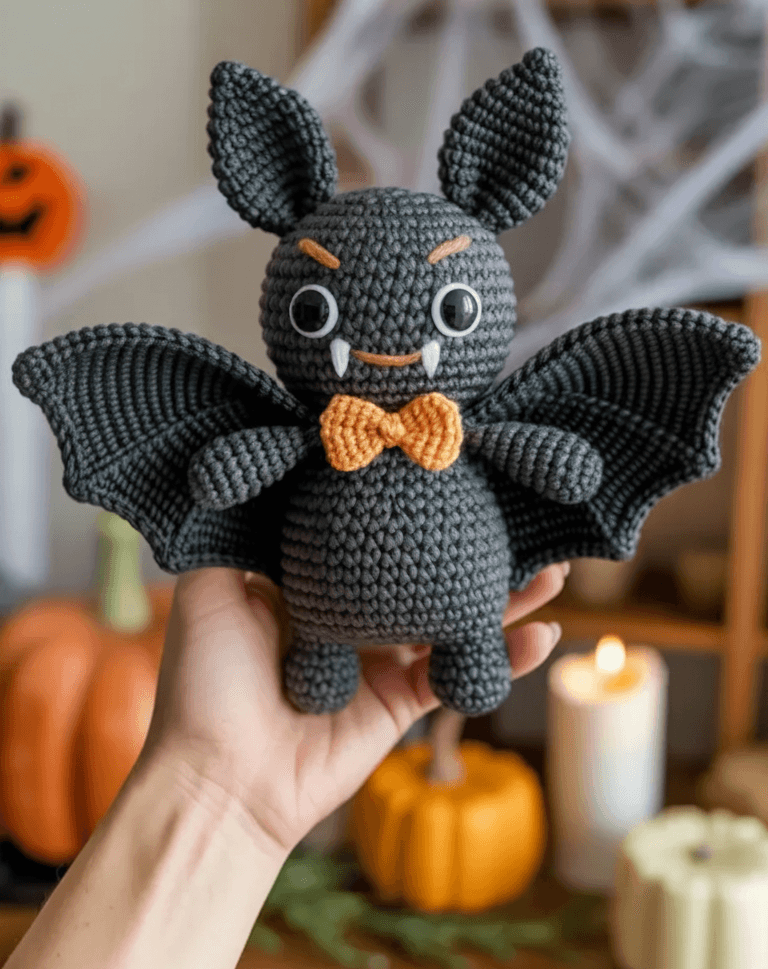
Starting your spooky season projects with an Amigurumi Halloween Bat Free Pattern is one of the best ways to combine creativity and festive charm.
You can crochet it in traditional dark shades like black or deep purple for a classic spooky vibe, or experiment with lighter yarns like gray, white, or even orange to create something playful and unique.
Crafting an Amigurumi Halloween Bat Free Pattern is also an excellent way to add handmade charm to your seasonal decorations.
Materials Needed for Your Amigurumi Halloween Bat
To start your Amigurumi Halloween Bat, you need only a handful of affordable and accessible materials. Most of them are already familiar to anyone who has worked on crochet projects before, but even complete beginners can easily gather what’s necessary. Having the right materials ensures that the final result looks polished and lasts through many Halloween seasons.
First, you’ll need yarn in your preferred color. Black is the traditional choice for a bat, but gray, purple, or even orange can give your bat a playful twist. Cotton or acrylic yarn is perfect because it holds shape well and gives your project durability. Choosing medium-weight yarn will make your stitches clear and your bat sturdier.
Next, select the correct crochet hook size. Usually, a hook slightly smaller than what is recommended for your yarn works best in amigurumi. This keeps the stitches tight so the stuffing won’t peek through the gaps. For medium-weight yarn, a 2.5mm to 3.5mm hook often works perfectly.
You’ll also need polyester fiberfill stuffing. This material is light, fluffy, and holds shape well inside small crochet projects. It gives your Amigurumi Halloween Bat its signature plump and cuddly form. Make sure to stuff evenly so the bat looks smooth and well-shaped.
Safety eyes or embroidery thread will bring your bat’s personality to life. Safety eyes are simple to attach and give the bat a polished look, while embroidery allows you to add custom expressions. If making this bat for a child, embroidered eyes are safer and eliminate any choking hazard.
A tapestry needle is essential for sewing parts together, weaving in loose ends, and adding finishing touches. Make sure to choose one with a wide eye so it can handle your yarn easily. Scissors, of course, will also be part of your toolkit for trimming yarn neatly.
Finally, consider optional embellishments. Tiny felt pieces for wings, embroidery thread for fangs, or even a small bow can add unique flair to your bat. These creative details are what make each project special and personal, transforming the Amigurumi Halloween Bat Free Pattern into a one-of-a-kind creation.
Step-by-Step Instructions for Beginners
Starting your Amigurumi Halloween Bat project might feel intimidating at first, but following a step-by-step process makes it manageable and fun. The beauty of amigurumi lies in its repetition of simple stitches, which eventually form adorable shapes.
Begin with the bat’s body. Using the magic ring technique, create a small circle of stitches that will expand outward. Increase round by round until the body reaches the desired size. This oval or rounded shape will serve as the main part of your bat. Keeping stitches tight is crucial here to avoid gaps in the fabric.
Once the body is complete, you’ll move on to the head. Some patterns combine the head and body into a single piece, while others require you to crochet them separately and stitch them together later. Either way, shaping the head slightly larger than the body makes the bat look cuter and more expressive.
The wings are what truly define an Amigurumi Halloween Bat. Crochet small triangular shapes or curved pieces, depending on the style you prefer. Attaching the wings at the sides of the body transforms the stuffed oval into something instantly recognizable as a bat.
Next, add the ears. Small pointed ears enhance the bat’s charm and help balance the overall shape. You can make them sharp and spooky or round and cartoonish depending on the look you’re going for. Sew them carefully at the top of the head to give your bat character.
After shaping the body, head, wings, and ears, it’s time to stuff each part with fiberfill. Even distribution is important to avoid lumpy spots. Close the openings with neat stitches to secure everything firmly. This step ensures the bat holds its form and remains durable.
Finally, attach the details. Add safety eyes, embroidered eyes, or any accessories you prefer. Fangs, bows, or even tiny capes can give your bat personality. With this step, your Amigurumi Halloween Bat Free Pattern project comes to life, turning yarn into a charming handmade decoration.
Creative Ways to Use Your Amigurumi Halloween Bat
Once you’ve completed your Amigurumi Halloween Bat, the fun continues as you decide how to use it. These bats are versatile and can be placed in various spots to bring warmth and festivity to your Halloween decor.
One popular way to use them is as home decorations. Place them on shelves, mantels, or coffee tables to add seasonal charm. A group of bats together creates a cozy, playful atmosphere perfect for fall evenings.
They also make wonderful gifts. Whether you give them to friends, family, or children, handmade bats carry thoughtfulness and creativity. Wrapping them with a small note can make the present even more special.
Another idea is to use them as hanging decorations. Adding a small loop of yarn at the top allows you to hang your bat from doorknobs, windows, or even your car mirror. This instantly adds festive spirit in a simple way.
For those who enjoy parties, an Amigurumi Halloween Bat can be part of the table centerpiece. Pair it with pumpkins, candles, and autumn leaves to create a magical Halloween scene. Your handmade bat will be a unique conversation starter.
Teachers and parents often use these bats in classrooms or at home with children. They are safe, soft, and perfect for little hands. Kids love having their own handmade Halloween friend, making it a charming alternative to plastic toys.
Finally, these bats are ideal for personal collections. Many crafters create seasonal amigurumi collections to bring out year after year. Adding a bat to your set ensures your Halloween decor always includes something handmade, meaningful, and joyful.
Tips for Perfecting Your Amigurumi Halloween Bat
Even if you follow the Amigurumi Halloween Bat Free Pattern closely, small tips and tricks can help make your final piece look more polished. Paying attention to details makes a huge difference in how professional and charming your bat appears.
First, maintain consistent tension throughout your stitches. Loose stitches may cause stuffing to show, while overly tight ones make the project stiff and hard to shape. Practicing tension control improves the look of your finished piece.
Second, always count your stitches carefully. Missing or adding one stitch can throw off the shape of your bat. Using stitch markers at the beginning of each round is a simple yet effective solution for beginners.
Third, stuff gradually instead of all at once. Inserting fiberfill in small amounts allows you to shape the bat evenly. This method avoids lumps and gives your bat a smooth, well-rounded form.
Fourth, sew parts together securely. Wings, ears, and other attachments must be fastened tightly to withstand handling. Use long, strong yarn tails from each piece for sewing instead of cutting and reattaching new yarn.
Fifth, customize with confidence. Amigurumi is about creativity, so don’t hesitate to try different yarn colors, eye shapes, or decorative details. Each personal touch makes your Amigurumi Halloween Bat unique and memorable.
Lastly, practice patience. Amigurumi may be repetitive, but it rewards careful attention. Working slowly and enjoying the process ensures that your bat turns out beautifully while giving you a relaxing and fulfilling crafting experience.
FAQ About Amigurumi Halloween Bat Free Pattern
What is an Amigurumi Halloween Bat?
It is a crocheted bat inspired by the Japanese art of amigurumi, often used as decoration or toy during Halloween.
Is the Amigurumi Halloween Bat Free Pattern beginner-friendly?
Yes, most patterns use basic stitches like single crochet, increases, and decreases, making them accessible for beginners.
What yarn is best for an Amigurumi Halloween Bat?
Cotton or acrylic yarn in medium weight works best because it holds shape well and is easy to work with.
Can children play with the Amigurumi Halloween Bat?
Absolutely, but if made for small children, it’s best to embroider the eyes instead of using safety eyes for safety reasons.
How long does it take to make an Amigurumi Halloween Bat?
Depending on skill level, it can take between a few hours to one or two days to complete.
Can I customize my Amigurumi Halloween Bat?
Yes! You can use different yarn colors, add fangs, capes, or bows to make each bat unique.
Conclusion
Creating an Amigurumi Halloween Bat Free Pattern is more than just a craft; it’s an opportunity to celebrate Halloween in a creative and personal way.
With simple materials, clear steps, and plenty of room for customization, anyone can enjoy the process of making their own bat.
If you’ve enjoyed this guide, please share your honest opinion and suggestions—I’d love to know how your bats turn out and how you bring them into your Halloween celebrations!

