If you have ever wanted to crochet an amazing bucket hat free pattern, you are in the right place. The crochet bucket hat has become a timeless fashion accessory that blends practicality with style. Unlike many other crochet items, this project is not only quick but also versatile, making it perfect for both beginners and experienced crocheters.
One of the greatest things about deciding to crochet an amazing bucket hat free pattern is how customizable it can be. From choosing vibrant colors to experimenting with textures, each hat becomes a reflection of your personality. Many crocheters love the bucket hat because it allows for creativity without demanding overly complicated techniques.
The popularity of the bucket hat has surged in recent years, largely due to fashion influencers and the comeback of retro styles. But instead of buying a factory-made version, making your own through crochet has its own charm. With the crochet an amazing bucket hat free pattern, you not only learn valuable skills but also end up with a handmade piece that carries sentimental value.
Why Choose a Crochet Bucket Hat
The first reason many people decide to make a crochet bucket hat is practicality. Unlike knitted items that may feel too warm, crochet provides a breathable structure, which makes it perfect for sunny days. A bucket hat gives you shade, protects your head, and can even be worn as a stylish accessory. Having a free pattern allows you to learn without worrying about costs.
Another advantage is durability. A handmade crochet hat is sturdy if crafted correctly, and you can use it season after season. It won’t lose shape easily and can withstand washing if you choose the right yarn. This is one of the reasons people love working with cotton yarn, as it combines softness with resilience.
When you crochet an amazing bucket hat free pattern, you also gain control over every detail. You choose the size, the style, and the finishing touches. This means your hat can be a perfect fit for your head, unlike store-bought options that may not feel as comfortable. Personalization is what makes crochet truly special.
Crochet bucket hats are also great for gifting. Since they are customizable, you can create one for friends or family, using their favorite colors. Handmade gifts are always more memorable and show extra thought. A crochet hat is also lightweight, making it easy to send by mail to someone you love.
The creative freedom that comes with this project cannot be overstated. You can stick with neutral tones for a classic look or play with bold shades for a modern twist. Adding stripes, embroidery, or even small appliqués can turn a simple hat into a fashion statement. The possibilities are endless once you get the hang of the pattern.
Finally, making this project helps you relax. Crocheting is known for reducing stress and giving a sense of accomplishment. Following a bucket hat free pattern step by step allows you to focus, unwind, and enjoy the process while building something useful and stylish.
Materials and Tools You Will Need
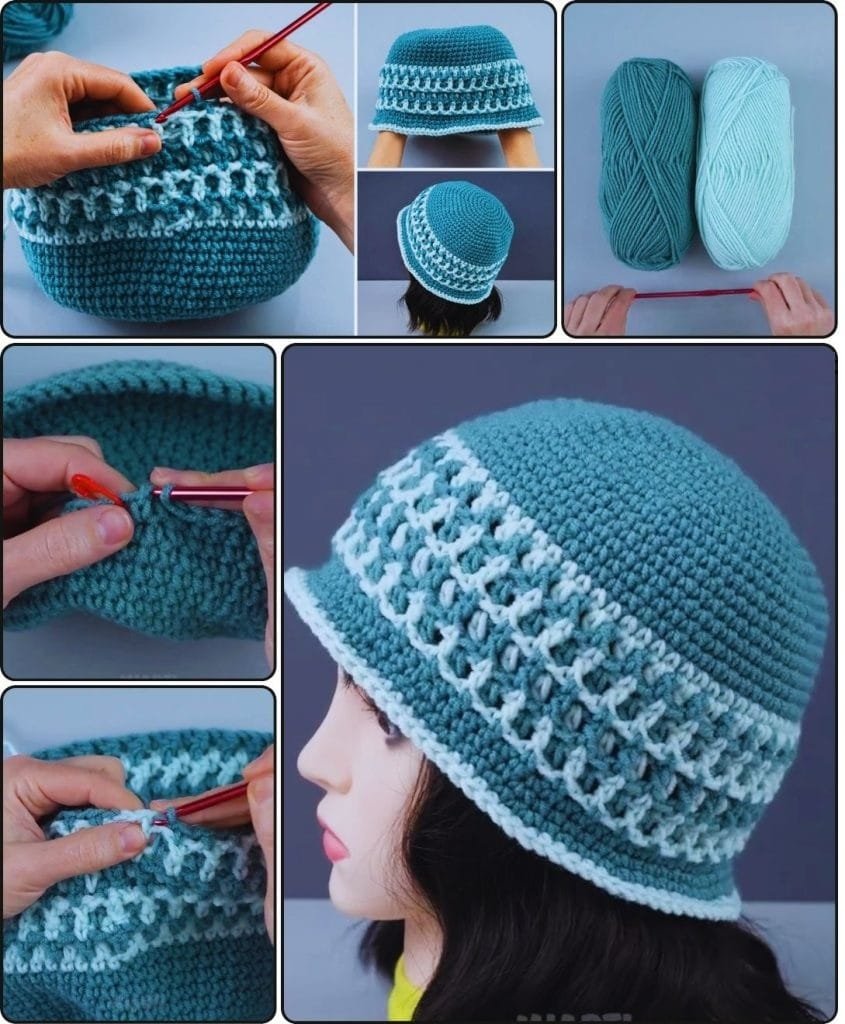
To start working on your crochet an amazing bucket hat free pattern, you need the right materials. The most common choice is cotton yarn, which ensures breathability and comfort. Acrylic yarn can also be used, but cotton provides a better structure, especially for summer wear. Always pick yarn that feels soft but holds its shape well.
You will need a crochet hook that matches the yarn weight. Most bucket hat patterns recommend hooks between 3.5 mm and 5 mm, depending on your tension. A medium hook works best for beginners since it balances stitch size and ease of handling. If you tend to crochet tightly, going up half a size may make your stitches more flexible.
Other essential tools include scissors, stitch markers, and a tapestry needle. Stitch markers help keep track of your rounds, preventing mistakes in the shape of the hat. The tapestry needle is useful for weaving in ends and securing the final look. Having these small items nearby will make your crocheting experience smoother.
Measuring tape is also important. Although the pattern is usually written with standard sizes, adjusting to your head circumference ensures the best fit. Bucket hats are often slightly loose, so you want to leave some space without making them fall off easily.
A comfortable workspace is equally important. Make sure you have good lighting, especially when working with darker yarns. A cozy chair and enough space for your yarn ball prevent unnecessary interruptions. Crocheting is meant to be relaxing, so creating a pleasant environment makes the process enjoyable.
Lastly, keep your pattern instructions close. If you’re following a written pattern or a diagram, having it printed or on a device nearby helps you stay on track. Many beginners highlight important sections or make notes along the way to avoid confusion. Staying organized is key to completing your bucket hat project successfully.
Step-by-Step Guide to Crochet an Amazing Bucket Hat
The process of making your bucket hat usually starts with the crown. Most patterns use a simple magic ring followed by rounds of single crochet or double crochet stitches. Expanding the crown evenly is essential to get the correct diameter. Skipping increases or adding extra ones may affect the final shape.
Once the crown is wide enough, you move to the body of the hat. This part usually involves working evenly without increases. Depending on how tall you want the hat, you may crochet several rounds. The body is what gives the hat structure and determines how it sits on your head.
After finishing the body, it’s time to create the brim. The brim is what makes the bucket hat distinctive. By adding increases strategically, you allow the brim to flare out naturally. Some crocheters prefer a stiff brim, while others like a more relaxed curve. Adjusting the number of rounds will change the style.
At this stage, you can start adding details. Some people love to insert stripes using different yarn colors, while others prefer keeping it monochromatic. Embellishments such as crochet flowers, appliqués, or even embroidery can personalize your hat even more. This is your chance to experiment with creativity.
Finishing touches include weaving in all loose ends securely. Using a tapestry needle, make sure to hide yarn tails within stitches so they do not unravel. Blocking the hat, especially with cotton yarn, helps it hold shape. Simply dampen the hat lightly and let it dry in the desired form.
By following these steps, you will see your project come together beautifully. Remember that mistakes are part of the process, and even if your first attempt isn’t perfect, each try will improve your skills. The joy of being able to crochet an amazing bucket hat free pattern is in both the journey and the final result.
Styling and Wearing Your Crochet Bucket Hat
One of the most enjoyable parts of making your own crochet bucket hat is styling it. Since you control the design, you can pair it with casual or chic outfits. A white cotton hat goes perfectly with summer dresses, while a colorful one complements beachwear. The versatility makes it a must-have accessory.
These hats are not limited to summer. By using thicker yarn, you can create a cozy version suitable for colder months. Darker shades, such as navy, brown, or black, give a sophisticated look that pairs well with coats and scarves. This makes the crochet bucket hat a year-round accessory.
Wearing your handmade hat also sparks conversations. People often notice unique accessories, and you can proudly say you made it yourself. It’s a great way to showcase your talent and even inspire others to try crochet. Many crafters discover their love for crochet through small projects like this one.
Another styling idea is to use your bucket hat as part of a themed outfit. For example, festival-goers often wear colorful hats with playful patterns. Adding beads or embroidery can make your piece stand out in a crowd. Handmade items are naturally eye-catching.
You can also match your hat with other crochet accessories. A bag or a lightweight scarf made from the same yarn creates a coordinated look. Crochet sets are becoming popular in fashion trends, and a bucket hat is the perfect starting point.
Most importantly, wear your hat with confidence. Fashion is about expressing who you are, and when you invest time in making something by hand, it carries meaning. Every time you put on your crochet bucket hat, you are wearing a piece of art made by you.
FAQ
Can beginners make a crochet bucket hat?
Yes, beginners can make a bucket hat. The pattern usually uses basic stitches, and with patience, even those new to crochet can complete it successfully.
What yarn is best for a crochet bucket hat?
Cotton yarn is the best choice because it is breathable, durable, and holds its shape well. Acrylic can be used for cooler versions.
How long does it take to crochet a bucket hat?
On average, it takes between 4 to 6 hours, depending on your speed and experience level. Some may finish it in a day, while others take several sessions.
Can I wash my crochet bucket hat?
Yes, but always follow yarn care instructions. Cotton hats can usually be hand washed and air-dried to maintain their shape.
How do I adjust the size of my crochet hat?
You can adjust the size by increasing or decreasing the crown diameter and modifying the number of rounds in the body. Measuring your head circumference ensures a perfect fit.
Can I sell crochet bucket hats I make from free patterns?
Yes, most free patterns allow you to sell the finished products. Just make sure to credit the pattern creator if required.
Conclusion
Learning how to crochet an amazing bucket hat free pattern is not only fun but also rewarding. You gain a fashionable accessory, practice your crochet skills, and create something truly personal.
VIDEO TUTORIAL
From choosing yarn and tools to finishing touches and styling, this project covers all the essentials for a complete handmade experience.

