The vintage granny square Christmas tree pattern is a timeless craft that brings a warm, nostalgic feel to your holiday decor. For crafters who enjoy crochet, this pattern combines the charm of classic granny squares with the festive spirit of Christmas.
Crocheting a vintage granny square Christmas tree pattern is not only a relaxing hobby but also an excellent way to personalize your holiday decorations. Each square can be made using different colors, textures, and yarn types, allowing you to customize your tree to fit your personal style.
One of the key benefits of the vintage granny square Christmas tree pattern is its versatility. You can create small tabletop trees for gifts, or larger versions to display in your home during the holiday season. The pattern can be adapted to different sizes and styles, depending on your preferences.
Understanding the Vintage Granny Square Technique
The vintage granny square Christmas tree pattern is rooted in the traditional granny square technique. Granny squares are small, modular units of crochet that are typically worked in rounds from the center outward. This technique allows crafters to combine multiple squares into larger projects, such as blankets, pillows, or in this case, a Christmas tree. Each square can be made using different colors, which is perfect for creating a visually appealing and festive look.
One of the benefits of using granny squares in this vintage Christmas tree pattern is the flexibility it offers. You can adjust the size of the squares to influence the overall size of your tree. Larger squares result in a bolder, more prominent tree, while smaller squares create a delicate and intricate design. The pattern can also be easily customized by changing the colors of the squares, using metallic or glittery yarn for a more festive effect.
Creating the squares involves basic stitches like chains, double crochet, and slip stitches. These simple stitches are easy to learn and execute, making this project accessible even for beginners. By following the instructions for each square carefully, you can ensure that your tree maintains a uniform shape and structure. Once all the squares are ready, you will assemble them in a specific arrangement to form the vintage granny square Christmas tree pattern.
The charm of granny squares lies in their timeless appeal. Each square can reflect personal creativity, whether you choose classic holiday colors like red, green, and white, or experiment with pastel and unconventional hues. This approach gives the vintage granny square Christmas tree pattern a unique look that is both traditional and modern. The repetition of patterns in granny squares also creates a visually pleasing symmetry that enhances the overall aesthetic of the tree.
Crocheters often enjoy the meditative aspect of creating multiple squares. The process of making each square and then assembling them teaches patience and attention to detail. The vintage granny square Christmas tree pattern not only results in a beautiful decoration but also provides a fulfilling crafting experience. This pattern can be passed down through generations, allowing family members to create their own unique variations of the tree.
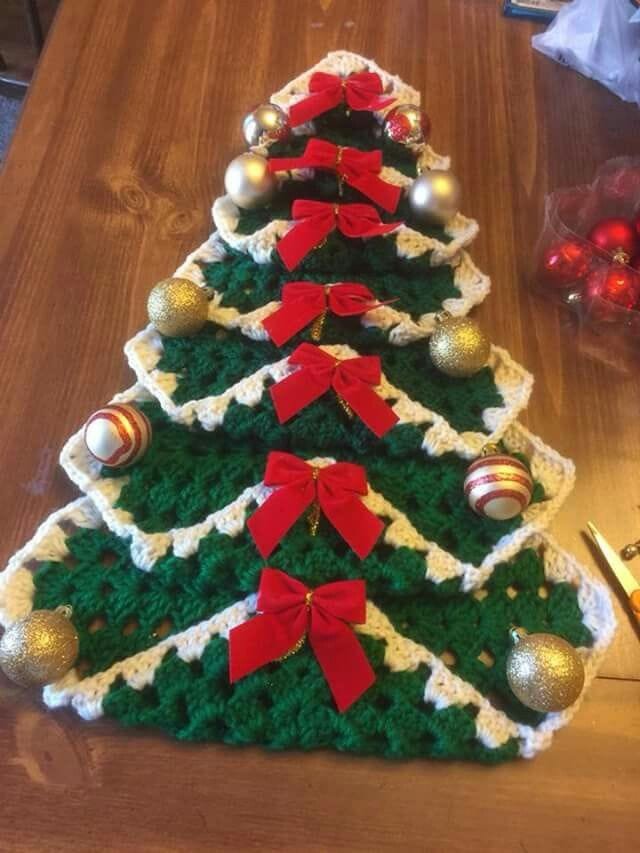
Lastly, the versatility of granny squares means that you can incorporate other decorative elements into your Christmas tree. Adding beads, small ornaments, or embroidered details can enhance the festive look of your vintage granny square Christmas tree pattern. The modular nature of granny squares allows for endless creativity, making this pattern a beloved choice among crafters of all skill levels.
Materials Needed for Your Vintage Granny Square Christmas Tree
To create a vintage granny square Christmas tree pattern, you will need a few essential materials. First, select your yarn. Cotton or acrylic yarn works best for durability and ease of stitching. Choose colors that reflect the holiday spirit, such as green, red, white, and gold, or mix in your favorite shades for a modern twist. Using multiple colors adds depth and vibrancy to the finished tree.
Next, select a suitable crochet hook. The hook size should match the thickness of your yarn, typically ranging from 4 mm to 5.5 mm for worsted weight yarn. Having the correct hook size ensures your granny squares maintain even tension and a neat appearance. Tension is important in the vintage granny square Christmas tree pattern because uneven stitches can affect the overall shape and assembly of the tree.
You will also need a pair of scissors to cut your yarn, a yarn needle for weaving in ends, and stitch markers if you prefer to keep track of your rounds. These basic tools make the process more manageable and allow you to focus on the creative aspects of the vintage granny square Christmas tree pattern. A measuring tape can also be handy to ensure your squares are uniform in size before assembly.
Optional materials include decorative elements like beads, buttons, or small bells. Adding these embellishments can give your tree a festive and personalized touch. For a more classic look, keep the design simple with only colored yarns, while for a more elaborate style, experiment with metallic threads or glitter yarn. Each choice contributes to the final aesthetic of your vintage granny square Christmas tree pattern.
Consider the workspace you will use for this project. A clean, well-lit area is essential for maintaining focus and precision. Organizing your yarn by color and keeping your tools nearby can make the crafting process smoother and more enjoyable. Being prepared with all materials ensures that your experience with the vintage granny square Christmas tree pattern is both productive and relaxing.
Finally, it’s important to have patience. Crafting a vintage granny square Christmas tree pattern involves creating multiple squares and assembling them carefully. While the process may take some time, the result is a beautiful, handmade decoration that reflects your effort and creativity. Enjoy each step of the journey, and embrace the satisfaction of completing a detailed and festive project.
Step-by-Step Instructions for Creating Your Tree
To begin the vintage granny square Christmas tree pattern, start by making the individual granny squares. Work each square in rounds, beginning with a small circle and gradually increasing the size. Ensure that all squares are of uniform size, as this will make assembly easier. Each square can have a different color pattern, adding vibrancy to your final tree.
Once your squares are complete, start arranging them into the shape of a Christmas tree. Begin with a single square at the top and gradually expand the width by adding rows of squares below. The bottom row should contain the most squares to create the traditional triangular tree shape. This assembly is crucial for maintaining the structural integrity of the vintage granny square Christmas tree pattern.
Next, stitch the squares together using a slip stitch or whip stitch. This will connect all the squares securely while keeping the edges neat. Be mindful of tension to avoid puckering or uneven joins. As you assemble the tree, check the overall shape frequently to ensure your vintage granny square Christmas tree pattern maintains a balanced and symmetrical appearance.
After the tree is fully assembled, it’s time to add any additional decorative elements. You can crochet a small star for the top, add beads or small ornaments to the squares, or use metallic threads for a festive touch. These enhancements personalize your vintage granny square Christmas tree pattern and make it truly unique. Creativity at this stage allows you to incorporate your individual style into the project.
Finally, weave in all loose ends and block your tree if necessary. Blocking helps the squares lie flat and gives the tree a polished finish. Take your time to ensure each edge is smooth and each square is aligned properly. The final result should be a cohesive and attractive vintage granny square Christmas tree pattern ready to display or gift.
Tips for Customizing Your Vintage Granny Square Christmas Tree
Customizing your vintage granny square Christmas tree pattern allows you to create a one-of-a-kind decoration. Consider experimenting with color combinations that reflect your personal style. Traditional colors like green, red, and gold evoke classic holiday vibes, while pastels or unconventional hues create a modern and whimsical look.
You can also play with the size of the squares to create a different aesthetic. Larger squares result in a more dramatic tree, while smaller squares create a delicate and intricate design. Mixing different square sizes within the same tree can add depth and visual interest to your vintage granny square Christmas tree pattern.
Adding texture is another way to customize your tree. Using different yarn types such as cotton, wool, or velvet yarn can make each square feel unique. Incorporating raised stitches or puff stitches in some squares creates a tactile experience and adds dimension to your vintage granny square Christmas tree pattern.
FAQ About Vintage Granny Square Christmas Tree Pattern
Q: Can beginners make a vintage granny square Christmas tree pattern?
A: Yes, the pattern is beginner-friendly. It uses basic crochet stitches like chains, double crochet, and slip stitches. Beginners may need to practice squares first, but the process is manageable with patience.
Q: What yarn is best for this pattern?
A: Cotton or acrylic yarn works well for durability and ease of handling. You can choose traditional holiday colors or experiment with unique shades for a personal touch.
Q: How many squares do I need for one tree?
A: The number of squares depends on the desired size of your tree. Small tabletop trees may use around 10–15 squares, while larger display trees may require 30 or more.
Q: Can I add decorations to my granny squares?
A: Absolutely. Beads, small ornaments, sequins, or metallic threads can be added to enhance the festive look. Customizing each square makes the tree unique.
Q: How do I assemble the squares into a tree shape?
A: Arrange squares in a triangular layout, starting with one square at the top and expanding each row below. Use slip stitches or a whip stitch to join them neatly.
Conclusion
In this article, we explored the vintage granny square Christmas tree pattern, covering its timeless appeal, materials needed, step-by-step creation, and tips for customization. This pattern is not only a delightful holiday craft but also a way to express creativity and mindfulness. By following the instructions and incorporating your personal touches, you can create a unique and beautiful handmade decoration that will be cherished for years. Share your experiences, leave honest opinions, and provide suggestions for improvements or variations. Your feedback helps make these projects even more special and enjoyable for everyone.

