If you’ve been dreaming about creating a quilt that bursts with color, movement, and personality, then this Starburst Quilt Tutorial will guide you every step of the way. The starburst design is a timeless favorite among quilters because of its dynamic shape and vibrant impact on any room. Whether you are a complete beginner or a seasoned crafter, this guide will help you make a quilt that looks professional while still carrying your personal touch.
The beauty of the Starburst Quilt lies in its versatility. You can choose bright, bold fabrics for a statement piece or soft, muted tones for a more calming effect. This tutorial will not only explain the steps but also share insider tips to make your sewing process smoother and more enjoyable. With a bit of patience and the right approach, you can create a quilt that will be cherished for years.
Before diving into the instructions, it’s essential to prepare the right tools, choose quality fabrics, and understand the basic layout of the starburst pattern. Once you have your supplies ready, we’ll break the process into manageable steps so you can focus on each stage without feeling overwhelmed. Now, let’s explore the journey of turning fabric pieces into a stunning Starburst Quilt masterpiece.
Choosing the Perfect Fabrics for Your Starburst Quilt
When starting a Starburst Quilt Tutorial, your fabric selection plays a huge role in the final look. The pattern’s radiating design works best when you have a good balance of contrasting and complementary colors.
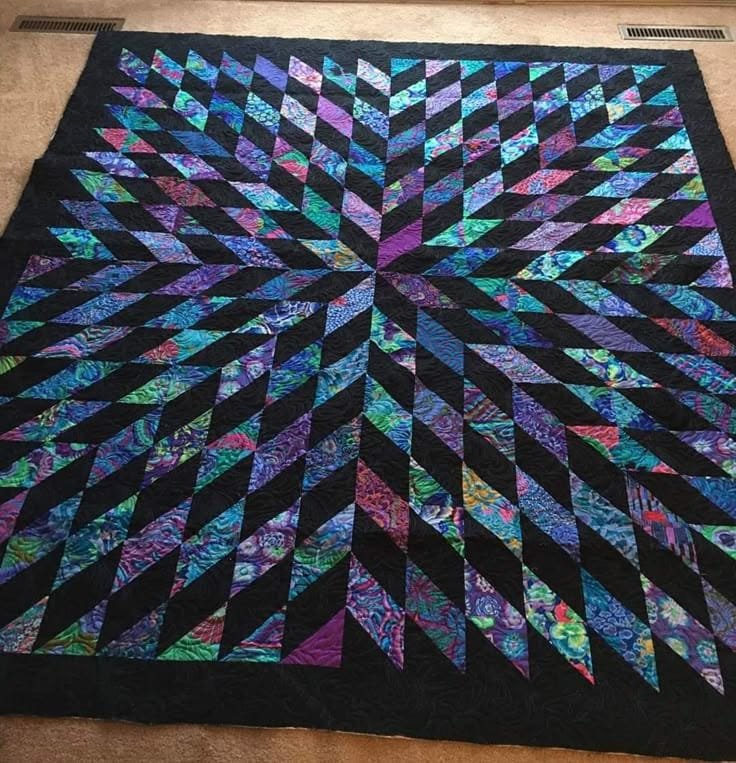
First, think about the mood you want your quilt to evoke. Bold colors like red, orange, and yellow create a vibrant, energetic piece, while blues, greens, and pastels offer a more soothing aesthetic. This choice will influence the overall personality of your Starburst Quilt.
Second, choose fabrics with different textures to add depth. Cotton is the most popular choice due to its ease of use, but you can mix in linen or flannel for variety. Just ensure that all fabrics are pre-washed to prevent shrinking later.
Third, consider using fabric scraps for an eco-friendly approach. Many quilters love combining leftover materials to create unique starbursts with a story behind each piece. This makes your quilt both sustainable and deeply personal.
Fourth, think about the scale of your prints. Large prints can dominate certain starburst sections, while small prints add subtle detail. A mix of both can create a balanced and eye-catching quilt.
Finally, invest in high-quality quilting cotton for durability. A Starburst Quilt is meant to last, so using better fabric will ensure your hard work stands the test of time.
Cutting and Preparing Your Quilt Pieces
The cutting stage is where the Starburst Quilt Tutorial truly begins to take shape. Accuracy here will make assembly much easier later on.
Start by ironing your fabric to remove any wrinkles. This will make your cuts cleaner and prevent mistakes caused by fabric bunching. Smooth fabric also makes measuring more precise.
Next, use a rotary cutter, quilting ruler, and self-healing cutting mat for the best results. Precision tools are worth the investment, especially for a pattern like the starburst where alignment is key.
Cut your fabrics into strips, then into triangles or diamond shapes according to your chosen starburst layout. Each piece should match the measurements exactly so that all sections fit together seamlessly.
Label your cut pieces with sticky notes or small tags. This step might seem unnecessary, but when you’re assembling multiple colors and shapes, proper labeling prevents confusion and speeds up your workflow.
If you’re a beginner, consider cutting extra pieces in case of mistakes. Having spares will save you from having to re-cut and risk mismatched fabrics later.
Lastly, keep your work area organized. A clutter-free space not only improves efficiency but also helps you maintain focus while working through your Starburst Quilt Tutorial.
Assembling the Starburst Design
Now comes the exciting part—bringing your Starburst Quilt to life through assembly. This step requires patience and careful alignment.
Start by laying out your fabric pieces on a flat surface in the starburst arrangement. This will help you visualize the final quilt and make adjustments before sewing.
Begin sewing the smallest sections first, such as pairs of triangles or diamonds. Always sew with a consistent seam allowance, usually 1/4 inch, for accuracy and professional results.
Press your seams as you go, preferably to one side, to keep the quilt top flat. Pressing is different from ironing—you want to lift and set the iron rather than drag it to avoid stretching the fabric.
Work in quadrants if the starburst is large. Completing one quarter of the quilt at a time makes the process less overwhelming and helps keep your pieces in order.
Double-check alignment before joining large sections. Small errors can add up and distort the final starburst shape. Taking time here ensures a cleaner finish.
Once all sections are joined, give the quilt top a final press to prepare it for the next stage—layering and quilting.
Quilting and Finishing Touches
The final phase of the Starburst Quilt Tutorial is where your project transforms from a collection of sewn pieces into a functional, beautiful quilt.
Begin by creating your quilt sandwich: the quilt top, batting, and backing fabric. Smooth each layer carefully to avoid wrinkles, and secure them with safety pins or basting spray.
Decide on a quilting pattern. You can follow the lines of the starburst for a striking effect, or use free-motion quilting for a more artistic finish.
Quilt slowly and steadily, ensuring even stitches. This is where patience truly pays off, as rushed quilting can cause puckering or uneven tension.
Once quilting is complete, trim the edges evenly to prepare for binding. This step gives your quilt a polished, square shape.
Attach your binding by sewing it around the edges, folding it over, and stitching it down. Binding frames your Starburst Quilt and gives it a professional, finished look.
Finally, inspect your quilt for any loose threads or missed stitches, then wash and dry it to give it a soft, cozy texture.
FAQ – Starburst Quilt Tutorial
1. How long does it take to make a Starburst Quilt?
The time varies depending on size and skill level. A beginner might take several weeks, while an experienced quilter could finish in a few days.
2. Do I need a sewing machine for this quilt?
While hand sewing is possible, a sewing machine will greatly speed up the process and provide more consistent results.
3. Can I use different fabrics for each starburst section?
Yes! Mixing fabrics adds character to your quilt. Just ensure they are all of similar weight and texture.
4. How do I prevent my quilt from puckering?
Use even stitching, press seams carefully, and baste layers securely before quilting.
5. Is the Starburst Quilt suitable for beginners?
Yes, but patience and attention to detail are essential. Starting with a smaller version can help you gain confidence.
Conclusion
In this Starburst Quilt Tutorial, we explored every step from choosing fabrics to adding the final stitches. By breaking the process into manageable parts, you can confidently create a quilt that’s both visually stunning and built to last.
Now it’s your turn—gather your materials, follow the steps, and bring your own starburst vision to life. I’d love to hear your honest opinions and suggestions about this guide, so share your thoughts and ideas to inspire other quilting enthusiasts!

