If you’ve been searching for a creative and fashionable accessory to make, then learning how to crochet a granny square bucket hat could be your next favorite project. This timeless crochet style combines the classic charm of granny squares with the modern flair of a trendy bucket hat, resulting in a piece that’s as practical as it is stylish.
The beauty of the granny square bucket hat lies in its adaptability. You can choose vibrant colors for a playful summer vibe or stick to earthy tones for a more neutral, everyday look. Plus, granny squares are easy to work with and can be made quickly, making this pattern a perfect weekend project.
Another great thing about making a crochet granny square bucket hat is that it’s completely customizable. You can adjust the fit, play with different yarn textures, or even mix and match colors in each square. The end result is a hat that truly reflects your personality and style.
Choosing the Right Materials for Your Granny Square Bucket Hat
When you start your journey to crochet a granny square bucket hat, the first step is gathering the right materials. The yarn you choose will have a big impact on both the look and feel of your finished piece, so select something that suits the season and your personal preferences. Cotton yarn is a popular choice because it’s breathable and comfortable for warmer weather, while acrylic or wool blends provide warmth for cooler months.
You will also need the right hook size for your yarn. This ensures your stitches are even and your hat holds its shape. Most granny square bucket hat patterns recommend a medium-sized crochet hook, such as 4 mm or 5 mm, but always check your yarn label for guidance. Using the correct hook size will prevent your hat from being too loose or too stiff.
Color selection is where your creativity can really shine. Traditional granny squares often feature multiple colors in a single square, but you could opt for a monochrome look if you prefer something more understated. The beauty of the granny square design is that even with just two colors, you can achieve a stunning, eye-catching result.
Don’t forget about other essential tools like scissors, a tapestry needle for sewing the squares together, and stitch markers to help you keep track of your work. Having all your materials ready before you start will make the process smooth and enjoyable.
Choosing the right yarn weight also matters. A medium-weight yarn is ideal for creating a hat that is not too bulky yet still warm and comfortable. Experimenting with different yarn types can also lead to interesting textures and finishes for your hat.
Lastly, if you’re making your crochet granny square bucket hat as a gift, consider the recipient’s style preferences. Choosing their favorite colors or adding unique embellishments can make your handmade gift even more special and meaningful.
Creating the Granny Squares
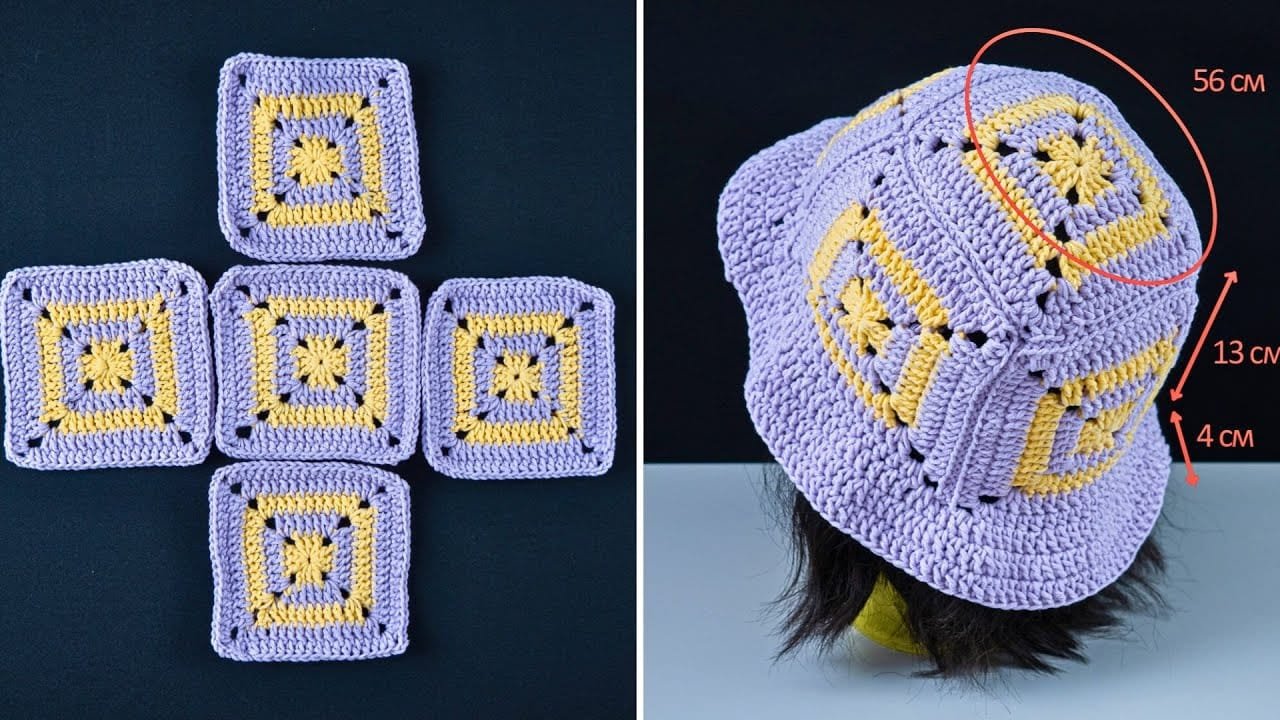
The foundation of your granny square bucket hat is, of course, the granny square itself. These small squares are made by crocheting rounds of stitches, usually starting from a center ring. The pattern is simple and repetitive, which makes it perfect for beginners. Even if you’ve never made a granny square before, you’ll quickly get the hang of it with a little practice.
To start, you’ll create a magic ring or chain loop, then work clusters of double crochets separated by chain spaces. Each round expands the square, and you can change colors at the start of any round for a fun, patchwork effect. The more squares you make, the more vibrant and varied your hat will be.
Consistency is key when making multiple granny squares. Try to keep your tension even so that all squares are the same size. This will make sewing them together much easier later on. Uneven squares can cause your hat to fit awkwardly or look lopsided.
One of the joys of granny squares is the freedom to experiment. You can incorporate stripes, use different stitches in the center, or even add decorative edges. This is your chance to make each square a small work of art.
Once you have enough squares for your hat’s circumference and crown, block them if needed. Blocking helps to smooth and shape the squares, making assembly more precise and professional-looking.
Remember, patience pays off here. The more care you put into making your granny squares, the more polished your finished crochet granny square bucket hat will look.
Assembling the Bucket Hat
After you’ve completed your granny squares, it’s time to piece them together into the shape of a bucket hat. Lay out your squares in the desired arrangement before you start sewing. This helps you visualize the final look and make any last-minute color adjustments.
Start by sewing the squares for the crown of the hat. This typically involves arranging them in a circular pattern and stitching along the edges with a whip stitch or slip stitch. Make sure your seams are neat and not too tight, as this can distort the shape.
Next, assemble the sides of the hat by joining squares in a band that will wrap around your head. This band is then attached to the crown. Check the fit as you go, making adjustments if the hat feels too loose or snug.
The brim is what gives the bucket hat its signature look. You can crochet it directly onto the bottom edge of the assembled squares or make it separately and then attach it. For a stiffer brim, consider using tighter stitches or adding a round of single crochet.
Once all pieces are joined, weave in any loose ends with a tapestry needle. This step is crucial for a tidy finish and ensures your hat will withstand regular wear.
Before you wear your hat, give it a final shape adjustment. Lightly steaming or blocking the hat can help set the seams and give it a more professional appearance.
Styling and Caring for Your Granny Square Bucket Hat
Once your crochet granny square bucket hat is complete, the fun part begins: styling it. This accessory can be worn in many ways, whether you’re going for a casual, bohemian vibe or a bold fashion statement. Pair it with sundresses, denim jackets, or even beachwear for a relaxed yet stylish look.
Because granny squares can be colorful, your hat can act as a focal point in your outfit. If you’ve chosen bright, contrasting colors, consider pairing your hat with neutral clothing to make it stand out even more.
Caring for your hat properly will help it last for years. Most cotton or acrylic yarns can be hand-washed in cool water and laid flat to dry. Avoid using hot water or harsh detergents, as these can cause your hat to lose its shape or fade in color.
If your brim starts to lose its structure, you can re-block it or add a round of tighter stitches to reinforce it. This will keep your bucket hat looking fresh and well-shaped.
For those who love accessorizing, you can add small embellishments like crochet flowers, buttons, or beads to your hat. These little touches can make your granny square bucket hat even more unique.
Finally, remember that handmade accessories like this hat are not only fashionable but also a conversation starter. When someone asks about your hat, you’ll have the joy of saying you made it yourself.
FAQ – Crochet a Granny Square Bucket Hat
1. Is a granny square bucket hat suitable for beginners?
Yes, it’s a great project for beginners because granny squares use basic crochet stitches and are easy to learn.
2. How many granny squares do I need for a bucket hat?
This depends on the size of your hat and the size of your squares, but typically 8–12 squares are enough for the crown and sides.
3. Can I use different yarn types for one hat?
Yes, but it’s best to choose yarns with similar weights and textures so the hat fits and feels consistent.
4. How do I make the brim stiffer?
Use tighter stitches, smaller hooks, or add an extra round of single crochet to give the brim more structure.
5. Can I wash my granny square bucket hat in a washing machine?
It’s safer to hand-wash it in cool water to maintain its shape and color.
6. How can I make my hat more unique?
Experiment with colors, add embellishments, or use different granny square designs for a one-of-a-kind look.
Conclusion
Learning how to crochet a granny square bucket hat is a rewarding project that combines traditional crochet techniques with modern fashion trends. By carefully choosing materials, crafting consistent granny squares, assembling your hat with precision, and caring for it properly, you can create a stylish accessory that’s uniquely yours. Whether for personal use or as a handmade gift, this hat is sure to impress. Share your thoughts and suggestions about this guide — your feedback helps make future projects even better.

