Looking to create something practical, fun, and beginner-friendly? This Fabric Koozies Bottle Wrap Free Sewing Pattern is the perfect DIY sewing project to try. Whether you’re making gifts or selling at craft fairs, fabric koozies are easy to make and super useful for keeping drinks cool while adding a personal touch.
This simple bottle wrap sewing pattern can be customized with your favorite fabrics, making it an ideal project for leftover fabric scraps. Even if you’re new to sewing, you’ll find this pattern enjoyable and satisfying from start to finish.
In this guide, we’ll walk you through how to create your own fabric koozies bottle wrap using a free sewing pattern, along with tips to personalize your design, make it last longer, and add professional-looking details. So, grab your materials, and let’s dive into the cozy world of bottle wraps!
What Are Fabric Koozies Bottle Wraps?
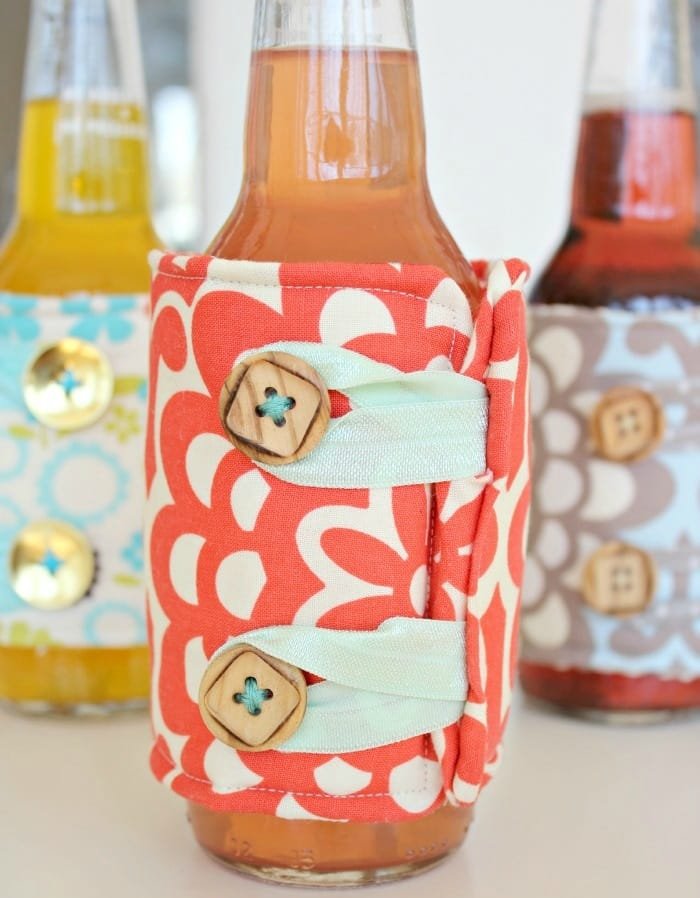
Fabric Koozies Bottle Wraps are reusable fabric sleeves designed to wrap around bottles or cans, helping to insulate the drink and keep your hands dry and comfortable. They’re a fun and sustainable alternative to disposable wraps or foam coolers.
These wraps are usually made from cotton or other washable fabrics, often lined with insulating materials to keep your drink cooler for longer. Their flexible, soft design means they can be adjusted to fit a range of bottle or can sizes.
With the right fabric koozies bottle wrap sewing pattern, you can make them in under 30 minutes, even if you’re just starting your sewing journey. From holiday prints to sports themes, the customization options are endless.
You’ll only need a few basic materials like fabric, insulating liner (optional), hook-and-loop tape or snap buttons, thread, and a sewing machine. The simplicity of this project is what makes it so appealing to crafters of all levels.
They’re perfect as handmade gifts, party favors, or even additions to your small business product line. Everyone loves a cute and functional wrap for their favorite drink!
And let’s not forget—they’re environmentally friendly, washable, and reusable. A fabric koozies bottle wrap is not just charming; it’s also practical and responsible.
Materials Needed for the Bottle Wrap Sewing Pattern
To make your fabric koozies bottle wrap, you’ll need only a few basic sewing supplies. These are likely items you already have in your sewing box or can find easily in any craft store.
Start by selecting your outer fabric. Choose cotton or canvas for durability and ease of use. Pick prints that match the style of the recipient—or go neutral for a minimalist look.
Next, you’ll want a lining fabric. Quilted cotton, fleece, or thermal batting like Insul-Bright can help insulate the bottle and give your koozie structure.
You’ll also need fasteners. Velcro, snap buttons, or even fabric ties can be used, depending on the aesthetic and adjustability you prefer.
A rotary cutter or scissors, fabric ruler, and cutting mat will help ensure clean, even cuts. Precise measurements make a huge difference in the finished look of your koozie.
Thread and a sewing machine are musts. You can hand-stitch if necessary, but machine-sewing will give you more durability and speed, especially for batch projects.
Finally, use an iron to press seams as you go—this improves the final appearance and helps make sewing easier. Always press your fabric before cutting for the best results.
Step-by-Step Guide to Sewing a Fabric Koozie
Start by cutting your fabric. Use the fabric koozies bottle wrap sewing pattern as your template. A good standard size is 10” x 4.5”, but you can adjust based on the bottle size.
Cut one piece of outer fabric, one piece of lining fabric, and one piece of thermal batting (if using). Layer them with the right sides of the fabrics facing each other, and the batting on top.
Pin all layers together and stitch around the edges, leaving a 2” gap on one side to turn the fabric right-side out. Use a 1/4” seam allowance for a clean edge.
Trim the corners diagonally before turning the fabric right-side out. This helps reduce bulk and gives a neater finish.
Turn the piece inside out through the gap. Use a pencil or blunt tool to push out the corners gently for sharp edges.
Press the piece flat with your iron, then top-stitch around the entire edge, closing the gap as you go. This step gives your wrap a polished and professional look.
Customization Ideas for Your Koozies
Personalizing your fabric koozies bottle wrap is part of the fun. You can get creative with colors, prints, stitching styles, and embellishments.
Try embroidering a name or short phrase on the outer fabric. This adds a unique and thoughtful touch, especially for gifts.
Mix and match different fabrics. Use coordinating solids and patterns, or combine textures like denim and cotton for a modern look.
Add piping or bias tape to the edges for a colorful border. This not only looks decorative but also reinforces the seams.
Use themed prints for special occasions—holidays, birthdays, weddings, or even corporate events. Your wraps can match the party decor!
Sew a small pocket on the side for tea bags, bottle caps, or small notes. This feature is fun and functional.
Try experimenting with shapes. While rectangular wraps are classic, you can make tapered designs or add darts for a contoured fit.
Tips for Selling Handmade Bottle Wraps
If you’re thinking of turning your sewing hobby into a business, fabric koozies bottle wraps are a great product to start with. They’re low-cost, easy to produce, and always in demand.
Offer variety in your designs. Create seasonal collections or themed bundles to attract repeat customers and increase perceived value.
Use quality materials. Customers will appreciate durable, washable koozies with neat finishes and strong stitching.
Take beautiful photos of your products. Natural light, clean backgrounds, and lifestyle shots can help your products stand out on social media or marketplaces.
Consider your pricing carefully. Factor in material costs, time, packaging, and shipping. Even small items should reflect the skill and care you put into them.
Promote your wraps at local craft fairs, farmer’s markets, or community events. These are great places to showcase handmade goods and build a local customer base.
Ask for customer feedback and adjust your designs based on what people love. This helps you grow a loyal following and improve with every batch.
FAQ – Fabric Koozies Bottle Wrap Free Sewing Pattern
What type of fabric is best for fabric koozies?
Cotton or canvas is ideal because it’s durable, washable, and easy to sew. For insulation, use quilted batting or fleece.
Can I make these koozies without a sewing machine?
Yes, you can hand-stitch them, though it will take more time. A machine makes the process faster and neater.
Do I have to use thermal batting?
Not necessarily. Thermal batting helps with insulation, but if you’re going for style more than function, standard interfacing or quilted fabric will do.
Can I wash the fabric koozie in the machine?
Absolutely. Just make sure all materials used are machine-washable. Close Velcro before washing to avoid lint buildup.
What size should I cut the fabric for a standard bottle?
A common size is 10” x 4.5”, but you can adjust based on the bottle’s shape. Always test-fit before making in bulk.
Is this pattern suitable for beginners?
Yes! This fabric koozies bottle wrap sewing pattern is perfect for beginners. It involves straight stitching, turning fabric, and optional topstitching.
Conclusion
The Fabric Koozies Bottle Wrap Free Sewing Pattern offers an easy, creative, and eco-friendly way to enjoy sewing while making something useful. Whether you’re crafting for personal use, gifting, or selling, this project is as fun as it is functional.
We’ve covered everything from materials, step-by-step instructions, customization ideas, and even tips on how to sell your finished wraps. The beauty of this pattern is its flexibility—there’s no one “right” way to make it your own.
If you’ve followed along, you now have all the tools you need to create your very own cozy bottle wraps. Don’t forget to experiment with fabrics, colors, and features that show off your unique style.
We’d love to hear your thoughts! Please leave a sincere opinion or suggestion below—your feedback helps shape future sewing tutorials and ideas that inspire.

