Creating a Handbag with a Spacious Bottom can be both a fun and functional project for any quilting enthusiast. Right from the start, this type of bag stands out for its combination of style, durability, and storage space. Whether you’re a beginner or an experienced quilter, learning how to make a handbag with a spacious bottom gives you the perfect opportunity to blend creativity with practical utility.
The goal of this tutorial is to guide you step-by-step through crafting a beautiful quilted handbag that not only looks great but also offers enough room at the base to carry your daily essentials comfortably. The spacious bottom design is particularly helpful for keeping your items upright and organized, unlike standard handbags that tend to collapse or become cluttered quickly.
As you follow this guide, you’ll learn techniques like quilting fabric, creating structure with interfacing, attaching a boxed bottom, and finishing the project with handles and closures. We’ll keep things clear and simple while ensuring your final product is professional-looking and robust enough for daily use. Let’s begin crafting your very own handbag with a spacious bottom!
Choosing the Right Materials
The foundation of any successful quilted handbag with a spacious bottom starts with the right materials. While aesthetics matter, functionality and durability are equally important for a bag you’ll use regularly.
Start with high-quality cotton fabric for the outer layers. Quilting cotton is a great choice because it’s easy to sew, widely available, and comes in a variety of prints and patterns. For the interior lining, a contrasting color or complementary print can add a stylish flair.
Sturdy interfacing is crucial for giving your bag structure. For the bottom part, consider using fusible fleece or foam interfacing, which adds thickness and stability. This is what gives your handbag with a spacious bottom its shape and helps it stand upright.
For quilting, use a batting layer between your outer fabric and the interfacing. This not only provides a quilted texture but also adds a touch of padding, giving the bag a soft yet structured feel. Choose 100% cotton or cotton-blend batting for best results.
You’ll also need a reliable thread, a good rotary cutter, and quilting clips to keep everything aligned during sewing. Metal hardware like magnetic snaps, rings, or D-rings can elevate the design and add a polished finish to your spacious handbag.
Finally, don’t forget the straps. Cotton webbing or leather handles are both excellent choices. Make sure they’re securely attached to support the extra weight your spacious bottom handbag is designed to carry.
Cutting and Quilting the Fabric
Once you have all your materials ready, it’s time to move on to cutting and quilting. Accurate measurements and careful planning are essential for a clean, symmetrical finish on your handbag with a spacious bottom.
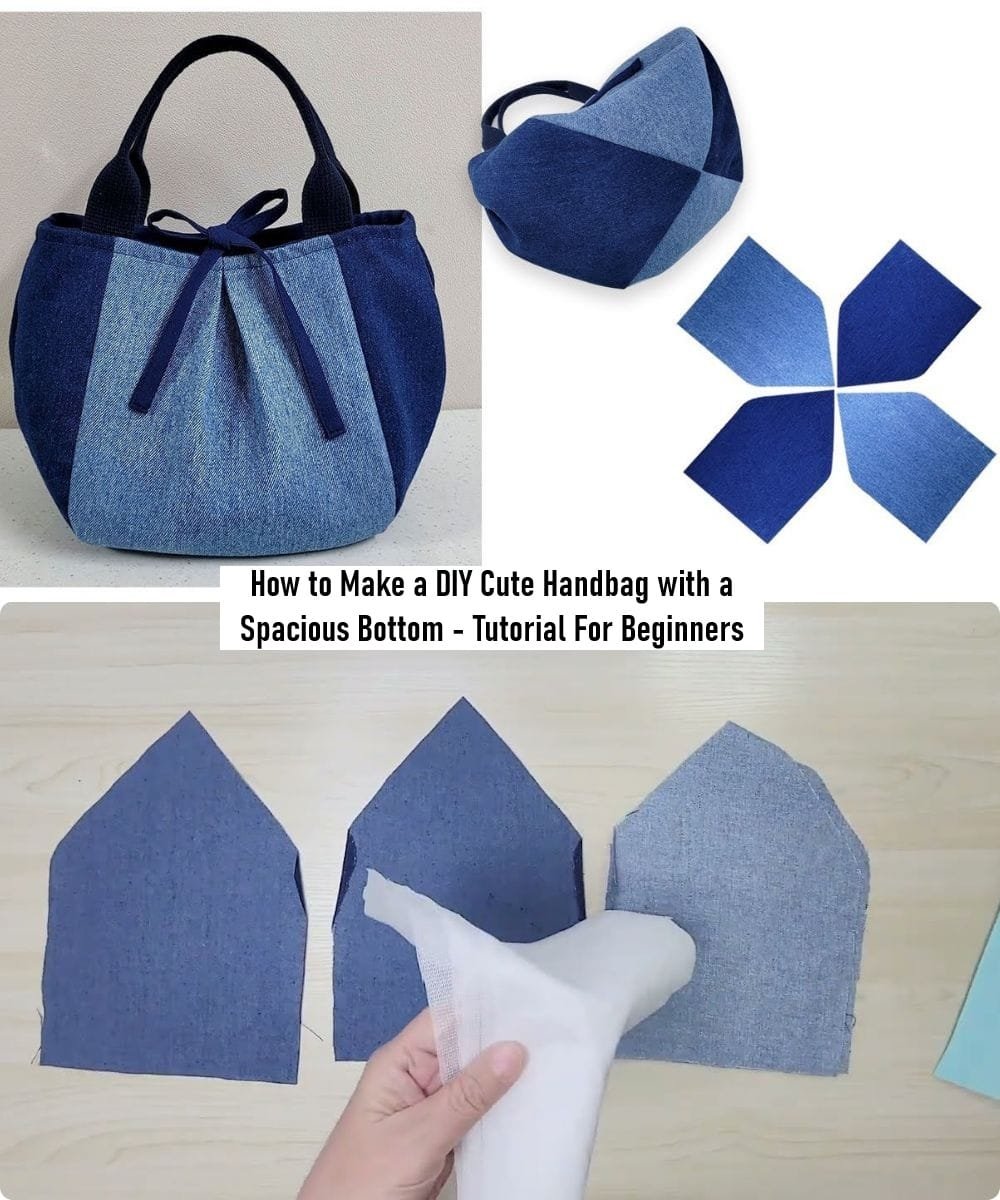
Start by cutting your outer fabric, batting, and interfacing to size. You’ll need two rectangles for the front and back, two for the lining, and one for the bottom panel. A good standard size for a roomy handbag is 16” x 12” for the body and 4” x 12” for the bottom.
Layer your outer fabric with the batting and quilt in a simple pattern—straight lines, diagonal crosshatching, or even a free-motion design if you’re confident. The quilting not only strengthens the fabric but also gives your handbag with a spacious bottom a luxurious handmade touch.
Once quilted, trim any excess batting and square off the edges to keep everything aligned. This step ensures your panels will sew together smoothly and your bag won’t look uneven.
Apply interfacing to the lining and bottom panels. This adds stiffness and ensures the base of your bag can support heavier items like books, tablets, or water bottles—exactly what you expect from a spacious-bottom handbag.
Don’t rush through this stage. A well-quilted and interfaced bag will hold its shape beautifully and last for years, making your efforts totally worth it.
Now set aside your prepared pieces, and get ready to assemble the bag’s body.
Assembling the Bag Body and Bottom
Now comes the most satisfying part: assembling the actual structure of your handbag with a spacious bottom. Start by sewing the front and back quilted panels together, right sides facing, using a ½-inch seam allowance. Leave the top edge open.
Repeat the same for your lining pieces but leave a 3-inch gap in the bottom seam for turning the bag later. This small detail is often overlooked but is critical for a clean finish in your spacious bottom handbag project.
Next, it’s time to attach the bottom panel. With the main body still inside out, align the bottom panel along the base, pinning it carefully around all four edges. Sew each side one at a time, making sure your corners are neat and sharp.
This boxed construction is what gives your handbag its spacious bottom. It provides a flat base, allowing the bag to stand on its own and hold items more securely.
Once the outer body is done, repeat the bottom attachment process with your lining. Again, sew slowly and precisely to avoid puckering at the corners.
After assembling both the outer and lining parts, it’s time to combine them. Insert the outer bag (right side out) into the lining (inside out), so that right sides are touching. Align the top edges and sew all the way around.
Turn the bag right side out through the opening in the lining. Sew that opening closed, tuck the lining inside, and press the top edge flat for a polished, clean look.
Adding Handles and Final Touches
At this stage, your handbag with a spacious bottom is nearly complete! The last few steps are about finishing details that enhance both function and beauty.
To attach the handles, mark even points on both sides of the top edge. Whether you’re using fabric straps, leather handles, or cotton webbing, make sure they’re positioned symmetrically and are reinforced with stitching or rivets.
If you’d like to add pockets, now’s the time. Inner pockets can hold phones, wallets, or pens, while an outer pocket adds quick access for keys or other small items. Consider using leftover quilted fabric scraps for a cohesive look.
A magnetic snap or zipper closure adds security to your handbag with a spacious bottom, preventing your items from falling out and giving it a professional finish.
You might also consider attaching metal feet at the bottom of the bag. These help prevent wear and tear when placing the bag on the floor and add a stylish detail that complements the spacious bottom feature.
Don’t forget to press all seams and give the finished bag a good steam to enhance its crisp shape. Quilted handbags especially benefit from this, as it helps define the structure and sharp lines.
And just like that, your functional and fashionable spacious bottom handbag is ready to show off!
FAQ – Handbag with a Spacious Bottom
What is a handbag with a spacious bottom used for?
A handbag with a spacious bottom is ideal for carrying bulkier items like water bottles, books, tablets, or even lunch boxes. The flat, structured base prevents tipping and helps organize contents better.
Can I make this bag without quilting it?
Yes, but quilting adds structure and beauty. If you prefer a non-quilted look, use thicker interfacing or foam to maintain the bag’s shape and preserve its spacious bottom structure.
How do I keep the bag from collapsing when empty?
Use strong interfacing and consider adding plastic canvas or a stiff base insert at the bottom. This ensures the handbag with a spacious bottom stays upright.
Is this handbag suitable for beginners?
Absolutely! While the project involves several steps, each one is simple. With patience and attention to detail, even a novice can craft a stylish spacious-bottom handbag.
What size should I make the bag?
A common finished size is around 16” wide by 12” tall with a 4” deep bottom. This gives you enough space for daily essentials while keeping the bag manageable.
Can I wash the handbag after it’s finished?
If all materials used are washable (cotton fabric, fusible interfacing, batting), yes. Wash gently in cold water and air dry. Avoid machine drying to prevent warping the spacious bottom shape.
Conclusion
In this tutorial, you learned how to create a handbag with a spacious bottom from start to finish—choosing the right materials, quilting your fabric, assembling the structure, and adding finishing touches like handles and closures. Each step builds upon the last to ensure your final product is not only beautiful but also highly functional and durable.
This project is perfect for quilters who want to explore practical sewing applications and make something they can use every day. With a strong base and customizable features, the spacious bottom handbag is sure to become a favorite in your collection.
If you enjoyed this tutorial, feel free to leave your honest opinion or suggestions on how we can improve. Your feedback helps shape future content and keeps the creativity flowing for all craft lovers!

