If you’ve ever wanted to repurpose your old jeans into something both stylish and practical, then this is your sign to try an Accordion Wallet Made From Jeans Free Pattern. Right from the first stitch, this project brings together sustainability, functionality, and creativity. Not only is it an eco-friendly solution, but it also gives you a unique and sturdy wallet that can hold all your daily essentials.
Creating your own accordion wallet made from jeans means you get to customize every detail to fit your style and needs. Whether you’re sewing for yourself, a loved one, or as part of a small craft business, this project is a great way to showcase your sewing skills. Jeans fabric is thick, durable, and holds its shape beautifully — the perfect material for a wallet that’s built to last.
Throughout this article, we’ll guide you through every step needed to make an accordion wallet made from jeans, from choosing the right denim scraps to assembling the compartments. This is a beginner-friendly tutorial but also satisfying for experienced crafters. You’ll finish with a wallet that not only looks amazing but also tells a story — of creativity, reuse, and handmade love.
Materials and Tools You Will Need
Before diving into the process, it’s important to gather all the right materials for your accordion wallet made from jeans. Using the proper tools ensures the final product will look polished and last longer.
Start with denim fabric from old jeans. Look for material that isn’t too worn out but still soft enough to fold easily. Avoid parts with holes or extremely stiff seams. The pockets, waistband, and leg sections are excellent sources.
Next, you’ll need a lining fabric, such as cotton, to add contrast and structure. Choose something lightweight but durable. This not only reinforces the inside but adds personality to the wallet’s design.
You’ll also want interfacing to help the wallet hold its accordion shape. Fusible interfacing works best because it adheres easily to both denim and cotton when ironed, adding stiffness where needed.
Don’t forget the closure mechanism. Snaps, Velcro, or magnetic buttons are popular options, depending on your skill level and personal preference. A decorative button or even a recycled jeans button can add charm.
Other essential tools include scissors, sewing machine (or hand sewing supplies), thread, pins or clips, ruler or measuring tape, and an iron. A zipper foot or denim needle can make sewing through thick layers much easier.
Once everything is prepared, set up your workspace and get excited to bring your accordion wallet made from jeans to life.
How to Cut and Prepare Your Denim Pieces
To begin creating your accordion wallet made from jeans, it’s crucial to cut your pieces with precision. This stage sets the foundation for a neat and organized wallet.
Start by sketching or printing out a simple pattern. You’ll need a main wallet body piece, several accordion dividers, and smaller pockets if you plan to include card slots. Keep each section labeled to avoid confusion.
Place your denim pieces flat and press them with an iron to remove any wrinkles. This makes it easier to trace and cut accurately. Use tailor’s chalk or a washable fabric marker to outline your pattern onto the denim.
Carefully cut your pieces using sharp scissors or a rotary cutter. If your jeans are thick, take your time — uneven cuts can make sewing more difficult later.
Repeat the same steps for the lining fabric. For a professional finish, all interior parts should be lined, even the dividers. This not only makes the wallet look better but adds strength.
Once all the pieces are cut, iron the interfacing onto the denim sections that require extra stiffness. Usually, the wallet body and accordion side pieces need the most support.
Finally, organize all your pieces in the order you’ll sew them. This step helps you stay focused and prevents mistakes as you build your accordion wallet made from jeans.
Assembling the Accordion Folds and Compartments
Now that everything is prepared, it’s time to assemble the signature accordion folds that make this wallet so functional and spacious.
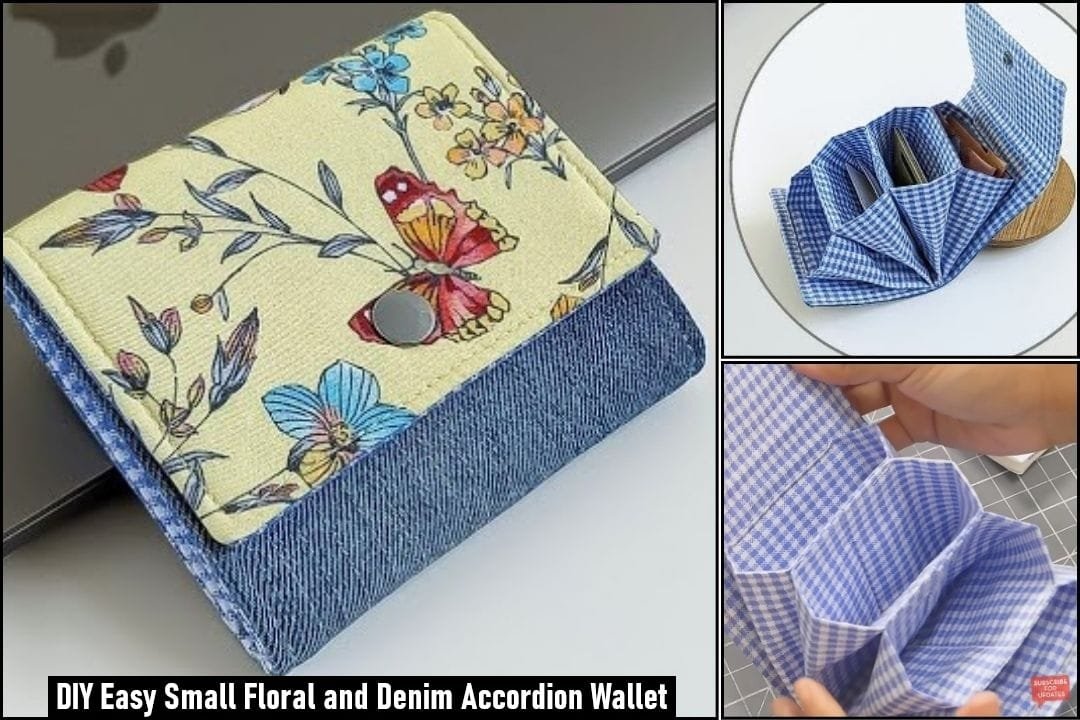
Begin by folding your side panels like a fan — fold, press, and pin each crease to form the accordion shape. These folds will expand and contract when the wallet is opened and closed, giving it its unique look.
Attach the accordion sides to the inner compartment pieces. These can be simple rectangles for bills or slightly curved for cards. Sew slowly to ensure everything stays aligned and neat.
Add the lining to each compartment before joining them. This helps hide raw edges and gives the wallet a polished interior. Use coordinating or contrasting thread, depending on your style preference.
Once all dividers are attached to the accordion sides, join the entire unit to the main wallet body. Use clips instead of pins if the layers are thick, and sew slowly to keep all pieces in place.
Topstitching the edges can make the wallet look more professional and secure the seams further. Be sure to backstitch at the beginning and end of each line to prevent unraveling.
Finally, test the accordion function by opening and closing the wallet. Adjust any uneven seams before adding the closure. Your accordion wallet made from jeans should now be taking its final shape!
Adding Finishing Touches and Closures
Now comes the fun part — personalizing and finishing your accordion wallet made from jeans so it’s ready for everyday use or gifting.
Decide on the closure style. A magnetic snap is the easiest and cleanest-looking option, while a Velcro tab is beginner-friendly. If you’re up for a challenge, install a recycled jeans button for an authentic touch.
Attach the closure to the flap and base of the wallet. Use interfacing under these areas to prevent tearing over time. Check alignment carefully before sewing to ensure a secure fit.
For a final touch, consider adding labels or embroidery. A stitched name, a cute heart, or even a patch can make the wallet truly yours. These details enhance the charm and individuality of your wallet.
You can also add a wrist strap or keyring loop to one corner. This feature makes your accordion wallet made from jeans more functional, allowing you to carry it on the go with ease.
Give the wallet a good press with an iron, using a pressing cloth to protect the fabric. This step helps smooth seams and shapes the wallet into its final form.
Once you’re satisfied, fill it with cards, cash, receipts, or anything else you need. You’ve now completed a practical, stylish, and eco-conscious project using nothing but your old jeans and a little creativity!
FAQ: Accordion Wallet Made From Jeans Free Pattern
Q: Can I sew the accordion wallet by hand instead of using a sewing machine?
A: Yes, you can! Hand sewing works well, especially with strong thread and a denim needle. It will take longer, but the result is still beautiful.
Q: What’s the best part of jeans to use for this project?
A: The leg and back pocket areas are ideal. Avoid areas with heavy seams or stretch fabric, as they may be hard to sew or wear out faster.
Q: Can I add a zipper to my accordion wallet?
A: Absolutely! You can include a zippered pocket inside for coins or add a zipper closure to the entire wallet for extra security.
Q: How many compartments can I include?
A: Most wallets have 3 to 5 compartments, but you can customize yours to fit your needs. Just keep in mind that more layers make the sewing process more complex.
Q: Is interfacing really necessary?
A: Yes. Interfacing gives structure and durability, especially when using soft or thin denim. Without it, your wallet might lose its shape.
Q: Can I wash the wallet after it’s made?
A: Spot cleaning is recommended. If you machine wash, use a laundry bag and gentle cycle, and avoid harsh detergents to preserve the structure.
Conclusion
Making your own accordion wallet made from jeans is more than just a fun sewing project — it’s a creative way to reduce waste, personalize your accessories, and challenge your DIY skills. From choosing the denim to adding your final touch, every step is satisfying and sustainable.
This tutorial showed you how to cut, assemble, and finish a wallet that’s not only functional but uniquely yours. Whether you’re sewing for yourself, for gifts, or even for a small craft business, this pattern is a great way to bring your ideas to life.
We’d love to hear your thoughts! If you tried this project or have tips, ideas, or suggestions to improve it, please leave a comment. Your feedback inspires others and helps our community grow!

