How to Sew a Stylish Bag (The Versatile Tote) is an exciting and rewarding project for sewing enthusiasts who want to create something practical, fashionable, and unique. This tutorial is perfect for those looking to sew a structured, elegant tote with a zipper and reinforced handles—just like the one pictured above. Whether you’re a beginner or someone experienced, this guide will walk you through the process of sewing a stylish bag you’ll be proud to carry every day.
Learning how to sew a stylish bag (the versatile tote) gives you the freedom to choose your fabric, adjust the dimensions, and personalize every detail—from the pockets to the zippers. The design showcased here has a professional finish, with clean lines, rounded edges, and a surprisingly spacious interior.
This article will teach you all the necessary steps and techniques to complete your own tote bag project. From selecting materials to stitching and finishing touches, you’ll discover how to sew a bag that’s not only beautiful but built to last. Let’s begin with the most important step—choosing your materials.
Choosing the Right Materials
Picking the right materials is the foundation of your success when learning how to sew a stylish bag (the versatile tote). The fabric, lining, and interlining all play a major role in the outcome of your project.
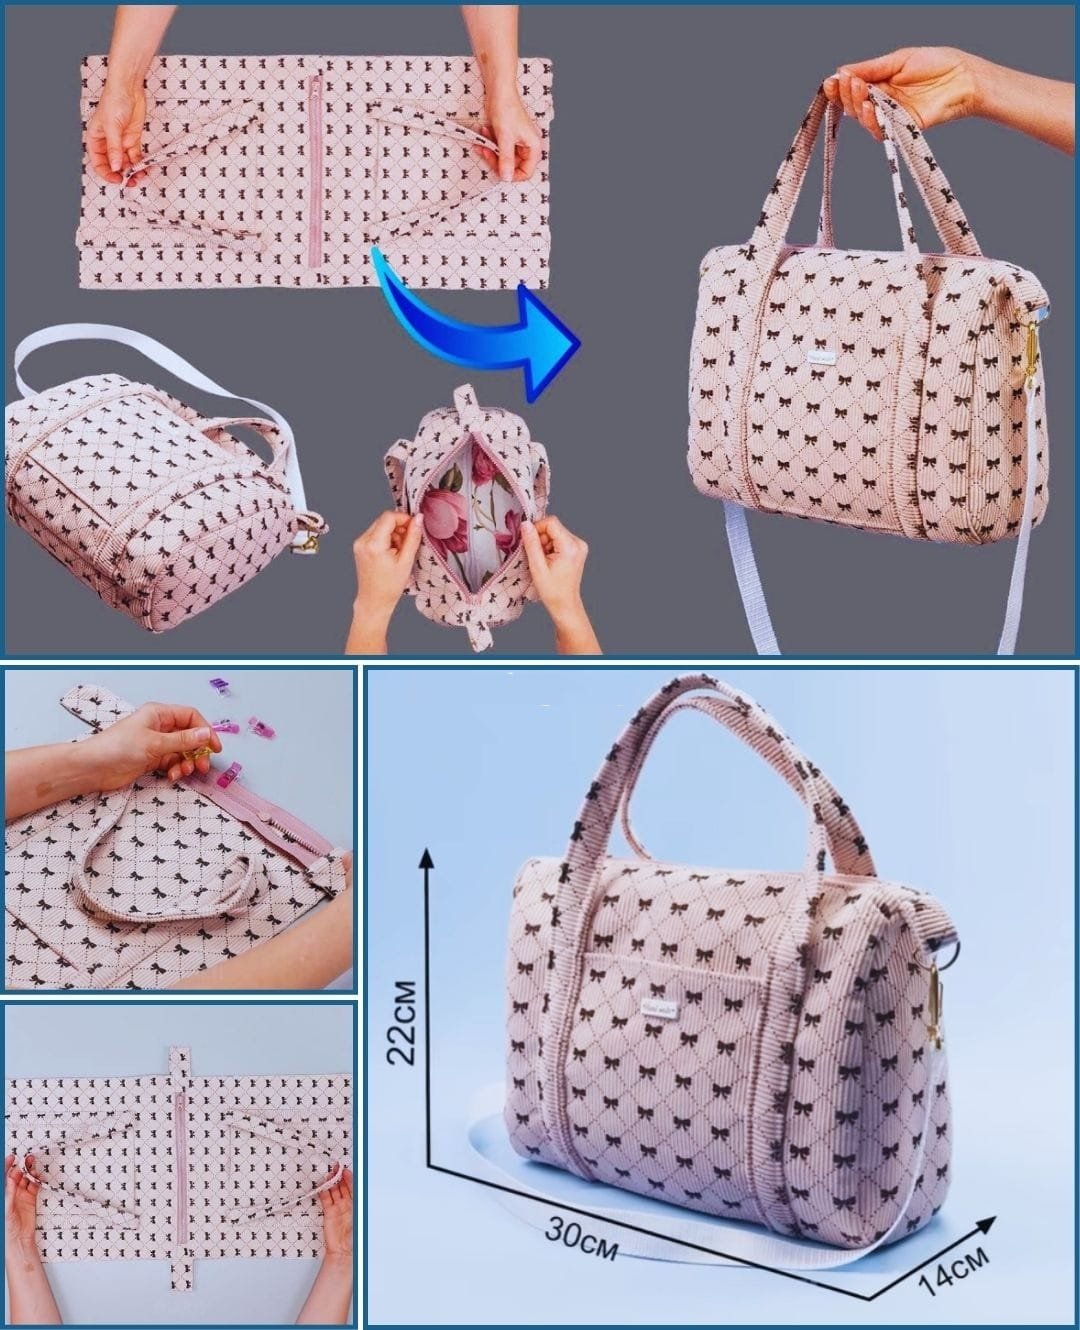
Start by selecting a medium to heavy-weight fabric like canvas, corduroy, or quilted cotton. These fabrics provide the structure your tote needs while allowing flexibility for sewing curves and corners. The fabric in the reference image appears to be a soft, padded cotton—perfect for achieving a stylish yet cozy aesthetic.
For the inner lining, consider a contrasting color or patterned cotton that matches your personality. Lining not only beautifies the inside but also reinforces the bag. Don’t skip it!
Use fusible interfacing to give your fabric body and shape. Foam interfacing is a great choice if you want the bag to maintain a 3D shape, as in the photo reference. It makes your tote feel more professional and durable.
Cutting and Preparing the Pieces
Once you have all your materials, the next step in how to sew a stylish bag (the versatile tote) is cutting the pieces accurately. Precision here ensures a polished look.
Begin by cutting the outer fabric into a rectangle measuring about 30cm x 44cm, which will form the body of the bag when folded. Also cut two identical pieces for the lining. If you want a base of 14cm x 30cm and a height of 22cm, these measurements will work beautifully.
Cut two long strips (around 55cm each) for the handles, and one longer strip for the optional shoulder strap. For the zipper top panel, cut two narrow strips that match the width of your zipper (usually around 4-5cm wide).
Attach the interfacing to the main body pieces using a hot iron. Make sure there are no bubbles—this will help your tote look smooth and professional.
Now, prepare the zipper panel. Align your zipper with the fabric strips, clip them in place, and sew along the edges. This will form the secure opening of your tote.
Assembling the Outer Shell
When you’re confident in your cut pieces and zipper panel, it’s time to begin assembling the outer bag structure—a key step in how to sew a stylish bag (the versatile tote).
Pin or clip the zipper panel between the two body pieces, aligning them carefully. Stitch the pieces together, then topstitch to reinforce the seam and prevent fabric from getting caught in the zipper.
Create the boxed corners by folding the bag sides and stitching the 14cm base together, matching the reference image. These boxy ends give the tote its rounded and stylish appearance.
Next, sew the handles in place. Position them 8–10cm from each side seam, making sure they are symmetrical. Reinforce the base of each handle by stitching a box or cross for strength.
If you’re adding a detachable shoulder strap, sew D-rings or loops on the side seams at the top corners. Make sure these are very secure, as they’ll carry additional weight.
Attaching the Lining and Final Assembly
The final stages of how to sew a stylish bag (the versatile tote) involve precision and care to ensure your interior looks just as good as the exterior.
With the outer shell ready, take your lining pieces and sew them together in the same shape as the outer bag—leave a small gap at the bottom to turn the bag inside out later. Optional: add interior pockets at this point by sewing rectangles onto the lining fabric before assembly.
Now, insert the outer shell into the lining, with right sides facing each other. Make sure the zipper is slightly open so you can turn the bag afterward. Pin or clip around the top edge and sew all the way around.
Carefully pull the bag through the gap left in the lining. Push out the corners and press everything flat. Sew the gap in the lining closed with a small invisible stitch or topstitch.
Topstitch the top edge of the bag for a clean, finished look and to keep the lining in place. Add any extra embellishments like tags, charms, or logos.
Adding Functionality and Style
A big part of how to sew a stylish bag (the versatile tote) is adding those thoughtful features that make your tote not only functional but fabulous.
Include zippered pockets or magnetic snaps for extra security. A front patch pocket like the one in the image is perfect for quick access to keys or a phone.
Decorate with trims, tassels, or embroidery for a personalized touch. A minimalist bag can look luxurious with gold zippers or faux leather accents, while a colorful lining can give it a fun surprise inside.
Think about the purpose of your tote—is it for travel, daily errands, or the gym? You can adapt its size and compartments accordingly.
Want a waterproof version? Use laminated fabric or add a water-resistant lining. Flexibility is the beauty of making your own bag.
Most importantly, test your finished tote! Fill it with your essentials to ensure the straps hold and it keeps its shape.
Take photos of your finished bag—you deserve to celebrate your accomplishment and maybe even share it with a sewing group online!
FAQ – How to Sew a Stylish Bag (The Versatile Tote)
Q: Is this tote bag beginner-friendly?
Yes! While it may seem complex, this project is totally doable with basic sewing skills. Take your time, and follow each step carefully.
Q: What kind of sewing machine is best for this project?
A domestic sewing machine is perfectly fine. Just make sure it can handle thick layers, especially when working with interfacing and handles.
Q: Do I need a special foot to sew the zipper?
Using a zipper foot is highly recommended for neat, straight seams. Most machines come with one, and it’s easy to install.
Q: How do I customize the size?
Adjust the width and height of the body pieces to make the bag smaller or larger. Just remember to scale the other components accordingly.
Q: Can I wash the tote bag?
Yes, if you’ve used washable fabric and interfacing. Just avoid heavy embellishments and use cold water to preserve the shape.
Q: How long does it take to complete?
On average, about 3–4 hours, depending on your skill level and any additional features you include.
Conclusion
Now you know exactly how to sew a stylish bag (the versatile tote) from start to finish. You’ve learned how to select your materials, cut and prepare your fabric, assemble a structured outer shell, line the interior, and add both functionality and flair to your bag.
This is more than just a sewing project—it’s an opportunity to create something uniquely yours. We hope this tutorial inspired you to take on the challenge and enjoy every step of the journey.

