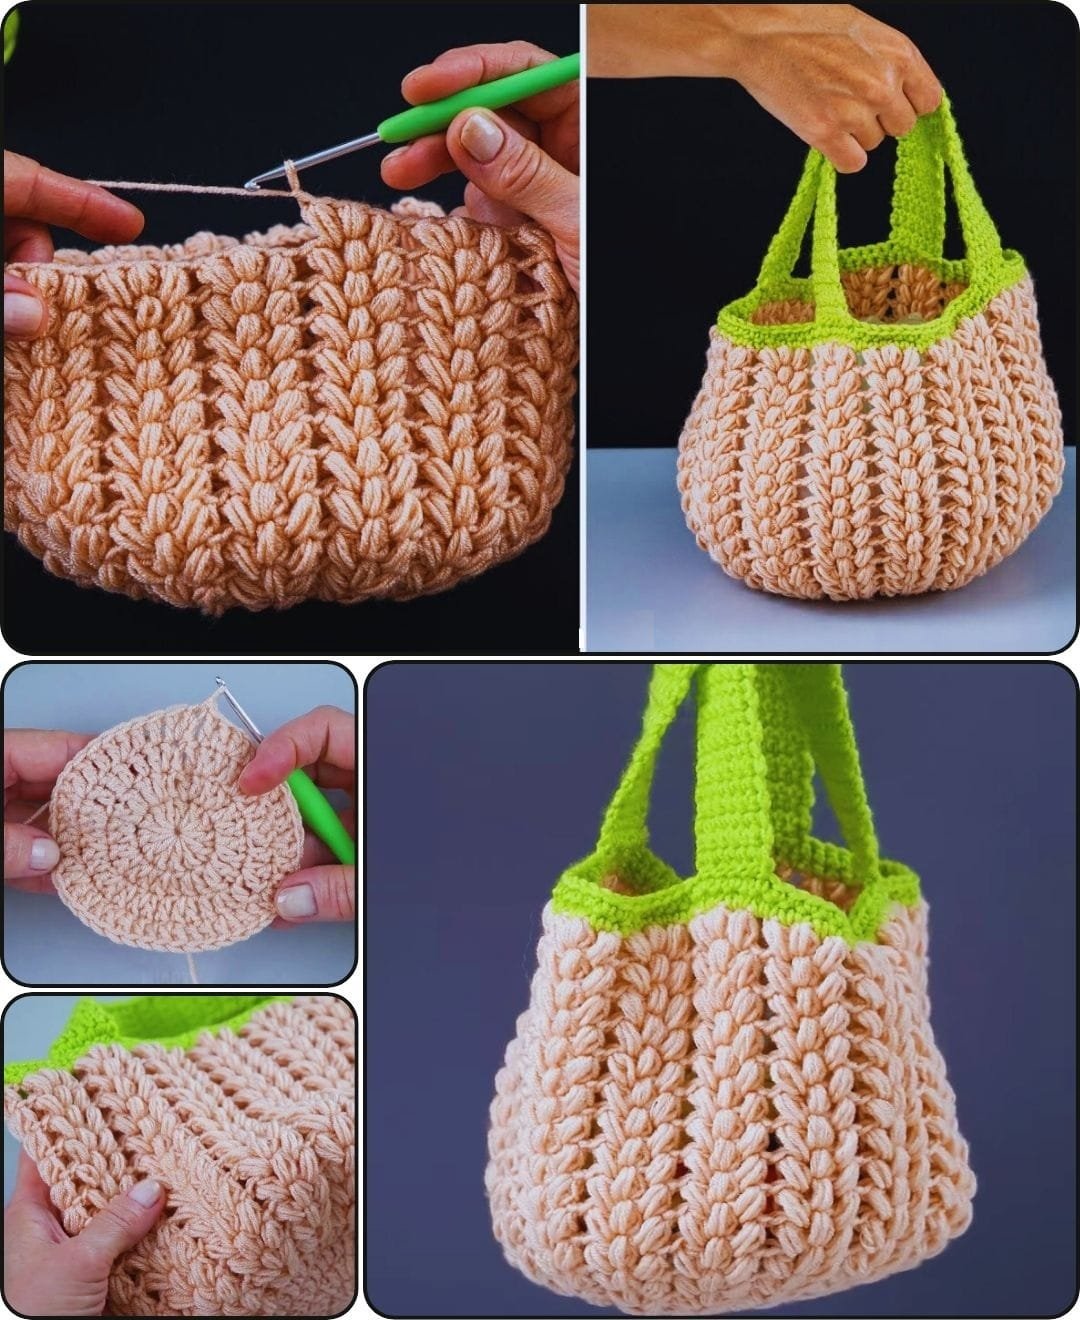
If you’ve been looking for a stylish yet functional accessory, learning how to crochet a cute mini tote bag – two-color tutorial is the perfect project to start. This charming and compact tote is ideal for everyday use, quick errands, or as a thoughtful handmade gift. Using two complementary colors, you can make your mini tote stand out while practicing your colorwork skills. Whether you’re a beginner or a seasoned crocheter, this tutorial will walk you through every step to ensure your bag looks professional and adorable.
Crafting your own tote bag gives you the opportunity to personalize it with colors, stitches, and details that match your taste. Not only is this a rewarding creative experience, but it also supports sustainability by promoting reusable handmade bags. With the right yarn and a bit of patience, you’ll be surprised how simple it is to crochet a cute mini tote bag – two-color tutorial and make it uniquely yours.
This project focuses on core crochet skills like working in rounds, color changes, and creating a strong, consistent structure. Plus, the two-color design adds a fun visual element without making the process overly complicated. Let’s explore the materials, pattern, techniques, and tips that make this tote a joy to create.
Materials and Tools You’ll Need
Before starting to crochet a cute mini tote bag – two-color tutorial, make sure you have all the right materials. Having everything ready beforehand keeps the process smooth and stress-free. Most of the supplies are affordable and easily available at craft stores or online.
Choose two medium-weight yarns in colors that complement or contrast nicely. For best results, opt for 100% cotton yarn, which provides structure and durability. Cotton also gives your tote a professional finish and holds shape better than softer fibers like acrylic.
You’ll need a size H-8 (5mm) crochet hook, which is perfect for worsted weight yarns. A smaller hook creates a tighter weave, essential for a sturdy bag that holds its form. You can adjust hook size based on how tight or loose you crochet naturally.
Make sure you have a pair of scissors, a yarn needle for weaving in ends, and stitch markers if needed. Stitch markers help keep track of rounds, especially when working in continuous spirals. Don’t forget a measuring tape to ensure symmetry between your two colors.
Some crafters prefer to use a liner inside their tote for added strength. While optional, a liner gives your bag a polished look and makes it more practical for carrying smaller items without stretching. You can hand-sew a liner using fabric scraps you already own.
Finally, keep a notebook or digital notes on hand in case you want to replicate your design later. Writing down stitch counts, round numbers, or your chosen color changes can save time on future projects. A clear pattern ensures your final result is both functional and beautiful.
Starting the Base and Creating a Solid Foundation
The base is the heart of your mini tote. When you crochet a cute mini tote bag – two-color tutorial, it’s essential to start with a firm and even base that supports the weight of the entire structure. Most crocheters use an oval base, worked in rounds using single crochet stitches.
Begin with a foundation chain, typically around 20 stitches, depending on your desired bag width. Work single crochet stitches along one side, then curve around and continue on the other. This creates an oval shape, which you’ll build upward to form the tote body.
As you continue in rounds, increase your stitch count at both ends of the oval to maintain the curve. Stitch markers can help identify the turning points, ensuring each round is symmetrical. By round 5 or 6, your base should resemble a flat, neat oval.
Stick with your first yarn color until the base is complete. This keeps the bottom cohesive and sturdy. Cotton yarn is best here since it doesn’t stretch out over time like other materials. Once the base is solid, you can switch colors for the sides if desired.
Consistency in tension is critical when working the base. Uneven stitches lead to a wobbly foundation and affect the overall look. Try practicing a few sample ovals before starting your tote to ensure you’ve got the right technique and rhythm.
Once your base is done, you can decide whether to slip stitch to join rounds or use continuous rounds. Each option offers a different look. Slip stitching gives clean seams while continuous rounds provide a seamless finish. Either works well—just be consistent.
Adding the Two-Color Body Section
Now comes the fun part: incorporating the two-color design. The body of the tote is where your creativity shines when you crochet a cute mini tote bag – two-color tutorial. You can alternate rows, create blocks of color, or work stripes—whatever fits your aesthetic.
Start by attaching your second color with a secure knot or seamless color change method. Continue working in rounds using half double crochet or single crochet for a tighter weave. This ensures your tote remains strong and can carry small items easily.
One popular pattern is alternating every two rows between the two colors. This creates bold, even stripes. For a softer look, change colors every four rows or add a fade by adjusting stitch types along the way. The possibilities are endless and allow for personalization.
Remember to carry the unused yarn up the inside of your work neatly. This reduces loose ends and saves time on weaving later. To avoid bulk, twist the yarn strands around each other every few stitches when switching colors.
Check your stitch count regularly to keep the shape even. Lopsided sides can result from skipped stitches or tight tension. Use your measuring tape to ensure the height is uniform all the way around. Typically, the body section should be 6 to 8 inches tall.
If you want texture, experiment with puff stitches or bobbles within the two-color section. Just remember that thicker stitches add bulk, so plan accordingly. They’re great for decorative totes but may reduce internal space slightly.
Lastly, finish the body section with one or two rounds in your base color. This creates visual balance and ties the design together. You can also create a slip stitch trim at the top for a clean, polished edge.
Creating the Handles and Finishing Touches
When you crochet a cute mini tote bag – two-color tutorial, adding well-crafted handles is the key to functionality. Your handles should be strong, evenly placed, and comfortable to hold, especially if you plan to use the bag regularly.
The simplest way is to create handles directly onto the top of the tote by chaining and skipping stitches underneath. After forming the base of each handle, work a few rows back and forth in single crochet to reinforce them.
Placement is important: measure equal distances from each side to position the handles symmetrically. Uneven handles will make your tote tilt and feel awkward when carried. Use pins or stitch markers to outline their placement before crocheting.
Consider handle length. Short handles are great for hand-held bags, while longer ones are ideal for shoulder totes. For a mini tote, 5 to 7 inches in handle length is typically perfect. It keeps the bag compact but still functional.
To ensure strength, go over each handle section twice. Reinforce the joins between the body and handle with tight stitches or even slip stitching across the top. The more secure the join, the longer your tote will last.
Add any finishing touches like tassels, buttons, or charms if you want a personalized detail. Keep it simple to avoid overwhelming the mini tote’s design. Embellishments should match the tote’s color scheme and not interfere with its use.
Weave in all ends neatly and trim excess yarn. If you used cotton, lightly steam the bag to smooth out bumps and align stitches. Your bag is now complete—stylish, sturdy, and ready to use!
Styling and Using Your Mini Tote
Once you crochet a cute mini tote bag – two-color tutorial, the real fun begins—styling and using it! This little bag may be small, but it’s big on personality. It can be worn with casual outfits, beachwear, or even dressy looks depending on your yarn choice.
Pair your tote with jeans and a t-shirt for an everyday accessory. Use bright colors for a summery vibe or neutral tones for something more elegant. Mini totes are a great statement piece that shows off your crafting skills and fashion sense.
If you’re gifting your tote, add a handmade tag or fill it with goodies. Crocheted bags make excellent birthday or holiday gifts. They’re reusable, practical, and a reminder of the care you put into something handmade.
These bags are also perfect for storing craft supplies, cosmetics, or even as small project bags for your next crochet item. Their structure and size make them versatile for various everyday needs, not just as fashion accessories.
Consider making a matching coin purse or pouch in the same two-color style. This creates a set and adds even more functionality. You could even sell these at craft fairs or online as part of a handmade collection.
For those who enjoy fashion photography or social media, mini totes look amazing in flat lay shots. Showcase your tote with accessories, yarns, or outfits to highlight the design and colors. Don’t forget to include your own creative twist!
Each time you crochet a cute mini tote bag – two-color tutorial, you’ll refine your skills and develop new ideas for future bags. This makes the process not just a craft, but a journey of creativity and personal expression.
FAQ: Common Questions About Crochet Mini Tote Bags
What yarn is best for a mini tote bag?
The best yarn for mini totes is 100% cotton. It’s durable, holds shape well, and is easy to wash.
Can beginners follow this two-color tutorial?
Yes! The project is beginner-friendly. Basic crochet knowledge is enough, and the two-color design is easy to manage.
How long does it take to complete one mini tote?
On average, 3 to 5 hours. This depends on your speed, pattern complexity, and whether you add details like linings or handles.
How do I prevent the colors from tangling?
Keep each yarn in a separate bag or bowl. Twist them gently when switching to avoid knots.
Can I sell bags made from this pattern?
Absolutely! Handmade totes are popular in craft fairs and online shops. Just credit the tutorial if it’s based on a specific pattern.
How do I clean my crochet mini tote?
Hand-wash in cold water with mild detergent and lay flat to dry. Avoid wringing or stretching.
Conclusion
We’ve explored how to crochet a cute mini tote bag – two-color tutorial from start to finish. From selecting materials and creating a strong base to adding stylish two-tone designs and practical handles, this guide covered everything you need to succeed. This small but mighty tote is both a creative outlet and a practical item.
If you enjoyed this project, we’d love to hear from you! Share your experience, tips, or variations. Leave a sincere opinion and let us know how your mini tote turned out—or suggest what kind of crochet project you’d like to see next!

