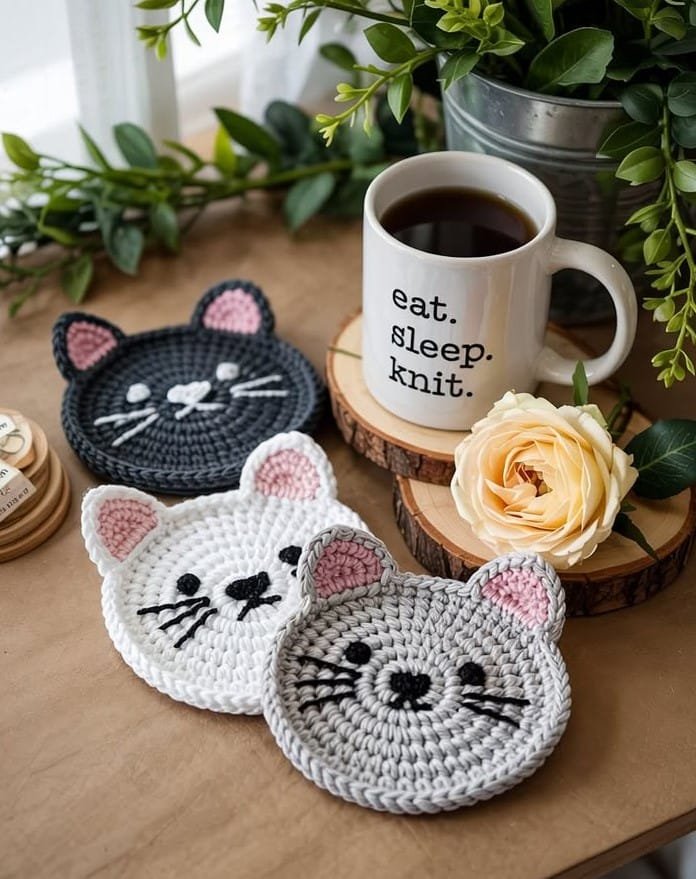
If you’ve been searching for the perfect Cat Coaster Crochet Tutorial, you’re in the right place. This fun, beginner-friendly project is ideal for anyone who loves crochet and adores cats. Whether you’re making a gift for a fellow cat lover or adding a personal touch to your home, a cat coaster crochet pattern is a creative and charming idea that brings personality to your decor.
Creating your own cat coaster crochet is more than just a craft — it’s an expression of love, patience, and artistry. With just a hook, some yarn, and a little time, you can transform basic stitches into a cozy, adorable cat-shaped coaster that is as functional as it is cute. Plus, it’s a fantastic stash-busting project that uses minimal materials.
In this guide, we’ll walk through the cat coaster crochet tutorial step by step. You’ll learn which materials you need, how to form the basic shapes, and how to finish it with clean and polished details. Let’s dive in and get your yarn moving!
Materials You’ll Need for Your Cat Coaster Crochet
Before starting your cat coaster crochet, it’s essential to gather all the tools and materials required. This will help ensure a smooth crafting process without interruptions. The good news? You likely already have many of these items in your crochet kit.
Choose a worsted weight cotton yarn. Cotton yarn works best for coasters because it’s absorbent and durable. It holds its shape well even after several uses.
Use a 4.0 mm or 4.5 mm crochet hook. This size offers a good grip on worsted yarn and creates a solid texture ideal for a coaster that will stay flat.
You’ll also need a yarn needle for weaving in ends once your coaster is finished. Clean edges and hidden tails make the final product look professional.
Keep a pair of sharp scissors nearby for trimming yarn ends after fastening off.
If desired, add safety eyes or embroidery floss to decorate the cat’s face. These extras give your coaster personality and charm.
Having a stitch marker on hand is helpful if you want to keep track of your rounds, especially if you’re new to crocheting in the round.
How to Start the Base Circle
The foundation of your cat coaster crochet is a simple circle. Most patterns begin with this shape because it provides a smooth base for adding ears and facial features.
Begin with a magic ring. This is a flexible way to start your project and helps avoid a noticeable hole in the center of your coaster.
Chain 2 and work 12 double crochets (dc) into the ring. Pull the loop tightly to close and slip stitch to join the round. This forms your first base.
In the second round, increase by working 2 dc into each stitch around. This gives you 24 stitches in total, forming a neat expanding circle.
For the third round, work 1 dc in the first stitch, 2 dc in the next, and repeat around. This will bring your total stitch count to 36 and keep the circle flat.
Continue with one more round, working 2 dc, 1 dc, 1 dc, repeating around. You should now have 48 stitches. This size is perfect for a standard mug or glass.
Always check that your circle lies flat. If it curls or domes, adjust your hook size or loosen your tension slightly.
Creating the Cat Ears
Adding the ears is what transforms this from a plain circle into a true cat coaster crochet project. The ears are simple triangular extensions that can be made directly onto the circle.
Identify two points across the top of the circle where the ears will go. These should be evenly spaced for a balanced look.
Join yarn to the first stitch and chain 1, single crochet (sc) in the next 4 stitches. Turn your work.
In the next row, sc across the 4 stitches again. Continue to turn after each row, reducing the number of stitches by 1 on each side.
Eventually, you’ll work sc2tog (single crochet two together) at the beginning and end of rows to shape the triangle.
When you reach the tip of the triangle (1 stitch), fasten off and weave in the ends. Repeat the process on the opposite side for the second ear.
You can make the ears pointed or slightly rounded based on your preference. Adjusting the number of rows or using half-double crochets can change the ear shape.
Some crocheters like to add a second layer behind the ear using a different color for contrast or boldness. This gives the cat’s ears more dimension.
Personalizing Your Cat Coaster
A cat coaster crochet is adorable on its own, but adding small details can really bring it to life. Customizing the coaster also makes it a thoughtful handmade gift.
You can embroider the cat’s face using black yarn or embroidery floss. Simple stitches form the eyes, nose, whiskers, and mouth. Keep the design minimal for a modern look.
Try adding buttons or felt pieces for the eyes and nose. Make sure they’re securely sewn to prevent them from coming loose, especially if children might use them.
Change the yarn color to create coasters representing different breeds or fur patterns. You can make tabby, calico, or black cat coasters with just a few color swaps.
Add a tail detail at the edge or a little bowtie between the ears. These small flourishes turn your coaster into a true keepsake.
If you’re making a set, try giving each coaster a unique expression by changing the eye shape or smile. It makes each one feel like its own character.
You could even incorporate some seasonal elements—a tiny Santa hat for Christmas or heart eyes for Valentine’s Day.
FAQ – Cat Coaster Crochet Questions
What yarn is best for cat coaster crochet?
Cotton yarn is ideal because it’s durable, absorbent, and easy to wash. Avoid acrylic, which may not absorb moisture well.
How big should a cat coaster crochet be?
The average size is around 4.5 to 5 inches in diameter. This fits standard mugs and cups comfortably.
Can beginners follow a cat coaster crochet tutorial?
Yes! Most patterns use basic stitches like single crochet and double crochet. If you’re new, this is a great way to build your skills.
How do I make the ears stand out more?
You can use slightly thicker yarn or add a double layer to the ears. Blocking them after finishing also helps them hold their shape.
Is it machine washable?
If you use cotton yarn, yes! Just be sure to weave in the ends securely so they don’t unravel in the wash.
Can I sell cat coaster crochet items I make?
As long as you’re using your own design or have permission from the pattern creator, handmade items like these are great for craft fairs and small shops.
Conclusion
In this Cat Coaster Crochet Tutorial, we walked through every step to create a charming, functional coaster that celebrates our love for cats and crochet alike. From choosing the right yarn to crafting the ears and adding personal flair, each detail helps make your project uniquely yours.
Whether you’re a beginner learning your first stitches or an experienced crocheter looking for a quick, satisfying project, this pattern offers something special. It’s an ideal way to create gifts, decorate your home, or simply relax with a hook in hand.
If you enjoyed this tutorial, I’d love to hear your thoughts! Please leave your honest opinion and suggestions—your feedback helps shape future tutorials and makes this creative space even better. Happy crocheting! 🧶🐾

