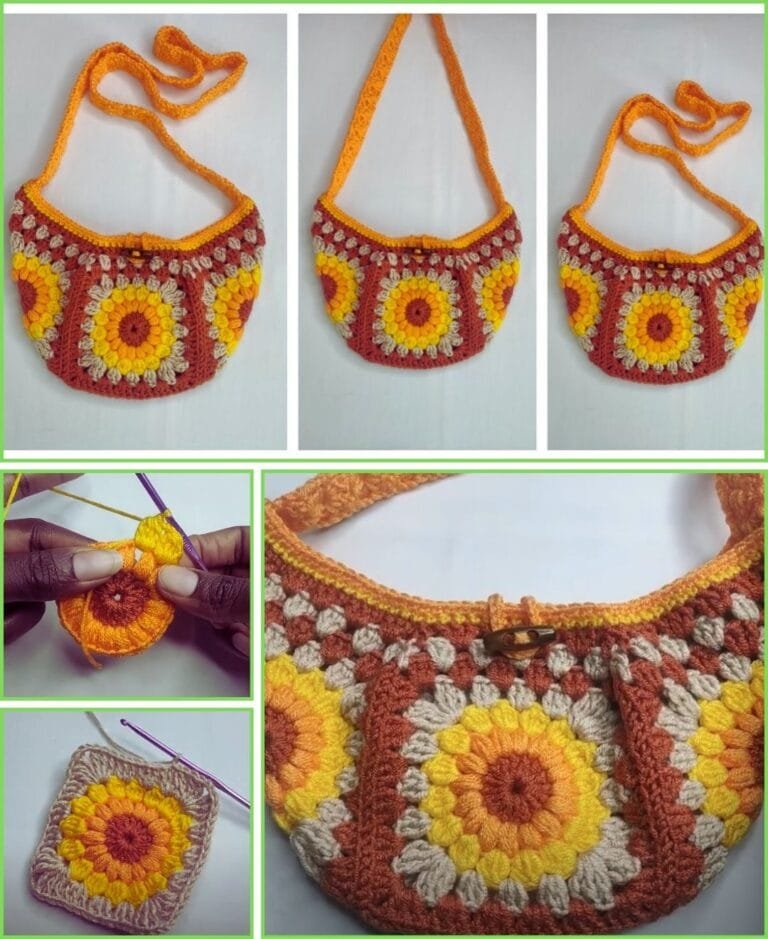
If you’ve been dreaming of a colorful and fun project, Crochet a Sunburst Granny Square Bag is a perfect place to start. This delightful crochet pattern brings vintage vibes together with a modern twist, creating a bag that is both stylish and functional. Whether you are a seasoned crocheter or just learning the basics, you’ll find this pattern inspiring and rewarding.
The charm of the Sunburst Granny Square Bag lies in its versatility. It can be made using any color combination, allowing you to express your personal style. It’s also a great project for using up leftover yarns, making it both eco-friendly and budget-conscious. The finished bag is ideal for carrying essentials, whether to the farmer’s market, beach, or simply out and about.
As we explore how to Crochet a Sunburst Granny Square Bag, you’ll learn about yarn types, joining techniques, lining tips, and the final assembly. We’ll also provide useful advice to ensure your bag is not only beautiful but sturdy enough for everyday use.
Choosing the Right Materials for Your Bag
When planning to Crochet a Sunburst Granny Square Bag, choosing the right materials is essential for success. The quality and type of yarn directly influence the texture, strength, and final look of the bag. While you can use most types of yarn, worsted weight cotton or cotton blend is highly recommended for durability and definition.
Cotton yarns hold their shape well, which is particularly important for bags. They also offer a clean finish that enhances the look of the sunburst granny square. If you prefer a softer, more boho look, consider using acrylic yarn, but keep in mind that it may stretch over time without proper lining.
Next, choose the correct hook size based on your yarn. Most medium-weight yarns work well with a 4.5mm to 5.5mm hook. The hook size can slightly alter the size of your squares and the overall tightness of the stitch. Always make a test square first to check your gauge.
You’ll also need a tapestry needle for weaving in ends and joining squares, along with scissors and stitch markers. If you plan to line your bag, have fabric, a needle and thread, or a sewing machine ready.
Color selection is where your creativity can shine. Use a palette of three to five colors for a vibrant and cohesive look. Traditional sunburst granny square designs work beautifully with bold contrasts or soft, earthy tones.
For structure, consider adding a button, zipper, or magnetic snap closure. These not only keep your items secure but also give a finished and professional look to your bag.
How to Crochet a Sunburst Granny Square
At the heart of this project is learning how to Crochet a Sunburst Granny Square. This specific style of square is slightly different from traditional granny squares, featuring a radiant, almost flower-like center that adds depth and character to your piece.
Begin by making a magic ring and working a series of double crochet clusters into the center. The first round usually involves puff or cluster stitches to create a textured base. These stitches add that “sunburst” effect, which makes your bag visually interesting and unique.
In the second and third rounds, you’ll work into the spaces between previous stitches, gradually expanding the square. It’s important to keep your stitch count consistent to maintain the shape and symmetry of the square.
You can experiment with colors on each round to highlight the layered, sunburst effect. This allows for playful combinations that bring out the vibrancy of the yarn. Many crocheters alternate between light and dark shades for a bold contrast.
Pay attention to your tension. Even tension ensures that each square is the same size, which is vital when joining multiple squares together. If some squares come out smaller, you may need to adjust your hook size or loosen your stitches slightly.
Once you’ve mastered one square, create as many as needed for your bag size. Most sunburst granny square bags require between 13 and 18 squares, depending on your design and intended dimensions.
Joining Squares and Shaping the Bag
Once your squares are ready, the next step in your journey to Crochet a Sunburst Granny Square Bag is joining them together. This stage can be as creative as the square-making process itself. There are various joining methods, and your choice will influence the bag’s appearance and durability.
One popular method is the whip stitch, where squares are sewn edge-to-edge using a tapestry needle. This creates a neat and subtle seam, allowing the sunburst pattern to take center stage. Alternatively, you can use slip stitches to crochet the squares together, adding a decorative ridge.
Lay out your squares before joining to decide the final layout. Symmetry and color distribution play a big role in how polished your bag looks. Many prefer a 3×3 layout for a simple tote or combine 4×4 with side panels for a larger handbag.
Remember to leave space for handles and opening. The top row of squares will become the mouth of your bag. You can leave it open or add a flap using additional squares or rows of double crochet stitches.
For the sides and bottom, you may use granny stripes or solid single crochet panels. These not only help shape the bag but also add support. Reinforce corners with extra rows or tighter stitches to hold the structure.
After joining, check for any loose ends or weak points. Weave in all yarn tails securely, and block the bag to even out the stitches and shape. This step makes your bag look professionally made and helps it hold its form better.
Adding Handles, Lining, and Final Touches
To fully Crochet a Sunburst Granny Square Bag, you’ll need to add functional and aesthetic finishing touches. Handles are one of the most important parts of any bag, and they should be both stylish and strong enough to carry daily items.
You can crochet the handles using a sturdy stitch like half-double crochet or single crochet in multiple rows. Another option is to purchase leather or wooden handles and sew them on for a more refined finish. Just be sure to reinforce the attachment points on the bag.
Lining your bag adds a layer of professionalism and prevents the bag from stretching or sagging. Choose a lightweight cotton fabric in a color that complements your yarn. Cut the fabric to match the inside dimensions of your bag and sew it by hand or machine.
Add a zipper or magnetic clasp to keep your belongings secure. This step is optional, but it greatly increases the bag’s functionality, especially if you plan to carry it while traveling or shopping.
Consider adding embellishments like tassels, buttons, or charms for a personalized touch. You can also crochet a small pocket inside the lining for keys or a phone.
Finally, give your completed bag one last steam block to set all the stitches and ensure everything looks crisp. This step is especially important if your bag will be gifted or sold.
Enjoy your finished Sunburst Granny Square Bag! It’s a beautiful creation that’s sure to turn heads and showcase your crochet skills.
FAQ: Crochet a Sunburst Granny Square Bag
What is a sunburst granny square?
A sunburst granny square is a variation of the classic granny square, featuring a puff or cluster stitch center that resembles a radiant sun or flower. It’s known for its textured, layered look.
How many squares do I need to make a bag?
It depends on your desired bag size. A small tote might use 9 squares (3×3), while a larger bag could need 13 to 18 squares, including sides and base panels.
What is the best yarn to use?
Worsted weight cotton yarn is ideal for durability and structure. It also holds shape well and is easy to wash, making it perfect for bags.
Can beginners make this bag?
Yes! While the sunburst granny square may look advanced, it’s beginner-friendly with a bit of practice. The project helps improve tension control, color changes, and joining techniques.
Do I need to line the bag?
Lining is optional but recommended. It prevents stretching, secures small items, and adds a polished finish. You can hand-sew or use a machine for lining.
How long does it take to complete this bag?
Time varies based on skill level and available hours. On average, it might take 2–4 days working a few hours daily, from making the squares to finishing the assembly.
Conclusion
In this guide, we walked through every step to Crochet a Sunburst Granny Square Bag—from selecting the right yarn to crafting the squares, joining them, and adding finishing touches like handles and lining. This is a rewarding and practical project that blends style, color, and handmade charm.
Whether you’re looking to create a unique accessory for yourself or a heartfelt gift, the Sunburst Granny Square Bag is a timeless design full of possibilities. Try different colors, handles, and closures to make it truly your own.
We hope this article inspired you to pick up your hook and start creating. If you tried this pattern or have any tips and suggestions, please leave a sincere comment and share your experience with us. Your feedback helps us grow and support fellow crochet lovers like you!

