The Crochet Granny Square Shoulder Bag Pattern is one of the most beloved and timeless creations in the world of handmade fashion. With its unique blend of vintage charm and modern flair, this stylish bag showcases the power of traditional crochet techniques transformed into a practical and fashionable accessory. Whether you’re a beginner or an experienced crocheter, learning to make your own Crochet Granny Square Shoulder Bag is both rewarding and enjoyable.
From casual strolls to weekend getaways, a granny square shoulder bag adds personality to any outfit. Its modular structure, crafted from individual squares, allows for endless design combinations and color experiments. Moreover, this type of project is a great way to repurpose leftover yarn, making it both eco-friendly and cost-effective.
In this article, you’ll learn how to choose your materials, understand the steps involved in building each granny square, and assemble them into a beautiful, functional shoulder bag. By the end, you’ll be ready to create your very own Crochet Granny Square Shoulder Bag, personalized to reflect your unique taste and style.
Choosing the Right Yarn and Hook Size
The success of your Crochet Granny Square Shoulder Bag Pattern begins with your choice of yarn and hook. While granny squares can be made from virtually any yarn weight, a medium (worsted) weight yarn is highly recommended for its balance between structure and flexibility.
Pick fibers that match your intended use for the bag. Cotton yarn offers durability and a polished look, making it perfect for everyday use. Acrylic yarn, on the other hand, is lightweight and budget-friendly, though less resistant to wear. Blended yarns can give you the best of both worlds.
Your crochet hook should match your yarn type. Typically, a 5.0mm (H/8) hook pairs well with worsted weight yarn. Using a smaller hook can create a denser stitch pattern, ideal for making your bag sturdier. A looser stitch may cause the bag to lose shape over time.
Stick to a cohesive color palette. While granny squares are known for their bold combinations, too many contrasting shades can look chaotic. Consider using complementary tones or create a color gradient for a modern look.
It’s also a good idea to crochet a test square. This allows you to gauge the size and tension, which is essential when determining how many squares you’ll need to complete the bag. Consistency is key for a symmetrical final result.
Lastly, consider using yarn that’s machine washable, especially if the bag will be used frequently. A bag that’s easy to clean will remain a favorite in your wardrobe rotation for years to come.
Creating Your Granny Squares
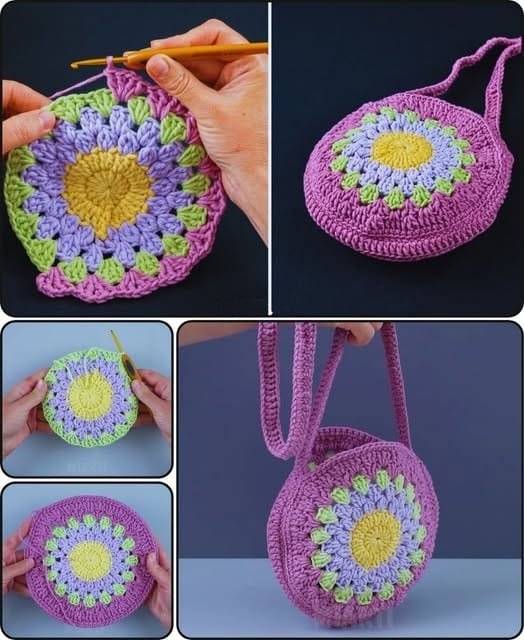
The core of the Crochet Granny Square Shoulder Bag Pattern is, of course, the granny square itself. These iconic motifs are made by working in the round, typically using basic stitches like chains, double crochets, and slip stitches.
Start with a magic ring or chain four and join to form a ring. This will serve as the center of your square. In the first round, crochet three double crochets into the ring, chain two (for the corner), and repeat until you have four clusters. Slip stitch to join.
In the following rounds, you’ll build upon this base. Each corner will consist of three double crochets, two chains, and three double crochets, while the sides will have three double crochets in each space. Keep working until your square reaches the desired size.
Uniformity matters. Make sure all your squares are the same size for seamless joining later. Blocking your squares helps maintain their shape and creates a professional finish.
Feel free to play with colors. Use a different shade for each round to create a rainbow effect, or keep it minimalist with a single color per square. The versatility of granny squares allows for limitless creativity.
Once you’ve made enough squares — typically 12 to 24 depending on your bag’s size — lay them out and plan your layout. Arranging them before joining helps you visualize the finished bag and make any changes.
When you’re happy with your layout, weave in the ends. This step is important to keep the inside of the bag neat and comfortable for everyday use.
Assembling the Bag Structure
Assembling your Crochet Granny Square Shoulder Bag involves strategically joining the squares to form the front, back, sides, and bottom of the bag. This can be done using various methods such as whip stitch, slip stitch, or single crochet.
Start by connecting the front and back panels. Arrange six to eight squares in a rectangle and stitch them together. Repeat the process for the opposite side. These panels will form the main body of the bag.
Next, create the side panels and bottom. You can use single rows of squares or rectangles, depending on the width and depth you desire. Join these to the front and back, carefully aligning corners for a clean edge.
Use a continuous join-as-you-go method if you prefer fewer seams. This technique involves crocheting the squares directly to each other while completing the final round of each square. It’s efficient and reduces the amount of sewing.
Add a lining for extra stability. Use a lightweight fabric like cotton or muslin. Cut it to match the size of your bag, sew the edges, and then attach it inside using a whip stitch or hot glue for a no-sew alternative.
Don’t forget the top edge. You can crochet a border around the opening of the bag for a polished finish. This also helps keep the shape intact and prevents the bag from stretching over time.
Finally, make sure all seams are tight and secure. Reinforce the handles and bottom with extra stitching if the bag will carry heavier items. A strong, neat finish ensures durability and function.
Crafting the Strap and Final Touches
The strap is the finishing element of your Crochet Granny Square Shoulder Bag Pattern, and it should be as sturdy as it is stylish. There are several options for creating the strap, depending on your skill level and desired look.
One popular method is to crochet a long, thick band using single or half-double crochet stitches. This gives a solid and flat strap that won’t stretch too much with use. You can also braid three long chains for a unique texture.
For added comfort, line the strap with fabric or felt. This prevents the strap from cutting into your shoulder during long periods of wear. If you’re adding a fabric lining to the bag, consider using the same material for the strap.
Attach the strap securely by sewing or crocheting it to the top sides of the bag. Reinforce the area with extra stitches or a small square patch to distribute the tension evenly.
Add decorative elements if you’d like — tassels, wooden beads, buttons, or even small appliqués. These final details personalize your creation and make your bag one of a kind.
You can also add a closure like a magnetic snap or button loop to keep your belongings safe inside. A zipper is another option, though it may require more advanced sewing skills.
Once finished, give your bag a light steam or block to even out stitches and enhance the overall shape. Now your bag is ready for daily use or to be gifted to someone special.
FAQ – Crochet Granny Square Shoulder Bag
How many granny squares do I need for a shoulder bag?
It depends on the size of the bag you want. Most standard Crochet Granny Square Shoulder Bags use between 12 and 24 squares.
What is the best yarn for granny square bags?
Cotton yarn is ideal due to its strength and resistance to stretching. However, acrylic is more affordable and still works well.
Can beginners make a granny square shoulder bag?
Yes! The pattern is beginner-friendly. If you know basic crochet stitches like chains and double crochets, you’re good to go.
Do I need to line the bag?
Lining is optional but recommended. It adds structure, prevents items from poking through, and increases durability.
How do I keep the bag from stretching?
Use tight stitches, a smaller hook size, and cotton yarn. Adding a fabric lining also helps maintain the bag’s shape.
Can I wash the bag in a machine?
If made with washable yarn and lined properly, yes. However, hand washing is safest to preserve shape and stitching.
Conclusion
The Crochet Granny Square Shoulder Bag Pattern combines creativity, tradition, and functionality into one delightful project. From choosing your yarn to stitching the final square, every step allows for personal expression and skill-building. With attention to detail and a little patience, you can create a bag that’s as practical as it is beautiful.
If you’ve followed this guide, you now have the tools to make your own stunning granny square shoulder bag. Don’t forget to leave a comment with your thoughts, honest feedback, or suggestions for future tutorials. Happy crocheting!

