If you’ve been searching for a fun, functional, and creative sewing project, look no further than the Simple and Easy Blanket Bag Pattern. Whether you’re an experienced crafter or just starting your journey in quilting, this pattern offers a unique way to express your creativity using fabric scraps, especially old denim.
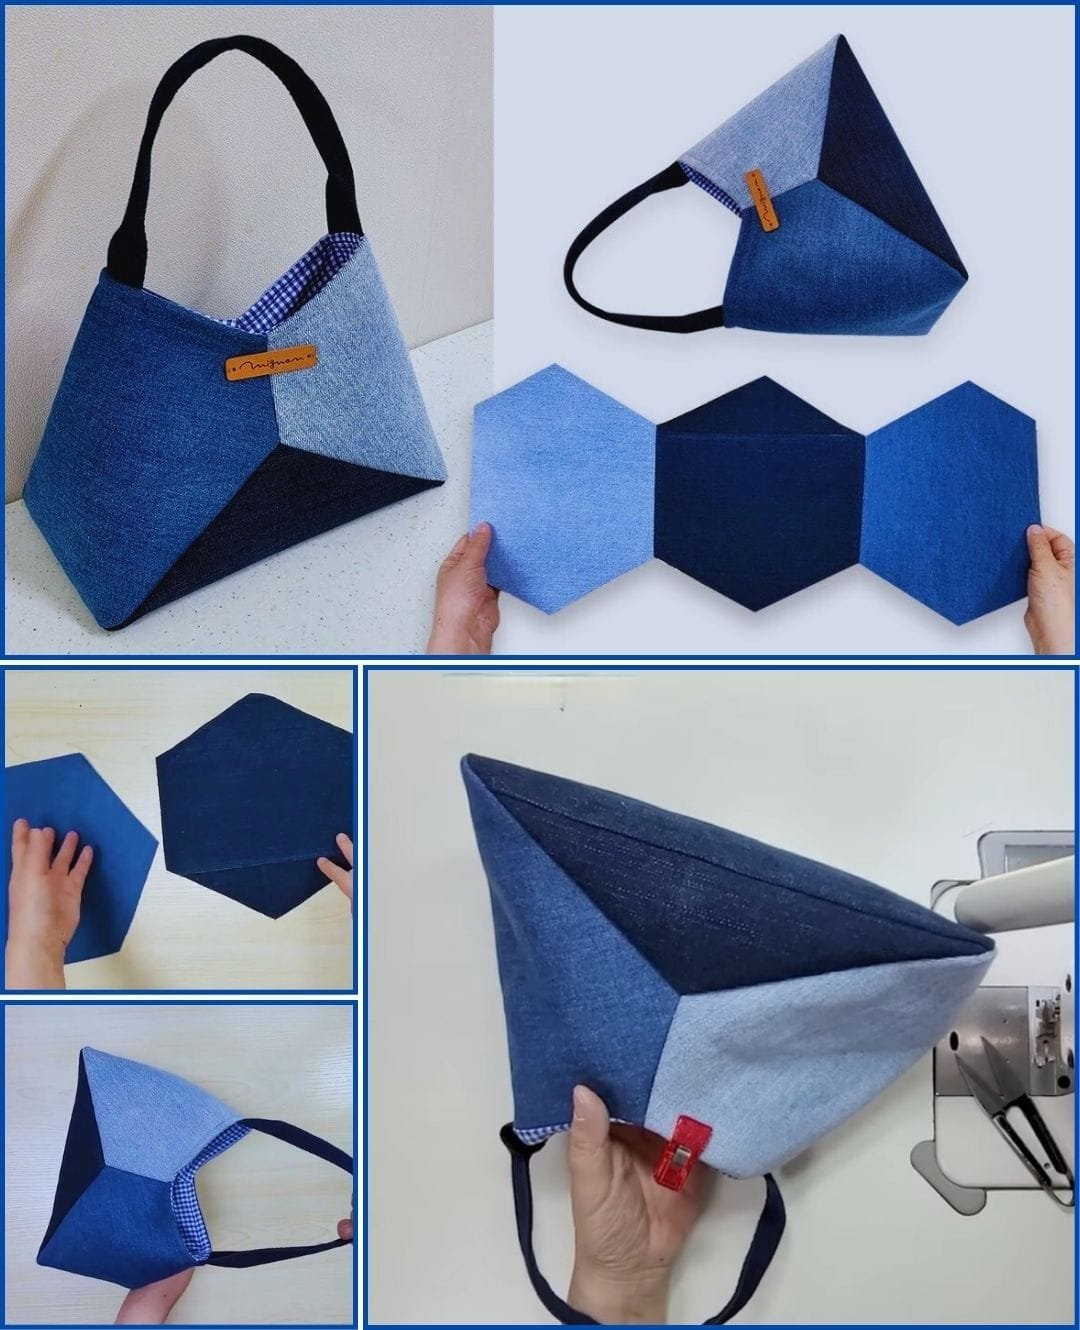
The Simple and Easy Blanket Bag is more than just a bag—it’s a project that brings joy in the making and pride in the final result. The pattern typically uses hexagons or pentagons, stitched together to form a modern, structured design.
This tutorial-style guide will walk you through everything you need to know about creating your own Simple and Easy Blanket Bag Pattern, including materials, techniques, and expert tips. It’s time to turn those leftover fabric scraps or old jeans into a chic quilted tote that’s perfect for carrying just about anything.
Choosing the Right Fabric for Your Blanket Bag
When creating a Simple and Easy Blanket Bag Pattern, the fabric you select will greatly affect the final look and feel. One of the best options is repurposed denim. Denim is durable, easy to sew, and provides a stylish modern look. Using different shades of denim—such as light, medium, and dark—creates contrast and depth.
Another popular option is cotton quilting fabric, especially if you want a softer or more colorful result. You can also use pre-quilted fabric if you prefer not to quilt manually. Look for materials that are sturdy enough to hold the bag’s shape but still flexible enough to sew easily.
Mixing textures can also make your Simple and Easy Blanket Bag stand out. Try pairing denim with gingham for the lining, as shown in many trendy examples. A patterned lining gives a fun surprise every time you open the bag and adds an extra layer of character to your handmade creation.
Don’t forget to pre-wash your fabrics, especially if you’re combining new and old materials. This prevents shrinkage and color bleeding, making your Simple and Easy Blanket Bag Pattern last longer and look better.
Cutting and Assembling the Shapes
The key to this quilt-style bag is the clever arrangement of geometric shapes. The pattern typically uses five or six equally sized shapes—often hexagons or pentagons—that are sewn edge-to-edge. This layout gives the bag its distinctive structured shape.
Start by creating a paper or cardboard template for your chosen shape. Trace it onto your fabric, making sure to include seam allowances (usually 1/4 inch). You will need at least five panels for the body of the Simple and Easy Blanket Bag.
Once your fabric is cut, arrange the pieces in a row or star pattern, depending on your desired shape. Use pins or clips to hold the pieces together before sewing. Precision is key during this step to ensure a clean, symmetrical design.
Use a straight stitch to join the panels, backstitching at the beginning and end of each seam. Press the seams open or to one side to reduce bulk. This will help the bag form its signature crisp, angular look.
Finish the outside by adding a decorative label or tag to personalize your Simple and Easy Blanket Bag Pattern even further.
Adding Structure and Lining
To give your Simple and Easy Blanket Bag a more professional finish, adding interfacing and lining is essential. Interfacing helps the bag keep its shape, while lining adds durability and a neat interior.
Cut interfacing pieces the same size as your outer fabric shapes. Use fusible interfacing if you prefer a quicker application. Iron the interfacing to the wrong side of each outer panel before assembling the bag. This reinforces the seams and helps the bag stand upright.
For the lining, repeat the same steps used for the exterior, cutting and sewing the same shapes in the same order. When you’re done, you’ll have two identical shapes: one for the outside and one for the inside.
Before attaching the lining, consider adding pockets or labels to the inside. You can also insert a magnetic snap or zipper at this stage if you want a secure closure for your Simple and Easy Blanket Bag Pattern.
Once both layers are ready, sew them together at the top edge, leaving an opening to turn the bag inside out. After turning, press the edges flat and topstitch around the opening for a polished finish.
Adding Handles and Final Touches
The final step in your Simple and Easy Blanket Bag Pattern is to attach the handles. You can use cotton webbing, denim strips, or quilted fabric to create a strong and comfortable handle.
Measure your preferred handle length and cut two equal pieces. Attach each end of the strap to the top corners of the bag, making sure they are evenly aligned. Reinforce with multiple rows of stitching to ensure durability.
If you want a single shoulder strap instead of two short handles, adjust the length accordingly. Consider lining the handles with a soft fabric to make the bag even more comfortable to carry.
Now, turn the bag right side out and inspect all seams. Make sure everything is secure and trimmed. Give the bag a final press with an iron, and you’re done!
Your handmade Simple and Easy Blanket Bag is now ready to use—or gift! Whether for books, groceries, or your next quilt project, this bag is as practical as it is beautiful.
FAQ – Frequently Asked Questions
1. What materials do I need to make a Simple and Easy Blanket Bag?
You’ll need fabric (denim or cotton), interfacing, lining fabric, thread, sewing machine, pins/clips, and straps or webbing for handles. Optional extras include a label, zipper or snap, and fabric glue.
2. Can I make the bag without a sewing machine?
Yes, but it will be more time-consuming. Hand sewing is possible using a strong needle and durable thread. Use small, tight stitches to ensure strength.
3. What’s the best fabric for this kind of bag?
Denim is ideal for a sturdy and stylish look. Cotton fabric works well too, especially if it’s pre-quilted. You can mix and match scraps for a unique design.
4. How big is the finished blanket bag?
It depends on the size of your geometric shapes. Using hexagons around 6 inches wide usually results in a medium-sized bag, ideal for everyday items.
5. Can I wash the Simple and Easy Blanket Bag?
Yes, if all materials used are washable. It’s best to use cold water and air dry the bag to preserve its shape and structure.
6. Is this a beginner-friendly project?
Absolutely! The pattern is straightforward and repetitive, making it ideal for beginners. The geometric shapes are easy to work with, and there’s room for creativity.
Conclusion
Creating a Simple and Easy Blanket Bag Pattern is a rewarding project for quilters, sewists, and DIY enthusiasts alike. This design combines practicality and style in a compact, structured bag that can be used every day. From fabric selection to final stitching, every step brings joy and creativity.
We’ve covered how to choose your materials, cut and assemble shapes, add structure, and finish your bag with beautiful details. Whether you use denim, cotton, or a mix of both, this project is a fantastic way to repurpose old fabric and showcase your sewing skills.
If this tutorial helped you or inspired your creativity, feel free to leave a sincere opinion and share your suggestions. We’d love to hear what kind of fabric combos you tried or how you personalized your Simple and Easy Blanket Bag!

