If you’ve been searching for a cozy and creative way to keep your feet warm, the Crochet Easy Granny Square Slippers Pattern is the perfect project to start with. This pattern is ideal for beginners and seasoned crocheters alike, offering a fun blend of tradition and style. Using granny squares, one of the most iconic elements in crochet, you can create something not only beautiful but also practical for everyday use.
The charm of the Crochet Easy Granny Square Slippers lies in their simplicity and versatility. Whether you’re using leftover yarn or choosing a new palette, these slippers are easy to customize. They make wonderful gifts and are perfect for crafting a personal touch in your own wardrobe. Plus, they work up quickly, which makes them ideal for those who want quick gratification from a handmade project.
This article will guide you step-by-step through the process of making Crochet Easy Granny Square Slippers, explain why this technique remains so popular, and offer tips to help you achieve the best results. We’ll also address common questions in a comprehensive FAQ, helping you build confidence as you crochet your first (or next!) pair of slippers.
What Makes Granny Square Slippers So Popular?
The granny square has long been a favorite among crocheters because of its structure and flexibility. When used to make slippers, it transforms from a flat square into a 3D wearable shape that fits snugly on the foot.
One reason for their popularity is their beginner-friendly nature. With just basic stitches like double crochet and slip stitch, anyone can start making Crochet Easy Granny Square Slippers even with minimal experience.
Granny squares also allow for endless creativity. You can mix and match colors to create bold or subtle designs. Some crafters even make seasonal slippers, changing color themes to match holidays or personal moods.
The pattern for Crochet Easy Granny Square Slippers typically requires minimal shaping, making it less intimidating than socks or more complex footwear. You’re essentially working with squares and assembling them—no complicated increases or decreases.
These slippers are also extremely practical. They’re lightweight, portable, and easy to wash. Plus, if you have leftover yarn from other projects, this is a great way to use it efficiently.
Lastly, they have a nostalgic charm. Many people associate granny squares with their grandmothers or childhood blankets. Turning those memories into wearable comfort is part of what makes this pattern so beloved.
How to Make Crochet Easy Granny Square Slippers
To begin your Crochet Easy Granny Square Slippers Pattern, you’ll need some basic materials: worsted weight yarn, a 4.5mm or 5mm crochet hook, scissors, and a tapestry needle. Choose yarn that’s soft but durable, such as cotton-acrylic blends.
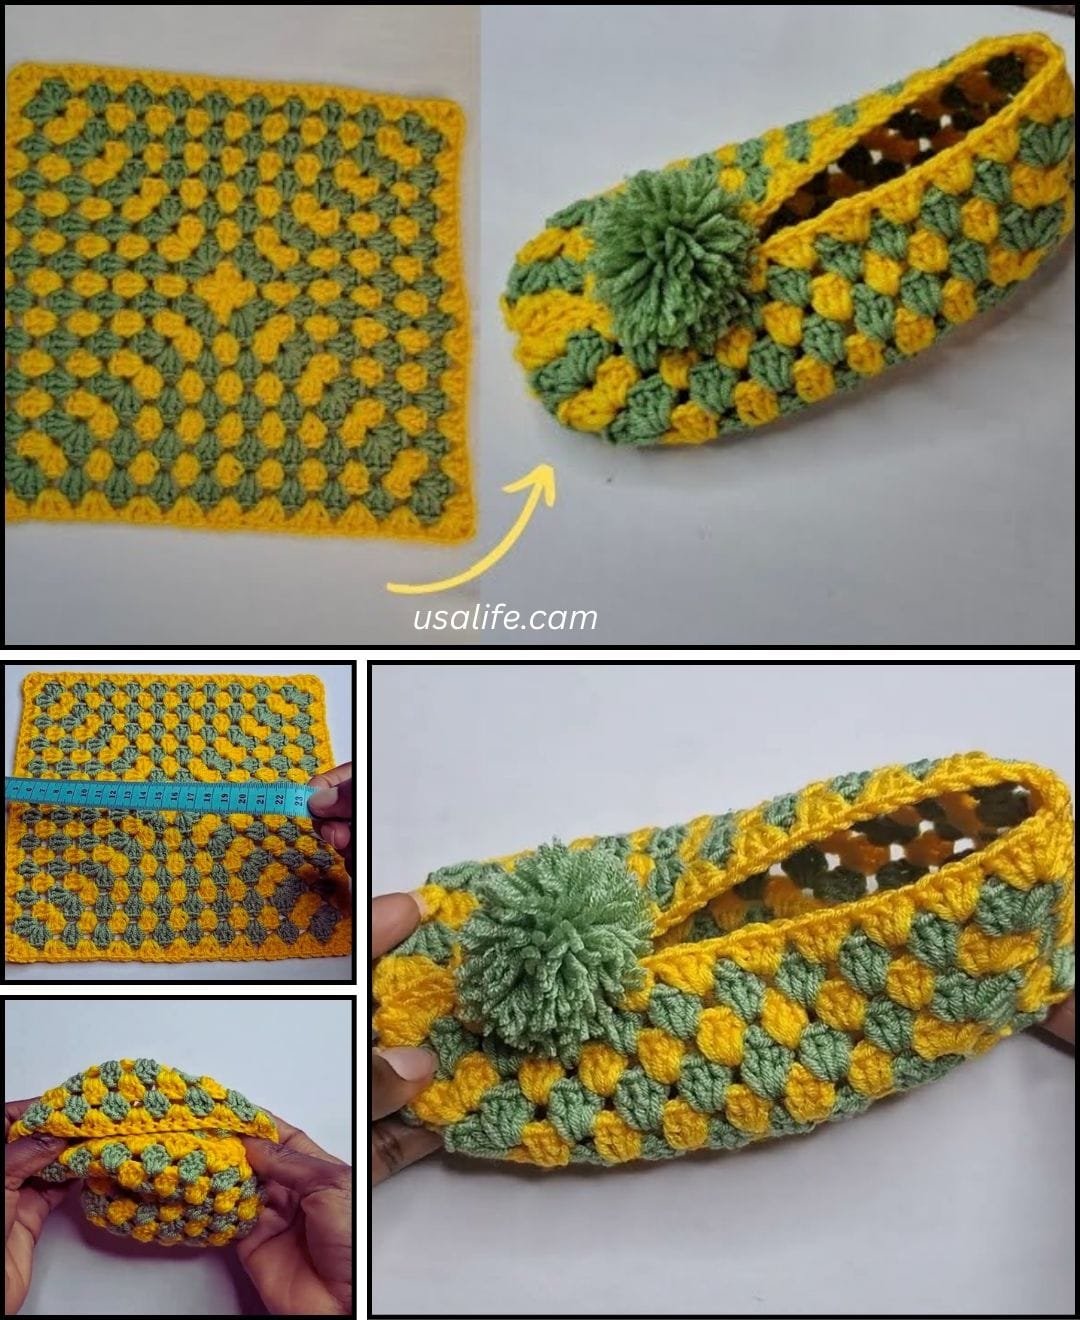
Start by making six identical granny squares. Each square should be roughly the size of your palm, or about 4×4 inches, depending on your foot size. If you want a tighter fit, you can reduce the size slightly.
A traditional granny square begins with a magic ring or chain loop, then builds outward using sets of double crochet stitches separated by chains. You’ll want to complete three to four rounds, finishing each with a slip stitch to keep the square symmetrical.
Once you’ve crocheted your squares, lay them out in a T-shape pattern: three squares in a vertical row, one on either side of the middle square, and one at the bottom. This layout will form the top and sides of the slipper.
Use whipstitch or slip stitch to sew the squares together, forming a slipper shape. The top square becomes the toe area, and the side squares wrap around the foot. Fold and join the back to form the heel.
Try the slipper on and adjust as needed. If it’s too loose, you can add a single crochet border around the top opening for a snugger fit. For more comfort, insert a felt insole or a second crochet layer inside the sole.
Repeat the process to make the second slipper. Make sure the colors and stitches match so your pair looks cohesive. You can even label them with custom tags if gifting them to someone special.
Tips for Personalizing Your Slippers
One of the most enjoyable parts of following the Crochet Easy Granny Square Slippers Pattern is the opportunity to personalize it. Your slippers don’t have to look like anyone else’s!
First, play with color combinations. You can use one solid color for a classic look or go wild with rainbow yarns for a vibrant twist. Ombre yarns also work beautifully and add depth with little effort.
You can experiment with different yarn textures. While most people use worsted weight, you could try chunky yarn for thicker slippers or lightweight yarn for summer versions. Just remember to adjust the square size accordingly.
Adding embellishments can elevate your design. Try crocheting small flowers, buttons, or bows to stitch onto the top. Pom-poms or tassels also add a playful element.
If you want extra grip, consider sewing anti-slip fabric to the sole or using puff paint to draw lines on the bottom. This is especially helpful if you have slippery floors at home.
You can also modify the shape slightly. For example, extend the ankle area to create bootie-style slippers. Add a strap with a button for a Mary Jane style. The base pattern gives you room to innovate.
Finally, don’t forget presentation. If you’re giving these as gifts, wrapping them in a handmade pouch or reusable bag can add a personal and thoughtful touch.
Troubleshooting Common Mistakes
Even with a simple pattern like the Crochet Easy Granny Square Slippers, beginners might run into a few hiccups. Don’t worry—these issues are easy to fix with some attention and practice.
One common problem is uneven squares. If your granny squares aren’t all the same size, the slipper might look lopsided or not fit properly. Be sure to count your stitches in every round and block the squares if needed.
Loose or tight stitching can also affect the final fit. Try to keep consistent tension throughout the project. If you tend to crochet tightly, go up a hook size. If your work is too loose, try a smaller hook.
Another issue is the slipper being too loose around the heel or ankle. Adding a row or two of single crochet stitches around the edge can help snug it up. You can also weave in elastic thread if necessary.
Misaligning squares during assembly is another common challenge. Before stitching, lay out your squares and pin them in place if needed. This helps you visualize the final shape and avoid missteps.
Yarn unraveling at the joins can occur if ends aren’t secured properly. Always weave in tails with a tapestry needle and secure them under several stitches. You can also use a dab of fabric glue for reinforcement.
Lastly, don’t be discouraged if your first pair isn’t perfect. Like all crafts, crocheting takes practice. Each pair you make will improve your technique and confidence.
FAQ – Frequently Asked Questions
How many granny squares do I need for one pair of slippers?
You will typically need 6 squares per slipper, so 12 in total for a pair. This can vary depending on foot size and customization.
Can I use different types of yarn?
Yes, but try to keep to similar weights. Mixing bulky and lightweight yarns can affect the slipper’s fit and durability.
Do I need to block the granny squares?
Blocking is optional but helps even out the size and shape of your squares, making assembly easier and neater.
Is this project suitable for beginners?
Absolutely! The Crochet Easy Granny Square Slippers Pattern uses basic stitches and straightforward construction, making it a great beginner-friendly project.
How do I adjust the size of the slippers?
Adjust the number of rounds in each granny square or use a different hook size. You can also add extra rows or squares if needed.
Can I machine wash these slippers?
This depends on the yarn used. Acrylic yarn is usually machine washable, but always follow the yarn label instructions for care.
Conclusion
The Crochet Easy Granny Square Slippers Pattern is a delightful project that combines creativity, tradition, and comfort in one. Whether you’re a beginner looking for a first crochet project or a seasoned crafter wanting a quick and satisfying make, this pattern offers just the right balance of simplicity and charm.
We’ve covered everything from crafting the perfect granny squares to assembling, personalizing, and troubleshooting your slippers. With a bit of yarn and time, you can transform simple stitches into warm, cozy footwear that reflects your unique style.
If you’ve followed along and made your own slippers, we’d love to hear from you! Leave your honest opinion and feel free to share any suggestions, questions, or experiences. Your feedback helps this creative community grow and improve.

