If you’re searching for a functional yet stylish way to declutter your space, the Crochet Wall Hanging Organizer Pattern is the perfect project for you. This charming handmade creation not only serves as a home for your small essentials but also adds a cozy and artistic touch to any room.
The Crochet Wall Hanging Organizer is an increasingly popular item in modern home decor, loved for its rustic charm, versatility, and handmade appeal. You can hang it near your entryway for keys and notes, in your craft room for tools and supplies, or even in the nursery to hold toys or accessories.
In this article, we’ll explore how to make your own Crochet Wall Hanging Organizer Pattern, what materials to use, customization ideas, and essential tips to help you succeed. By the end, you’ll feel confident and inspired to create a crochet wall organizer that’s both decorative and useful.
Materials and Tools You’ll Need
Before diving into the Crochet Wall Hanging Organizer Pattern, it’s important to gather all the essential tools and materials. Choosing the right supplies not only affects the outcome but also makes the process smoother and more enjoyable.
First, you’ll need quality yarn. A worsted-weight cotton yarn is highly recommended because it’s sturdy, washable, and holds shape well. Cotton also offers a clean and structured look, perfect for hanging organizers that need to support some weight.
Next is your crochet hook. Typically, a 4.0mm to 5.5mm hook works best with worsted-weight yarn. Check the yarn label to choose the right size for a consistent and neat stitch pattern that isn’t too loose or too tight.
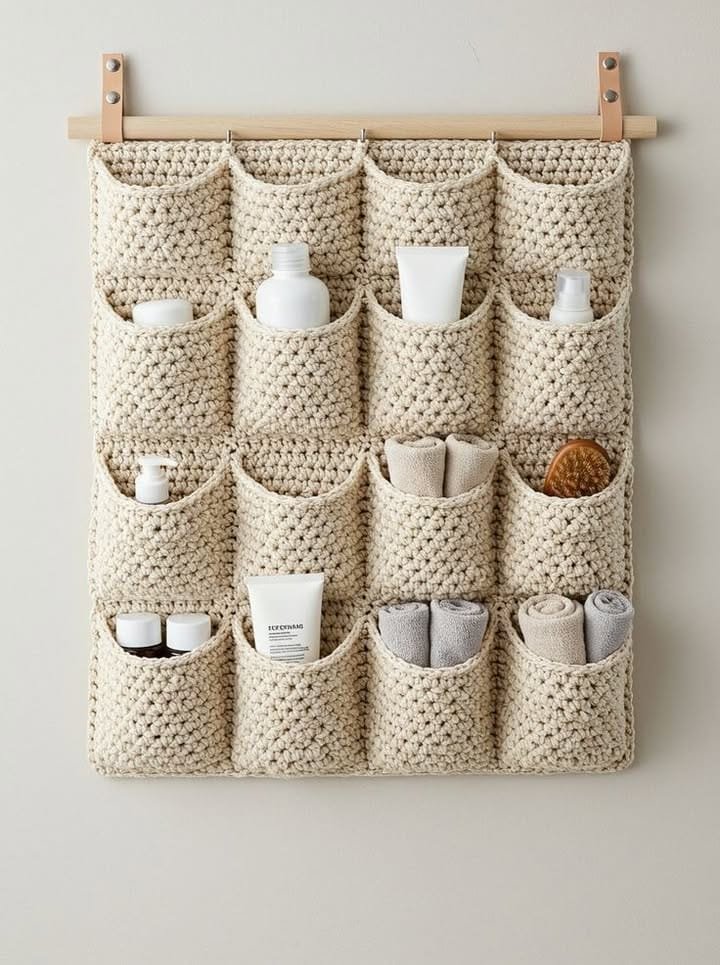
In addition to yarn and a hook, you’ll want a wooden dowel or driftwood branch to serve as the top support of your Crochet Wall Hanging Organizer. This not only helps with structure but also adds a rustic, natural touch.
Other helpful tools include a pair of scissors, a tapestry needle for weaving in ends, and stitch markers if you’re working with multiple compartments or layers. Having these items ready will make the entire experience more seamless and enjoyable.
Lastly, consider adding decorative elements such as tassels, buttons, or embroidered labels. These small additions can enhance the overall aesthetic and give your Crochet Wall Hanging Organizer a personalized feel.
Step-by-Step Construction Guide
Now that your materials are ready, it’s time to dive into the actual construction of the Crochet Wall Hanging Organizer Pattern. This process can be broken down into simple, manageable steps, making it accessible even for beginners.
Start by crocheting the base rectangle. This will serve as the backing of your wall organizer. A classic single crochet stitch is ideal for a sturdy and dense foundation. You can determine the dimensions based on where you plan to hang the organizer.
Once the base is complete, you can begin adding pockets. The number and size of the pockets depend on your needs. Some people prefer symmetrical rows of small pockets, while others like a mix of large and small compartments for versatility.
To attach the pockets, crochet them separately and sew or crochet them onto the base. Use whip stitch or single crochet join for a clean finish. Make sure they are evenly spaced and securely fastened so they don’t sag under weight.
At the top edge of your backing, create loops or directly crochet around a wooden dowel. This allows your Crochet Wall Hanging Organizer to be easily hung on the wall without folding or distorting the shape.
Now comes the fun part—decorating. Add fringe, tassels, or surface crochet designs to make the organizer more visually appealing. This is where you can infuse your personal style into the project.
Finish the organizer by weaving in all yarn ends and blocking the piece if necessary. Blocking ensures that your creation hangs flat and maintains its shape, especially if you’ve used a natural fiber like cotton.
Customization Ideas for Every Style
One of the best aspects of the Crochet Wall Hanging Organizer Pattern is how easily it can be customized to suit your personal style or home decor theme. With just a few tweaks, you can transform a basic pattern into something unique and beautiful.
Color is the most obvious way to customize your wall hanging. Choose a monochrome scheme for a modern and minimalist look, or go for vibrant, multi-colored stripes for a more playful and eclectic vibe.
You can also play with stitch patterns. Instead of using single crochet throughout, consider incorporating textured stitches like bobbles, puff stitches, or basket weave to add depth and interest to your Crochet Wall Hanging Organizer.
For a boho aesthetic, add long fringes or macramé-inspired knots at the bottom. These decorative features give the piece a relaxed and earthy feel, perfect for bedrooms, studios, or reading nooks.
Want something kid-friendly? Use bright primary colors and embroider cute animals or shapes onto each pocket. You can also crochet separate motifs and sew them on for a three-dimensional effect.
Another way to personalize your wall organizer is by varying the pocket design. Create angled pockets, overlapping flaps, or even add buttons for closure. These additions are not only decorative but also increase functionality.
Finally, label each pocket with small tags or embroidery to indicate what goes where. This is especially useful if you’re using the organizer in a craft space or office. It turns your Crochet Wall Hanging Organizer into a stylish and practical tool for staying organized.
Tips for Success and Common Mistakes to Avoid
Even though the Crochet Wall Hanging Organizer Pattern is beginner-friendly, there are a few key tips and common pitfalls to be aware of. Keeping these in mind will save you time and ensure a polished final result.
Always start by making a gauge swatch. This helps ensure your finished size matches what you need. Different yarns and tensions can affect the final dimensions more than you might expect.
Don’t rush the pocket attachment. Uneven or loosely attached pockets can sag or distort the backing. Take your time to pin and align them before sewing or crocheting them in place.
Watch your tension. Inconsistent tension can lead to a crooked or puckered wall organizer. Try to maintain an even hand, especially when working on the base panel that needs to lie flat.
Remember to block your finished piece. This step is often overlooked but can make a huge difference in the final look. It smooths out uneven stitches and helps the piece hold its shape on the wall.
Use stitch markers to plan pocket placement. This ensures even spacing and symmetry, which is important for both functionality and aesthetics.
Lastly, don’t overstuff your pockets. Even though your Crochet Wall Hanging Organizer may look strong, stretching it with heavy items can distort the shape or pull it off the wall. Stick to lightweight objects like notepads, craft tools, or baby accessories.
Frequently Asked Questions (FAQ)
What is the best yarn for a Crochet Wall Hanging Organizer?
Cotton yarn is the best choice due to its durability and structure. It provides the strength needed to hold items without stretching out over time.
Can I make this pattern as a beginner?
Yes! The Crochet Wall Hanging Organizer Pattern is beginner-friendly, especially if you start with basic stitches like single crochet and simple pocket shapes.
How do I hang the organizer on the wall?
Most organizers are attached to a wooden dowel or stick at the top. You can then hang the dowel on a nail, hook, or wall-mounted rod.
What kind of items can I store in it?
These organizers are perfect for storing keys, remote controls, small tools, stationery, makeup, and craft supplies. Just avoid placing heavy items that could stretch the fabric.
Can I machine wash my Crochet Wall Hanging Organizer?
Only if you’ve used machine-washable yarn like 100% cotton. Even then, handwashing is often recommended to maintain its shape and decorative details.
How big should the organizer be?
The size depends on your space and needs. A typical size is around 12×18 inches, but you can easily adjust the dimensions to fit your wall or the number of pockets you want.
Conclusion
Creating a Crochet Wall Hanging Organizer Pattern is a satisfying and creative way to add charm and order to your space. From selecting the perfect yarn to customizing pockets and decorations, each step allows you to showcase your personality and craftsmanship. Whether for your home or as a thoughtful handmade gift, this project is as beautiful as it is useful.
If this article helped you feel more prepared to start your own Crochet Wall Hanging Organizer, we’d love to hear your thoughts! Leave a sincere comment with your experience, ideas, or suggestions—we’re always eager to connect with fellow crafters and improve future tutorials.

